Reward your employees with earning points by making themselves available or working.
Table of contents
Gamification purchases dashboard module
How does the employee experience this in the app
Introduction
The gamification module is available for customers with a Classic or Pro plan. With this functionality, we offer the option to motivate employees to share availability and get to work via awarding points, badges and rankings. Gamification aims to make the user experience more attractive, enjoyable and interactive by introducing a game aspect.
Managers can define possible achievements based on a trigger, being a certain action taken by employees at work or in the app, and award points to these achievements. Once an employee achieves one of the achievements, they earn points. These points can then be redeemed for items you create in the marketplace. You keep an overview of these purchases on your dashboard via the Gamification purchases module.
Activate gamification
If you qualify for gamification and wish to make use of it, you must first activate this functionality on the CONFIGURATION page via SETTINGS. Only a manager with the permission Manage gamification will be able to do so.
Then, in order to be able to manage the gamification settings, you need to activate the Manage Gamification permission for these managers in the profile.
CrewTip! if you only have an Essential plan but wish to use gamification, you can upgrade to a Classic or Pro plan at any time.
At the bottom left of this page you will find the GAMIFICATION functionality, select YES to activate it.

Once the functionality has been activated, you will have an additional page GAMIFICATION available in the SETTINGS menu.

On this page, you create the achievements your employees need to fulfil in order to collect points and determine which marketplace items they can exchange these points for. We have already created some examples for you here, you can always delete or adjust them to your needs.
Once you are satisfied with your gamification settings, you are ready to activate gamification for your employees. To do this, navigate to the CONFIGURATION page again and set the functionality GAMIFICATION ACTIVATED FOR EMPLOYEES to YES:

CrewTip! We recommend that, for example, you first process all time entries before creating an achievement for which the trigger Received rating was chosen, so that your employees can start with a level playing field.
Achievements
On the gamification settings page, you have an overview of and manage the achievements that employees need to fulfil in order to earn a number of points you have determined. This overview includes the name of an achievement, the trigger or action one must perform and the number of points they can earn.

You will notice that a number of achievements are already present on this page. These are already active but serve rather as examples and can still be completely modified or removed. More on this in a moment, first we will go over how to create an achievement.

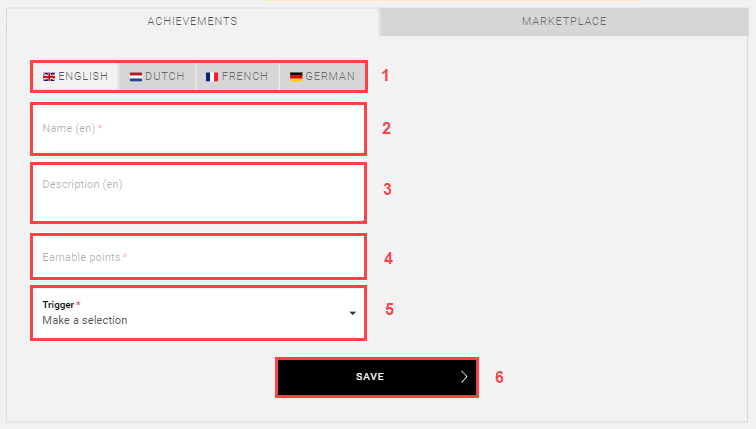
Create an achievement
To create an achievement, simply select CREATE ACHIEVEMENT in the top left of the GAMIFICATION page in SETTINGS.

Then you have the following options:
-
Language selection: English is the default language, so if you only want to use one language, just enter all the information here. If you want to use different languages, you will have to set this for each language.
CrewTip! If you set your achievement for the different languages, it is important that you translate it one on one, including the descriptions.
-
Name: Here you define the name of your achievement, which will be visible to your employees in the app.
-
Description: Give your achievement a short description so that your employees understand how to earn points.
-
Points: Determine how many points an employee earns. Please note, you cannot set more than 1,000 earnable points for an achievement. We also recommend not setting high amounts.
-
Trigger: determine which action will be the trigger to earn points.
You can choose from the following dropdown menu:
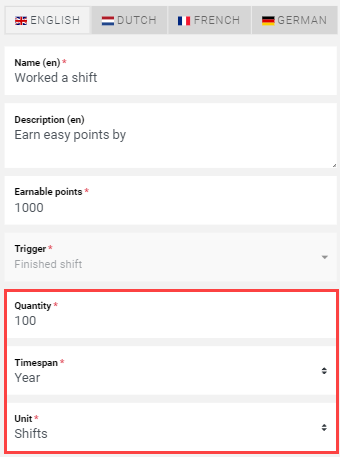
Some triggers have additional performance-related settings. For example, you can set that the employee must have worked 100 shifts in a year to receive the points.
The option to define these achievements appears only after you select SAVE. You can define additional achievements for the following triggers:-
Finished shift
-
Received rating
-
Gave project preference
-
-
Save: Select SAVE to save your initial trigger choice for your achievement and display any further settings. However, do not forget to save these further settings again.
Language selection: English is the default language, so if you only want to use one language, just enter all the information here. If you want to use different languages, you will have to set this for each language.
CrewTip! If you set your achievement for the different languages, it is important that you translate it one on one, including the descriptions.
Name: Here you define the name of your achievement, which will be visible to your employees in the app.
Description: Give your achievement a short description so that your employees understand how to earn points.
Points: Determine how many points an employee earns. Please note, you cannot set more than 1,000 earnable points for an achievement. We also recommend not setting high amounts.
Trigger: determine which action will be the trigger to earn points.
You can choose from the following dropdown menu:

Some triggers have additional performance-related settings. For example, you can set that the employee must have worked 100 shifts in a year to receive the points.
The option to define these achievements appears only after you select SAVE. You can define additional achievements for the following triggers:
Finished shift
Finished shift
Received rating
Received rating
Gave project preference
Gave project preference
Save: Select SAVE to save your initial trigger choice for your achievement and display any further settings. However, do not forget to save these further settings again.
Your achievement has now been created and will be visible not only in your overview, but also to your employees in the app. They will also be able to collect points immediately once the trigger has been achieved.
CrewTip: As soon as you create an achievement, it is active immediately. We therefore recommend that, for example, you first process all time registrations before creating an achievement for which the trigger Received rating was chosen, so that your employees can start with a level playing field.
Edit an achievement
If you wish to edit an existing achievement, select the pencil icon to the right of the achievement in question in the overview on the GAMIFICATION page.

This opens the settings for this achievement and allows you to edit it. Always select SAVE to save and activate any adjustments.
Delete an achievement
If you no longer wish to use an achievement, select the bin icon on the right side of this achievement in the overview.

This opens the following pop-up:
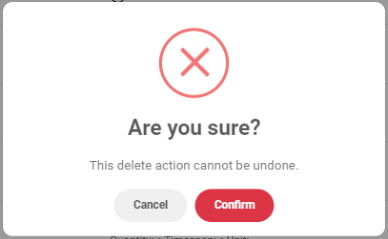
Please note, once you confirm, the achievement will be removed and employees will not be able to earn further points for this. However, previously earned points will be retained.
Marketplace
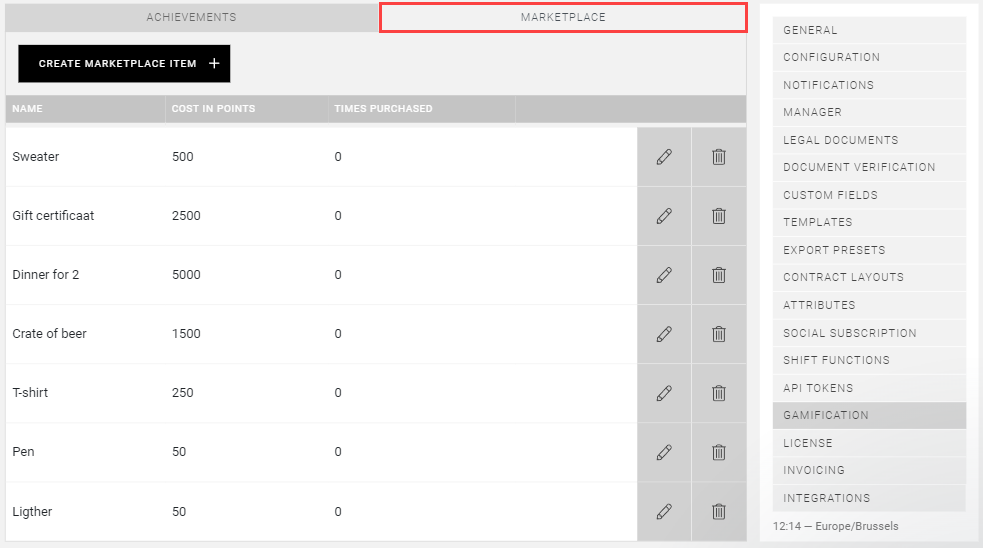
Now that you have set up how employees can earn points, the next step is to set up your marketplace for them to spend their points. Here you determine which items employees can purchase and how many points they need to do so.
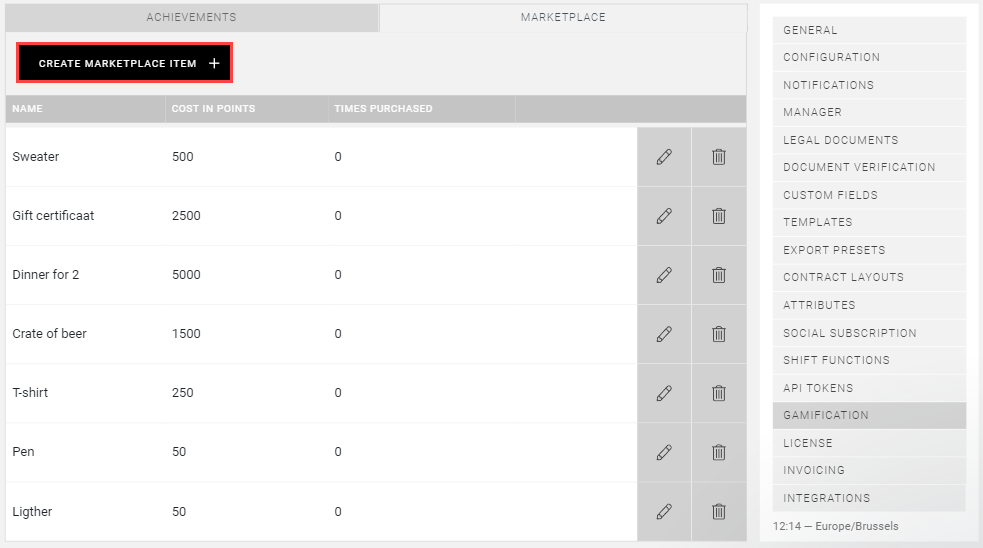
You manage your marketplace items again through the GAMIFICATION page in SETTINGS in the MARKETPLACE tab. Here you will find the overview of all marketplace items with the name, the cost in points and how many times the item was purchased.
Create a marketplace item
Select CREATE MARKETPLACE ITEM at the top left of the MARKETPLACE tab to create a new item.
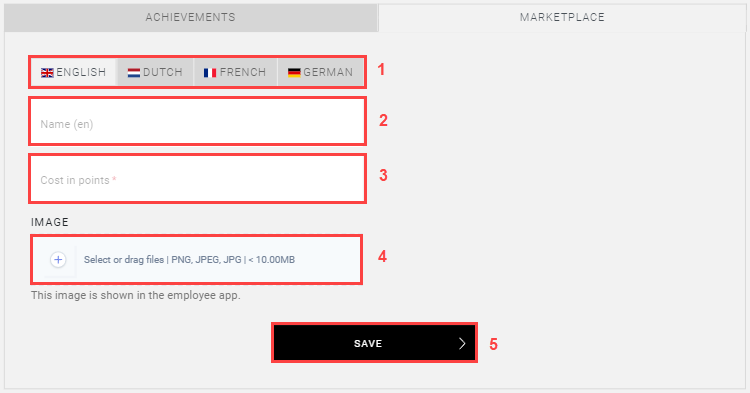
This will open the following page where you can add the following information:
-
Language selection: English is the default language, so if you only want to use 1 language, just fill in all the information here. If you want to use different languages, you will have to set this for each language.
CrewTip! If you set your item for the different languages, it is important that you translate it one to one, and upload the picture each time.
-
Name: Give a name to the item your employees can earn here.
-
Cost in points: Define how many points your employees need to buy this item.
-
Image: Here you have the option to upload an image of the item.
-
Save: Select SAVE to add the item and activate it.
Language selection: English is the default language, so if you only want to use 1 language, just fill in all the information here. If you want to use different languages, you will have to set this for each language.
CrewTip! If you set your item for the different languages, it is important that you translate it one to one, and upload the picture each time.
Name: Give a name to the item your employees can earn here.
Cost in points: Define how many points your employees need to buy this item.
Image: Here you have the option to upload an image of the item.
Save: Select SAVE to add the item and activate it.
Your item has now been added and can be purchased immediately by employees if they have enough points.
Edit a marketplace item
You can edit an item at any time by selecting the pencil icon in the MARKETPLACE overview on the GAMIFICATION page next to the item.

This opens the marketplace item and allows you to make the necessary changes. Always select SAVE to save and activate these changes.
Delete a marketplace item
If you no longer want to make an item available for your employees to purchase, you can delete it. To do this, select the bin icon in the MARKETPLACE overview.

You will be asked again if you are sure and once you confirm this, the item will be deleted. However, the information related to the number of times this item was purchased remains available in the Gamification purchase overview on your dashboard. More on this in a moment.
Gamification purchases dashboard module
Once you have activated gamification, you will also have the additional GAMIFICATION PURCHASES module available on your dashboard. This module allows you to track the items purchased on your marketplace so that you can deliver them to the correct employees.
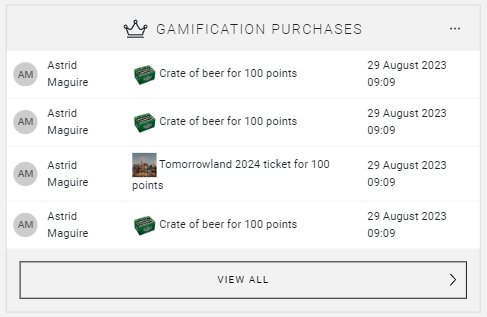
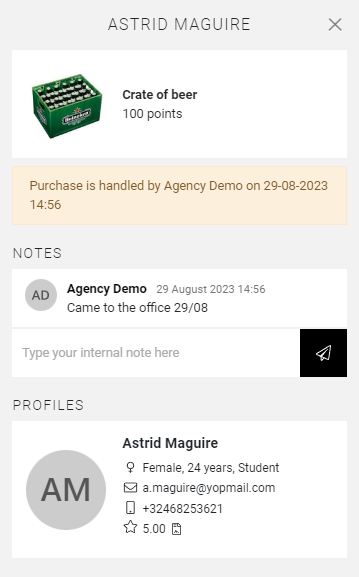
The module displays 8 purchases, but using the PREVIOUS and NEXT options you navigate to other purchases. If you want to add a note to a purchase or just want more information, select this purchase which opens the following pop-up window:
Select VIEW ALL, and you will be taken to the overview page of all purchases.
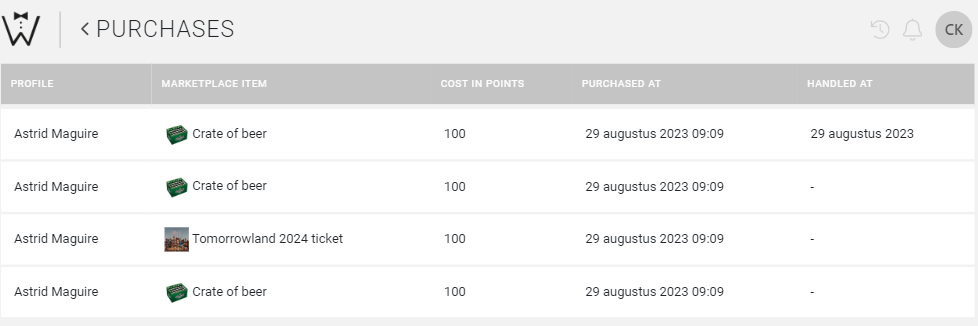
This page shows at a glance who bought which item, for how many points, on which date and finally, when this purchase was handled.
Employee profile
However, you not only have an overview of the purchases made by your employees, you can also access further gamification information via the employee profile.
Open the employee profile by selecting EDIT and you will notice the additional tab GAMIFICATION. Here you will find the following information:

-
Points balance: The number of points available to the employee after any purchases.
-
Total points earned: The total number of points the employee has earned so far.
-
Position: At which position your employee is ranked on the leaderboard.
-
Date: The dates on which the employee obtained points.
-
Description: Here you will find the name and description of the achievement that earned points.
-
Points: The number of points one has earned.
-
Modify: With this functionality, you can not only give the employee extra points but also subtract them by entering a negative number. Note that you cannot delete or modify these manual modifications afterwards. You can only correct these again by adding a new modification.
Points balance: The number of points available to the employee after any purchases.
Total points earned: The total number of points the employee has earned so far.
Position: At which position your employee is ranked on the leaderboard.
Date: The dates on which the employee obtained points.
Description: Here you will find the name and description of the achievement that earned points.
Points: The number of points one has earned.
Modify: With this functionality, you can not only give the employee extra points but also subtract them by entering a negative number. Note that you cannot delete or modify these manual modifications afterwards. You can only correct these again by adding a new modification.

How does the employee experience this in the app
Once you have activated gamification, the employee will see a cup icon appear at the top of the app with the total number of points earned so far next to it.
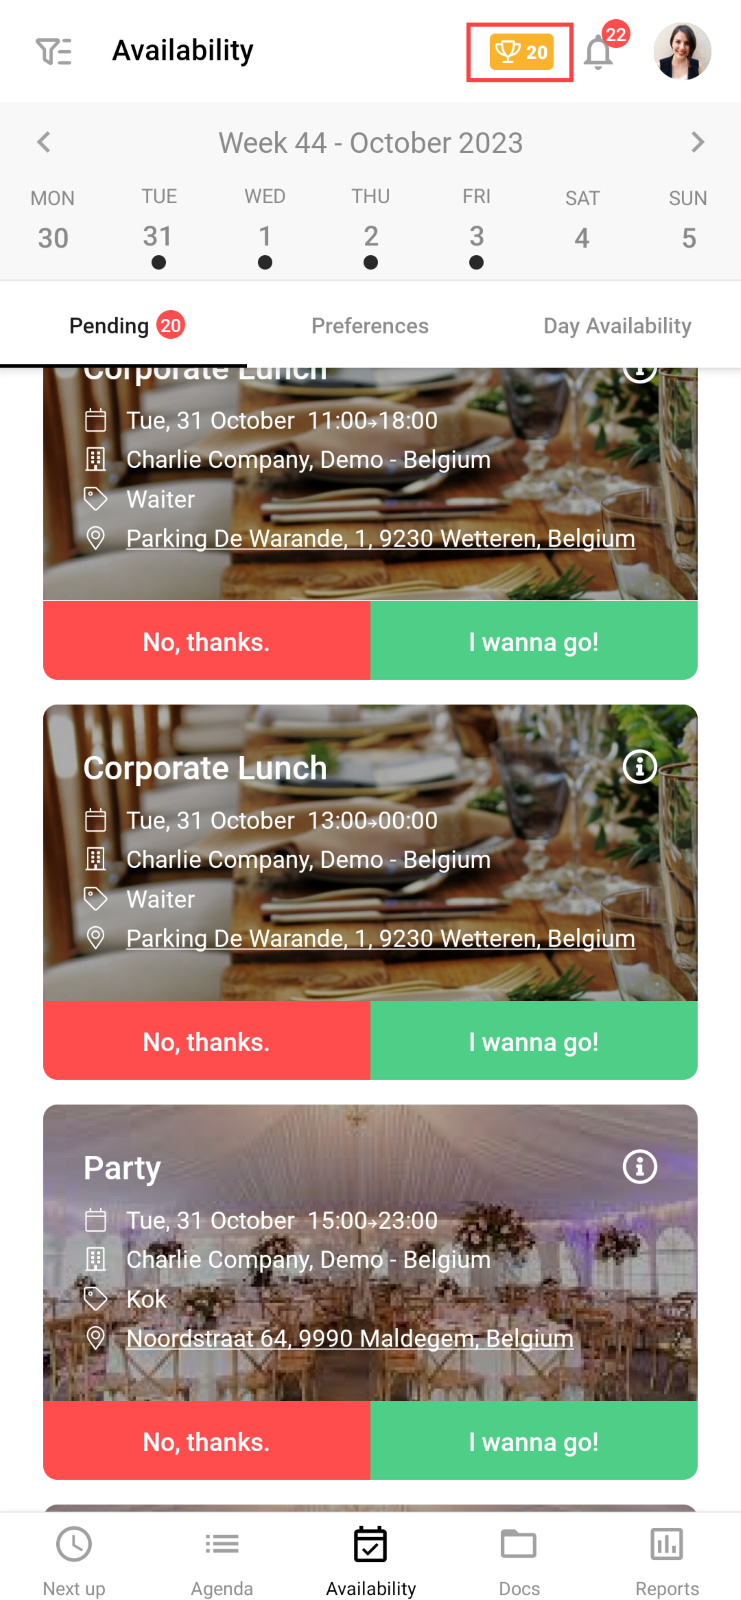
When the employee selects this icon, they will be directed to the leaderboard of the gamification pages.

Here they can not only consult which place they occupy on the leaderboard, but at the bottom of this page they have the following options:
-
Redeem points and purchase items through the marketplace
-
Consult their earning history
-
Learn how to earn points
Redeem points and purchase items through the marketplace
Consult their earning history
Learn how to earn points
Once they select one of these options, they will be directed to the relevant pages:

We hope this article has helped you!
If you still have questions, take a look at our Crew Academy first. You might find the answer in one of our articles.