Payouts
Manage your weekly / monthly advance payments with this extra module.
Table of contents
Set up your payout advance rules per contract type
Introduction
With our additional PAYMENTS module, CrewPlanner offers you the option to calculate an advance payment for the hours worked by your employees. In addition, this module creates a bank file based on the known performances, allowing you to instruct your bank to execute the payment.
This means your social secretariat will only need to process a wage calculation at the end of the month, subtracting the advances from the actual salary, instead of doing this weekly.
In consultation with your social secretariat, you could even apply this to advance payments for permanent employees.
You can add this module to your subscription and have it activated by your account manager.
Activate and set up payouts
Activating this module is a two-step process. First, you activate the PAYOUTS module on the CONFIGURATION page in SETTINGS.
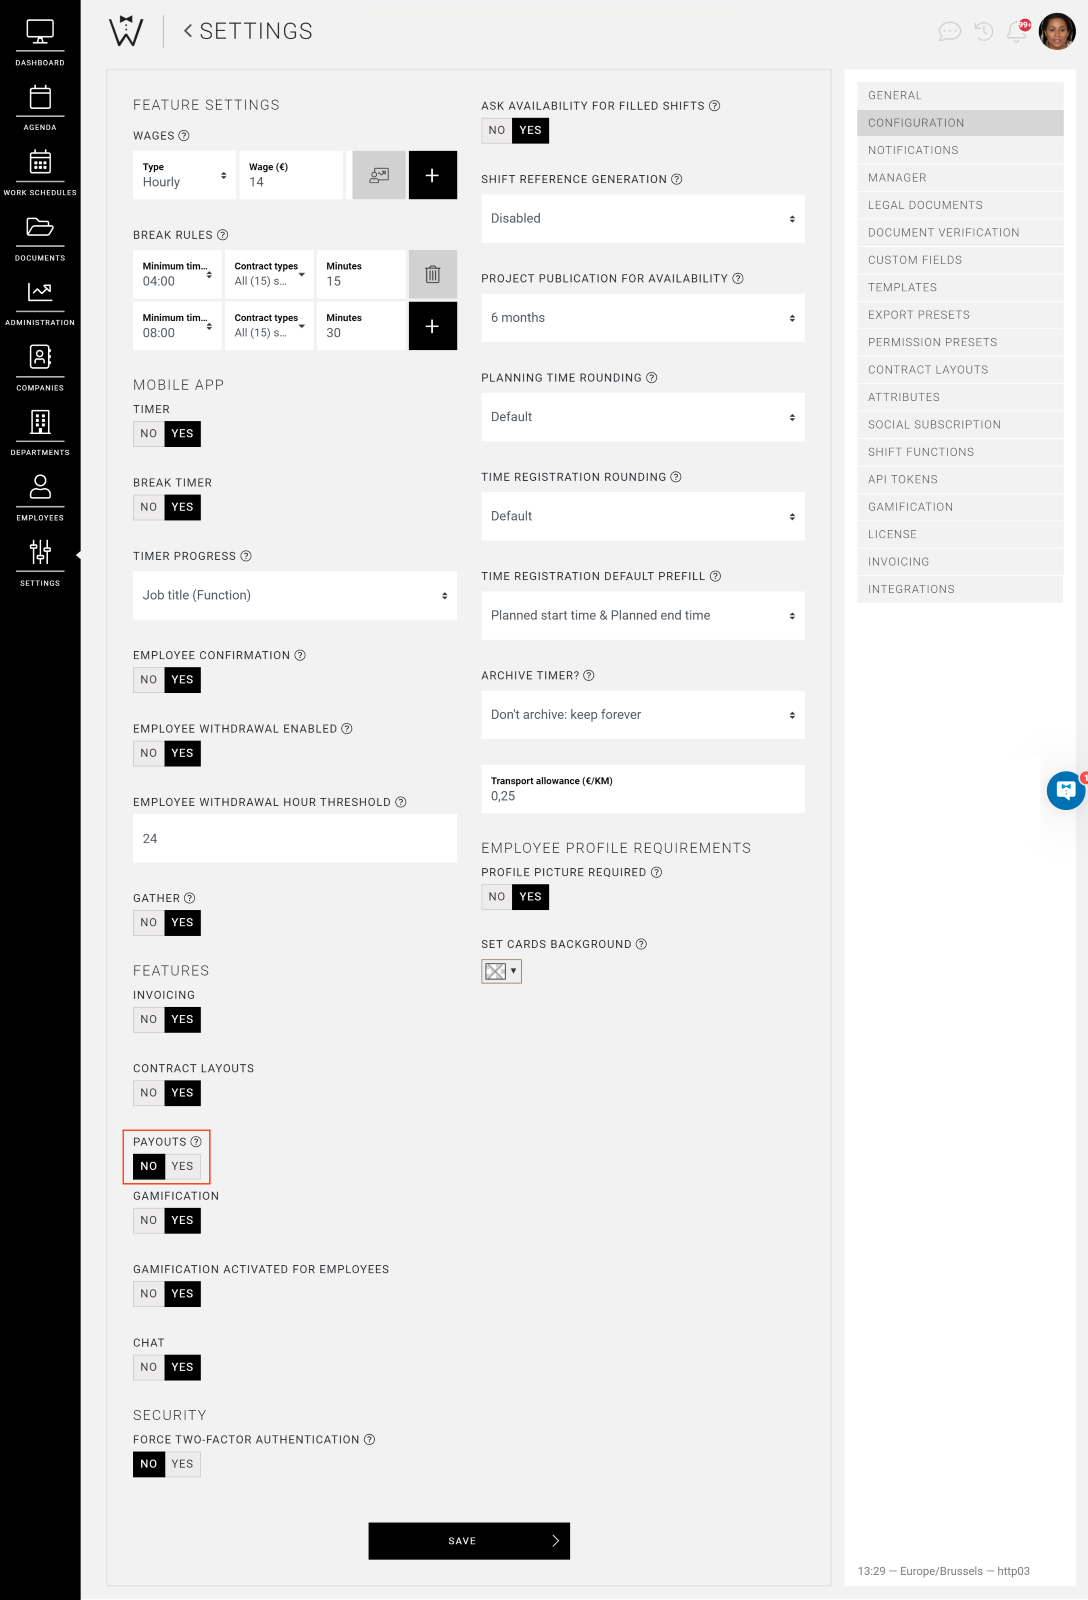
You do this by selecting YES and saving.

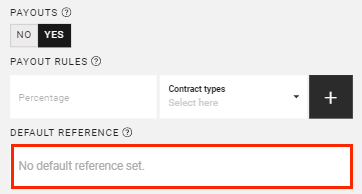
Once you have activated the module, the additional fields PAYOUT ADVANCE RULES and DEFAULT REFERENCE will appear below.
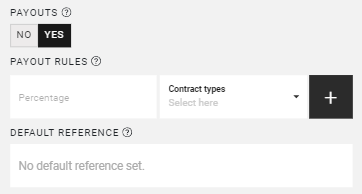
As you can imagine, this is where you set your preferences for your payments, but more on that shortly.
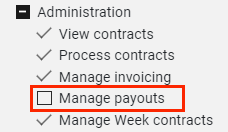
Note that after activating this module, you need to activate this permission for the managers who are allowed to manage payments by ticking it in their profile.
Set your advance rules per contract type
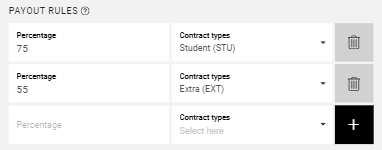
These configuration rules calculate how much of the gross wage is paid as an advance. We are happy to explain how you proceed:

-
Set the percentage of the gross wage
-
Select the contract type
Set the percentage of the gross wage
Select the contract type
Once you have entered these two fields, select the plus sign to add another advance rule. You continue this process until you have added all the necessary rules, and then click SAVE at the bottom.
Set your default payment reference
In the field below the rules, you can set a default reference for the payments. The default reference will be pre-filled for each generated bank file, but you always have the option to adjust this before the bank document is generated.
Consult payments
After activating this module, you will see an additional PAYOUTS option under ADMINISTRATION in the menu bar.
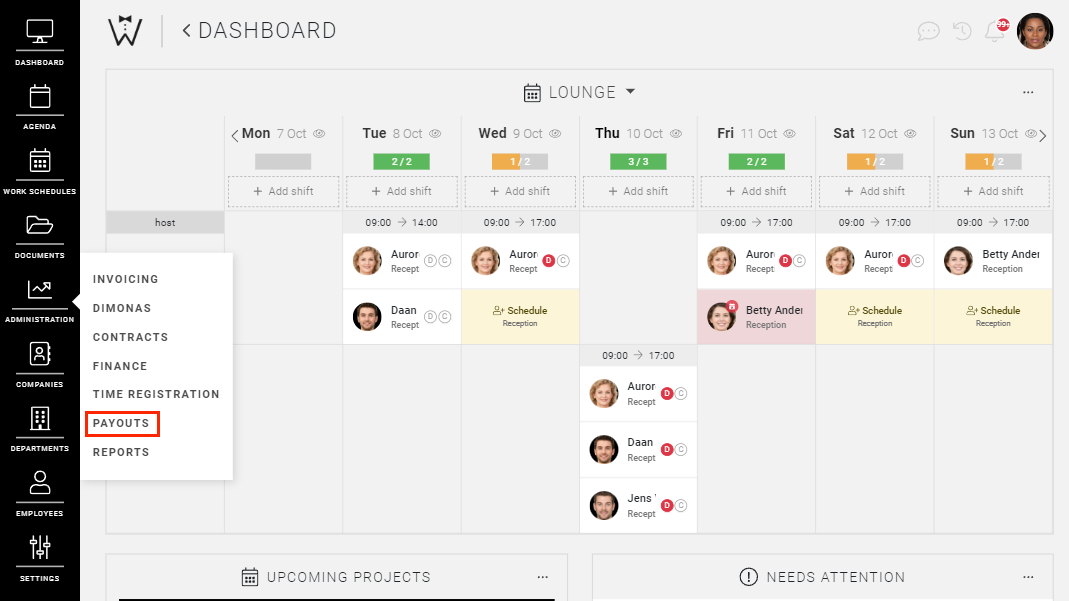
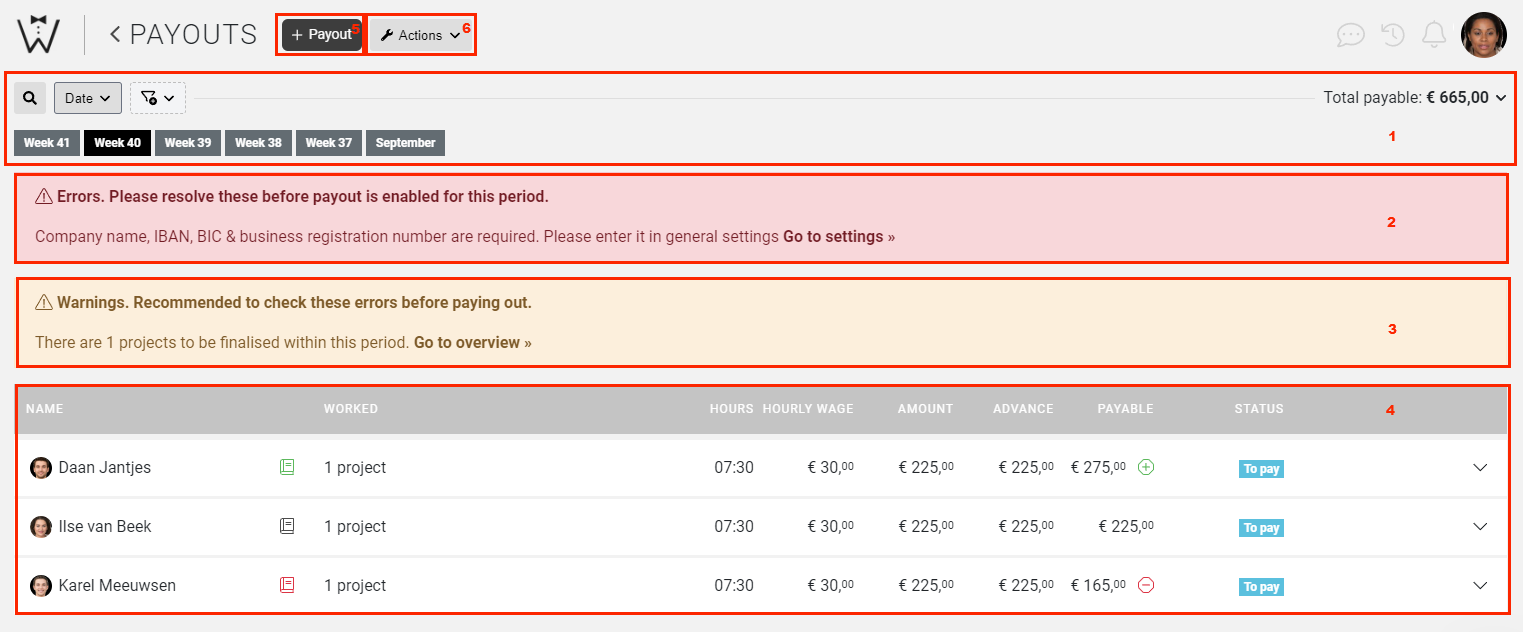
When you select this, you are directed to the main page of your payments. Here’s what you will find on this page:
-
Filters: You have various filters available, with the most obvious being the date and period filters, which are always visible. We will discuss the filters in more detail later.
-
Errors: The first error message displayed here is only applicable if you have not set everything up correctly yet. In this light red field, we provide a list of the blocking errors that need to be resolved before CrewPlanner can calculate an advance payment. For each line, you can quickly find a solution by selecting the ‘Bold text >>’.
-
Warnings: The second yellow field shows warnings that should be reviewed and resolved. However, these warnings do not block the creation of your advance payment file. In the above example, one project still needs to be completed. If this is not resolved before the next payment round, these projects will be ready to be processed in the bank file once completed.
-
Payment overview: Below these potential notifications, you will find an overview of the employees and their worked hours, which have been finalized by a company manager and are eligible to receive an advance payment. This overview consists of the following five components:
A. These are the profile photos and names of the employees who are being paid.
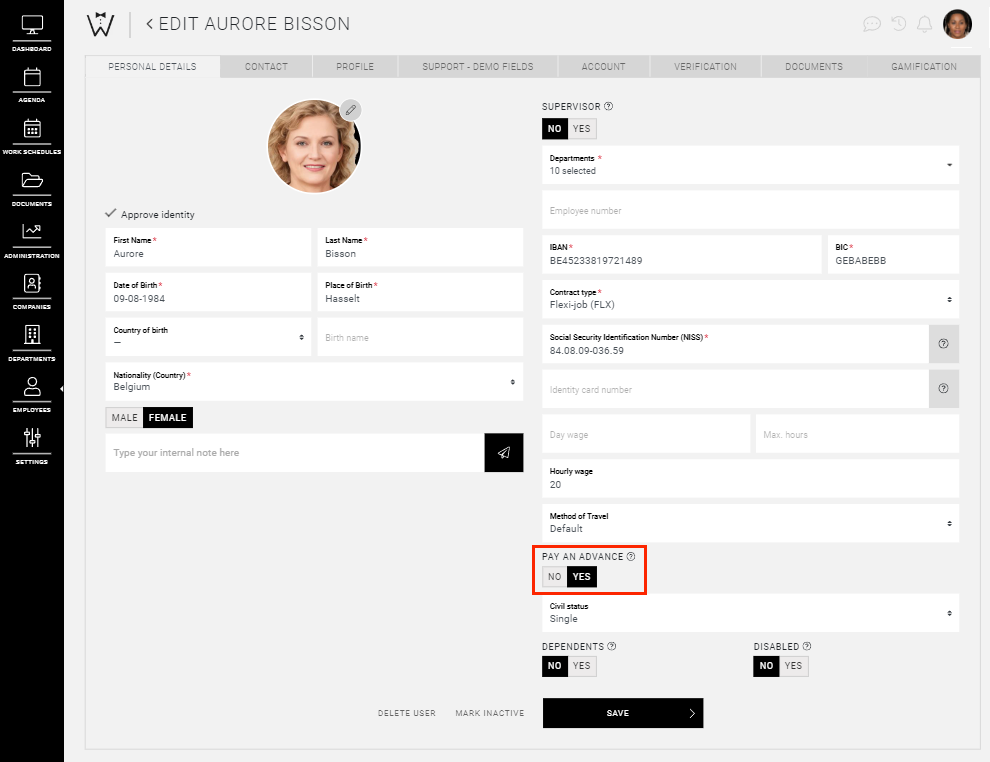
CrewTip! Ensure that in the profile of a flexible employee, it is indicated whether they are eligible for an advance payment.
B. You will see a book icon and the number of projects the employee worked on. Clicking on "x project" will give you more details about the projects.
If you select the book icon, a pop-up will appear where you can enter an adjustment, either more or less (plus or minus), on the amount paid as an advance.
Example of a negative amount due to a penalty:
When entering a negative amount, the book icon will turn red.
CrewTip! If the amount to be withheld is greater than the amount to be paid, CrewPlanner will remember this and deduct the remaining amount from the next payment.
Example of a positive amount due to extra expenses:
When entering a positive amount, the book icon will turn green.
C. These fields provide you with information about the performances, the wage, and the amount to be paid.
D. This is the status of the advance payment.
E. By clicking this arrow, you can view or hide the details of the projects on which the employee worked.
-
Payout: At the top, you will find two more options. Once all errors are resolved, you can generate a payment file by selecting the PAY option. More on this in the next section.
-
Actions: This option opens the following dropdown menu:
Here, you have the option to view previous payment files or generate an export document of the data related to payments.
Filters: You have various filters available, with the most obvious being the date and period filters, which are always visible. We will discuss the filters in more detail later.
Errors: The first error message displayed here is only applicable if you have not set everything up correctly yet. In this light red field, we provide a list of the blocking errors that need to be resolved before CrewPlanner can calculate an advance payment. For each line, you can quickly find a solution by selecting the ‘Bold text >>’.
Warnings: The second yellow field shows warnings that should be reviewed and resolved. However, these warnings do not block the creation of your advance payment file. In the above example, one project still needs to be completed. If this is not resolved before the next payment round, these projects will be ready to be processed in the bank file once completed.
Payment overview: Below these potential notifications, you will find an overview of the employees and their worked hours, which have been finalized by a company manager and are eligible to receive an advance payment. This overview consists of the following five components:

A. These are the profile photos and names of the employees who are being paid.
CrewTip! Ensure that in the profile of a flexible employee, it is indicated whether they are eligible for an advance payment.
B. You will see a book icon and the number of projects the employee worked on. Clicking on "x project" will give you more details about the projects.

If you select the book icon, a pop-up will appear where you can enter an adjustment, either more or less (plus or minus), on the amount paid as an advance.

Example of a negative amount due to a penalty:
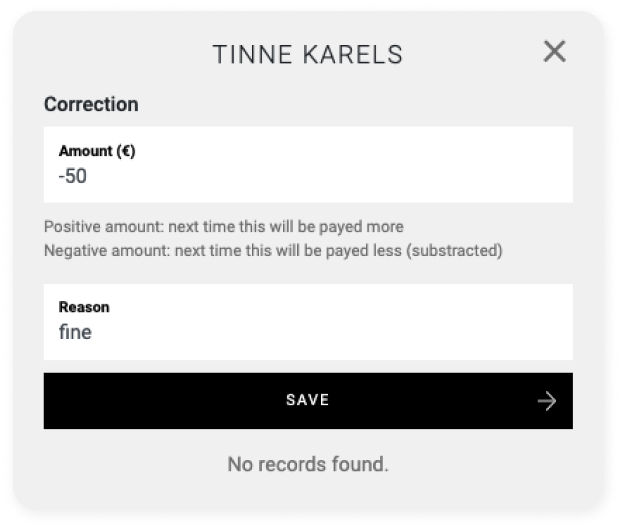
When entering a negative amount, the book icon will turn red.
CrewTip! If the amount to be withheld is greater than the amount to be paid, CrewPlanner will remember this and deduct the remaining amount from the next payment.
Example of a positive amount due to extra expenses:
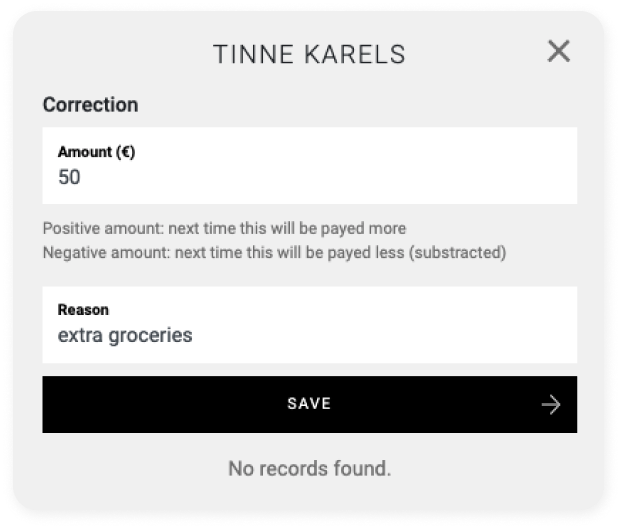
When entering a positive amount, the book icon will turn green.
C. These fields provide you with information about the performances, the wage, and the amount to be paid.
D. This is the status of the advance payment.
E. By clicking this arrow, you can view or hide the details of the projects on which the employee worked.
Payout: At the top, you will find two more options. Once all errors are resolved, you can generate a payment file by selecting the PAY option. More on this in the next section.
Actions: This option opens the following dropdown menu:
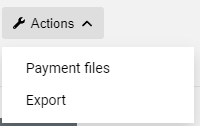
Here, you have the option to view previous payment files or generate an export document of the data related to payments.
Filters
As mentioned earlier, you will find the search function and filters under these options.
Some specific periods and the date filter are always immediately available.
If you need more specific filters, select the funnel icon to display the following menu:
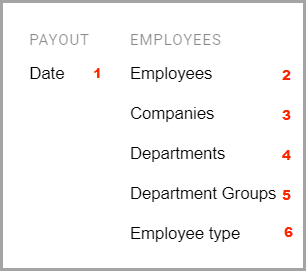
These filters are available:
-
Date: Select the period you want to pay by choosing one of the options on the left-hand side or by selecting a start and end date.
-
Employees: Tick the employee(s) you want to pay.
-
Companies: Filter by customer(s) for whom the employees have worked.
-
Departments: Select the department(s) from which the employees were scheduled.
-
Department groups: Select the department group(s) from which the employees were scheduled.
-
Employee type: Filter by contract type of your employees or by supervisors.
Date: Select the period you want to pay by choosing one of the options on the left-hand side or by selecting a start and end date.
Employees: Tick the employee(s) you want to pay.
Companies: Filter by customer(s) for whom the employees have worked.
Departments: Select the department(s) from which the employees were scheduled.
Department groups: Select the department group(s) from which the employees were scheduled.
Employee type: Filter by contract type of your employees or by supervisors.
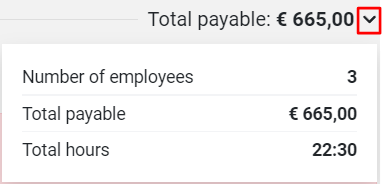
Finally, select the down arrow next to the total to get a handy overview of the results of your selections.
Create a bank file
Once you have applied the necessary filters and performed your checks, you are ready to execute a payment by selecting PAYOUT at the top. This will trigger the following pop-up:
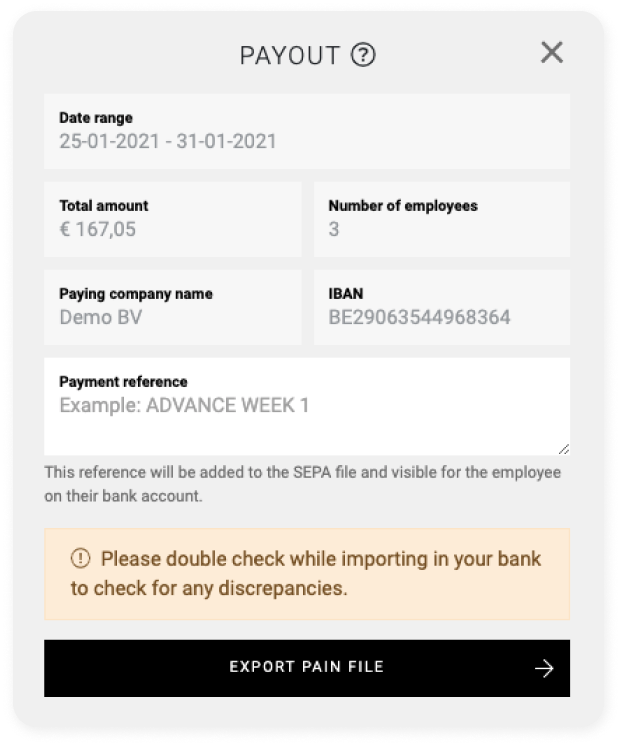
You will notice that all fields, except the Payment reference field, are light grey. These fields cannot be edited but are based on the input data and your account's general settings. Enter the reference for this payment in the Payment reference field.
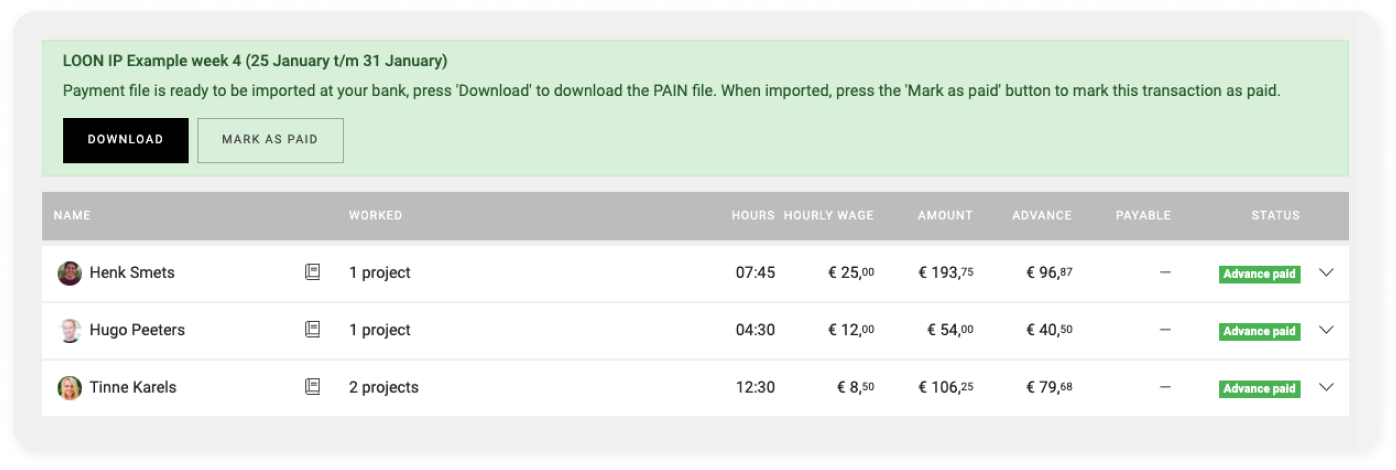
After selecting EXPORT PAIN FILE, you will be redirected to the PAYMENTS overview, where a green field will now appear asking if you want to download the file or mark it as paid. More on this in the next chapter.
IMPORTANT: Mark as paid
We recommend that after generating the bank file, you immediately DOWNLOAD and upload it to your bank to process the advances.
This brings us to the final but crucial step: In the green field, you also have the option to MARK AS PAID. This manually changes the status in the second-last column to "Advance paid" after you have instructed your bank to make the payment. This status update is not automated.
Once you have completed all these steps, the overview will look as follows:

Please note:
It is important to know that once a payment is marked as paid, this cannot be undone. Payment files also cannot be regenerated.
We hope this article has helped you!
If you still have questions, take a look at our Crew Academy first. You might find the answer in one of our articles.


