Venues
Manage your companies’ venues and their associated data.
Table of Contents
Introduction
Add venue
Venues overview & icons
-
Work schedule
-
Time clock
-
Edit venue
Edit venue
-
Company managers
-
Shift functions
-
Finance
-
Invoicing
Export venue data
Delete venue
Company managers and venues permissions
Custom fields
Venues for payrolling
-
Add venue
-
Payroll manager
-
Payroll employees
-
Shift functions
-
Finance
-
Invoicing
Introduction
A VENUE in CrewPlanner provides the option to add a subdivision to a company, for example different physical locations, making it easier to organise projects, shifts, and other activities at venue level. Venues enable more granular management of activities and resources within each company, allowing better tracking and planning for your business.
Deviating shift functions and invoicing settings can be set for each venue and they can be linked to projects, work schedules, invoices, and more. Only managers with the relevant permissions will have access to manage venues and permissions can be restricted up to venue level via the VENUES dropdown.
Add venue
Adding a venue is straightforward. Venues must have a name and address if known, but further details can be added once created to make the venue more functional for your business processes.
How do you add a venue?
-
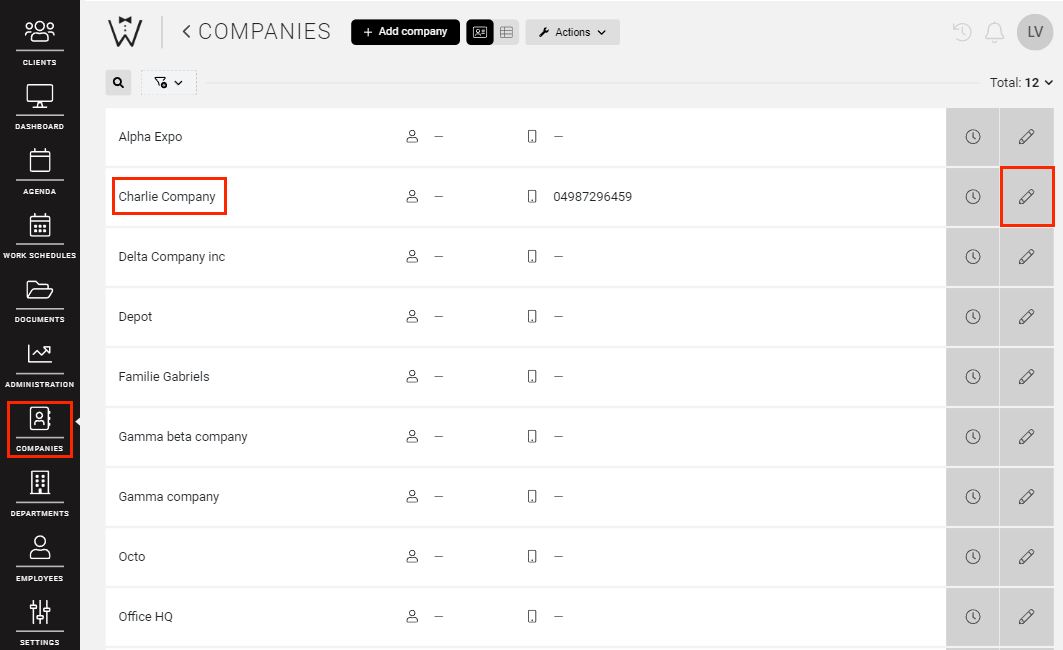
On the COMPANIES page, open the company to which you want to add a venue by selecting the company or the pencil icon on the right.
-
Navigate to the VENUES tab on top.
-
Select ADD VENUE.
-
Fill in the required fields:
On the COMPANIES page, open the company to which you want to add a venue by selecting the company or the pencil icon on the right.
Navigate to the VENUES tab on top.

Select ADD VENUE.
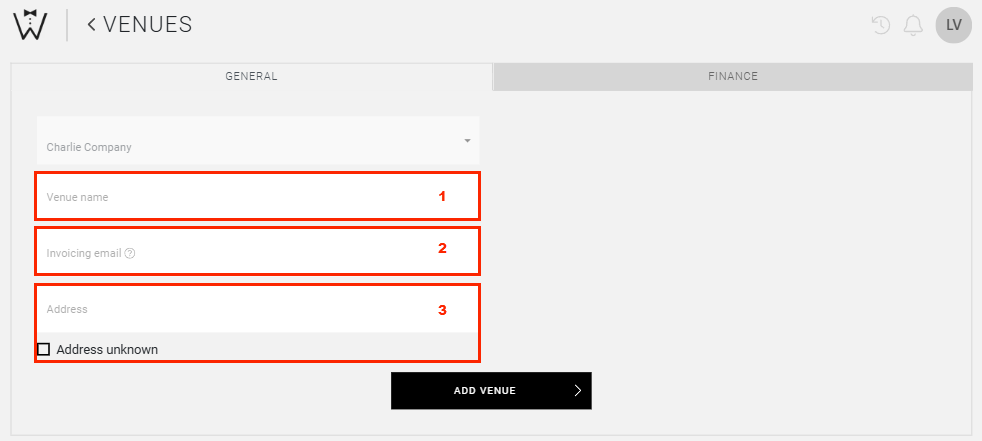
Fill in the required fields:
-
Venue name: The name of the venue.
-
Invoicing email: This offers the option to send invoices for this venue to a different email address than the one specified in the company file.
-
Address: This will be linked to Google Maps for easy location access or if the address is unknown, tick the box.
CrewTip! When creating new projects or work schedules for a venue, the venue address will always be used to prefill the address field of the project or work schedule.
Select ADD VENUE to save and add the venue.
Once a venue has been added, you may also complete additional optional fields as needed, such as shift functions, financial information, and invoicing rules. More on this in the chapter Edit venue.
CrewTip! Please note, venues can only be added to existing companies. You will therefore have to add a company first and edit this company to add a venue.
Venues overview & icons
As soon as a venue has been added to a company, it will appear in the VENUES tab of its company.

You will notice that on the right of each venue you have the following icons:

-
Work schedule
When you select this icon, you will be led to the page below where you will be able to create a work schedule for this venue:
Read our work schedules article for more information.
-
Time clock
Select the time clock icon to generate a unique timeclock code for each venue to facilitate time registration for employees on-site.
In this article you find more information on the use of a time clock.
-
Edit venue
The pencil icon opens the venue and allows you to edit this venue or add additional information. In the next chapter you find out what the options are.
Work schedule
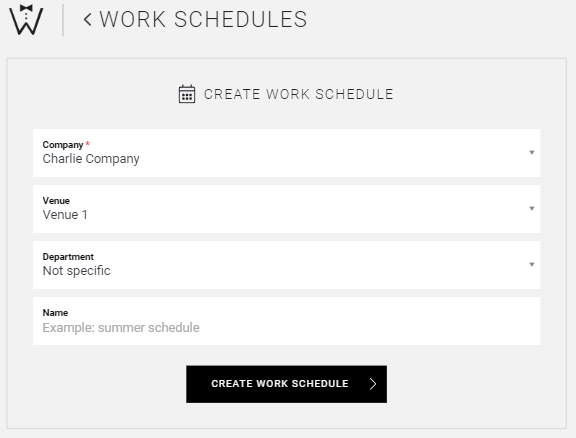
When you select this icon, you will be led to the page below where you will be able to create a work schedule for this venue:
Read our work schedules article for more information.
Time clock
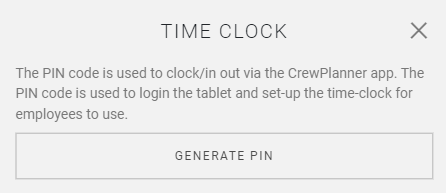
Select the time clock icon to generate a unique timeclock code for each venue to facilitate time registration for employees on-site.
In this article you find more information on the use of a time clock.
Edit venue
The pencil icon opens the venue and allows you to edit this venue or add additional information. In the next chapter you find out what the options are.
Edit venue
As mentioned, to edit a venue, select the pencil icon in the venue overview. This way, you can modify details initially provided earlier when adding a venue in the tab GENERAL, but also add information such as company managers, shift functions, finance and invoicing settings.
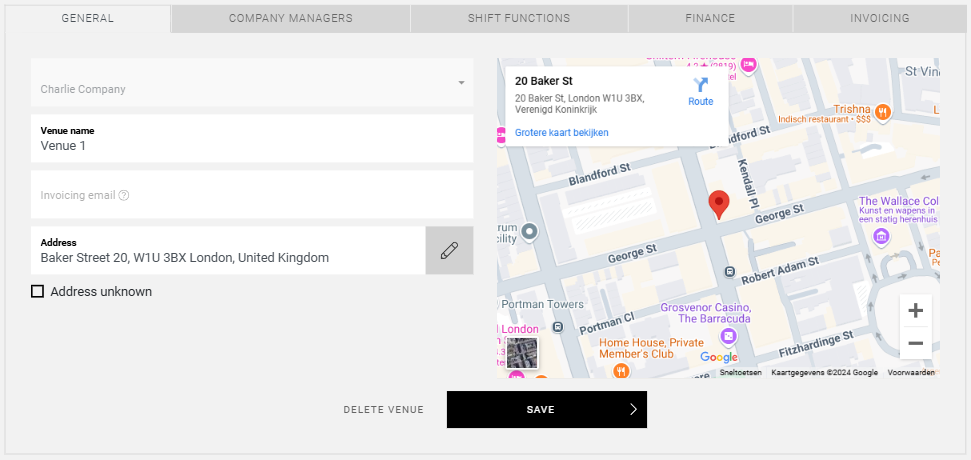
Company managers
The tab COMPANY MANAGERS offers you the option to invite or add company managers who will only be able to view and perform actions for this particular venue.

Select INVITE or ADD COMPANY MANAGER to proceed. Read more here.
CrewTip! If the company manager may view and manage multiple or all venues, navigate to the COMPANY MANAGER tab of the company file instead to create their account. Read how in the chapter below on company managers.
Once your company managers have been created, you will be able to view all company managers with the explicit permission to view and manage this venue in the COMPANY MANAGER tab of a venue.
CrewTip! Company managers without venue restrictions, so for whom no venue permissions have been set, only appear in the COMPANY MANAGER tab of the company file.
Shift functions
In the tab SHIFT FUNCTIONS, you will be able to create shift functions which will only apply to this venue.

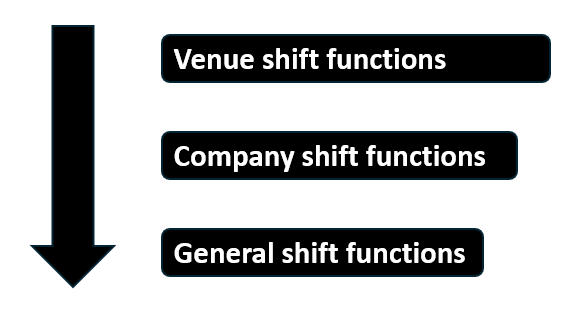
Do note, similar to company shift functions, once a venue shift function has been created, general shift functions or if present for this company, company shift functions, will no longer be available for this venue.
However, if no venue shift functions have been created, for Venue 2 for instance, the company shift functions will still be available for this venue, or if no company shift functions have been set, the general shift functions will be available.
Shift function logic:
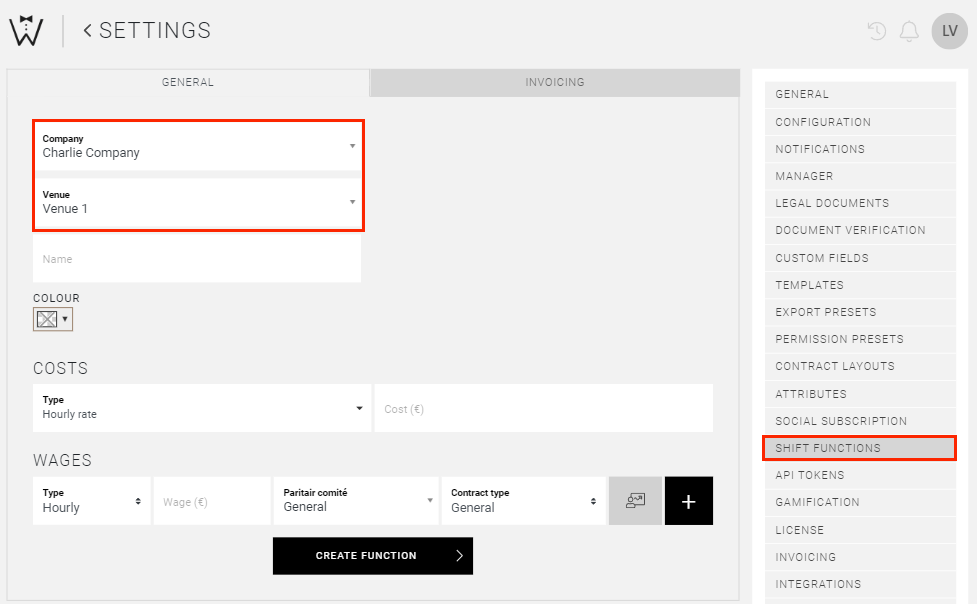
Select CREATE FUNCTION and you will be led to the general SHIFT FUNCTIONS page, but you will notice that the company and venue are already prefilled.
For more information on shift functions and how to create them, read here.
Finance
Select the tab FINANCE if you merely want to allocate a deviating hourly price to an existing general or company shift function if it is only applicable for this venue.

To do so, select the shift function in the Function dropdown and add a new hourly price. Select the plus icon to add multiple and SAVE.
CrewTip! This offers you the option to limit the number of shift functions. Do note, if you want this deviating price to be available for the whole company instead of just one venue, then set a deviating price for a general shift function in the FINANCE tab of the company file instead.
Read this article to learn more about finance.
Invoicing
If you use our invoicing module, you will also have a tab INVOICING available, where you can set the invoicing requirements for this venue.
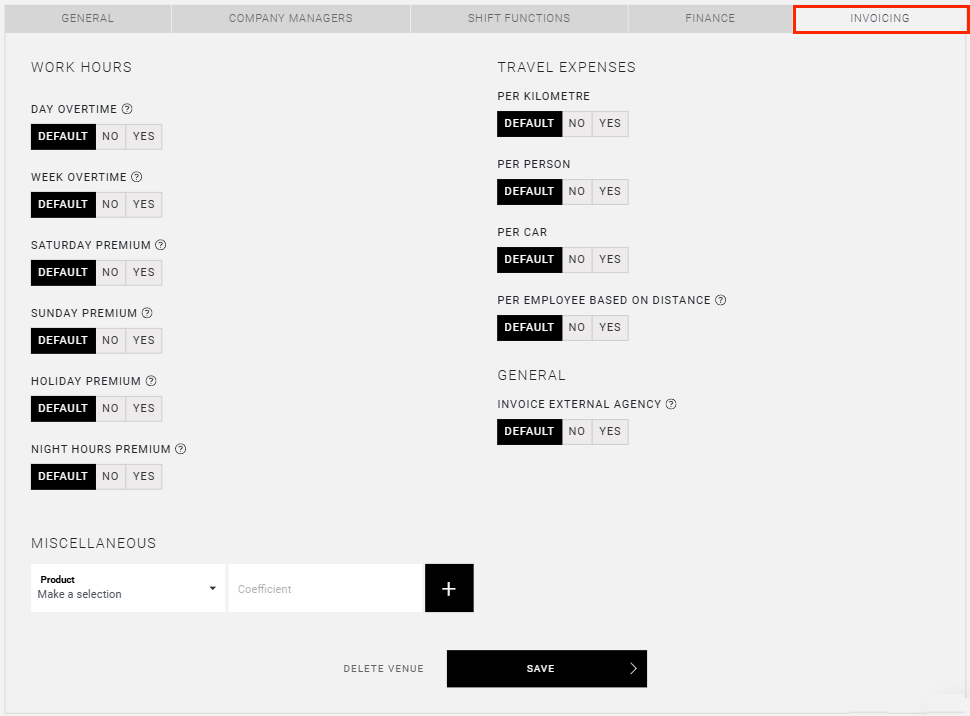
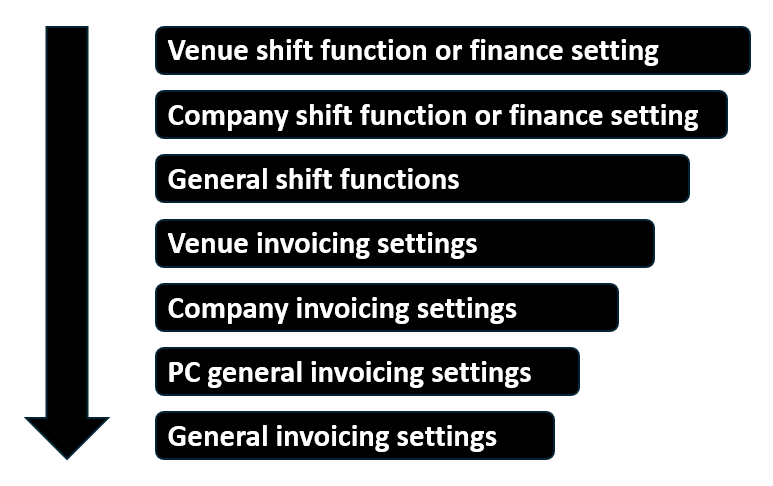
For more detailed information on how to set these options and their implications, read our invoicing module article. However, below you have a quick view of the invoicing logic applied in CrewPlanner. For example, if non-default invoicing rules are present for a venue shift function, these take precedence over invoicing rules set for company shift functions and so on.
Invoicing logic:
Make sure to SAVE any changes.
Export venue data
To export data for one or more venues, simply navigate to the COMPANIES page.
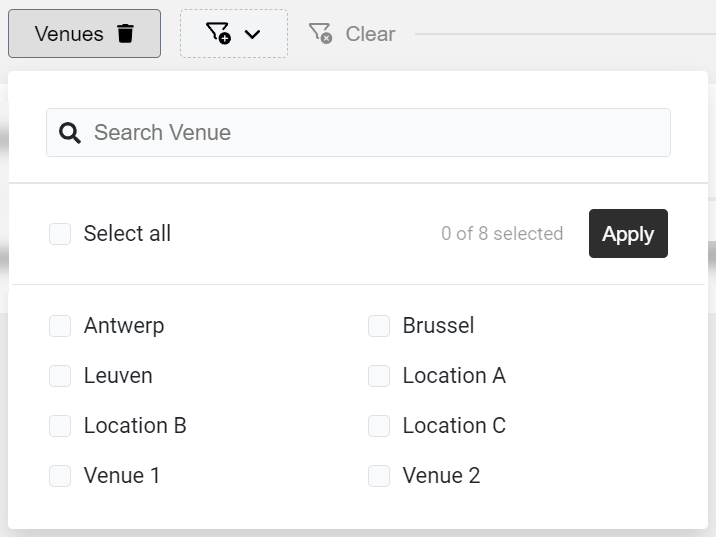
If you want to limit your export to the data of one or more venues, select the relevant venues in the filter and apply.
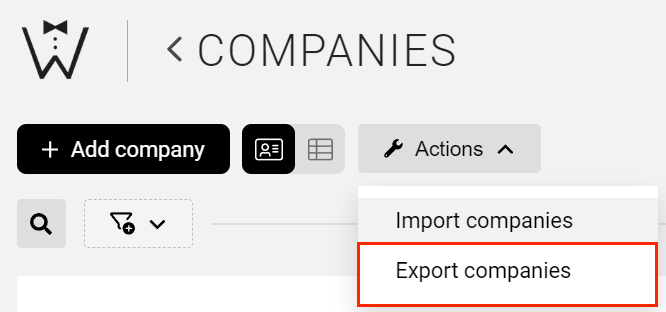
Then select EXPORT COMPANIES in the ACTIONS dropdown to export data for all companies listed in the overview after applying the filters of your choice.
This opens the export document builder in which you can select the fields you want to include in your export or even add custom fields. You can export data in formats such as Excel, CSV, or PDF.
Delete venue
If you wish to delete a venue, navigate to the venue you wish to delete, open the edit view via the pencil icon and on the bottom, you will see the option DELETE VENUE:
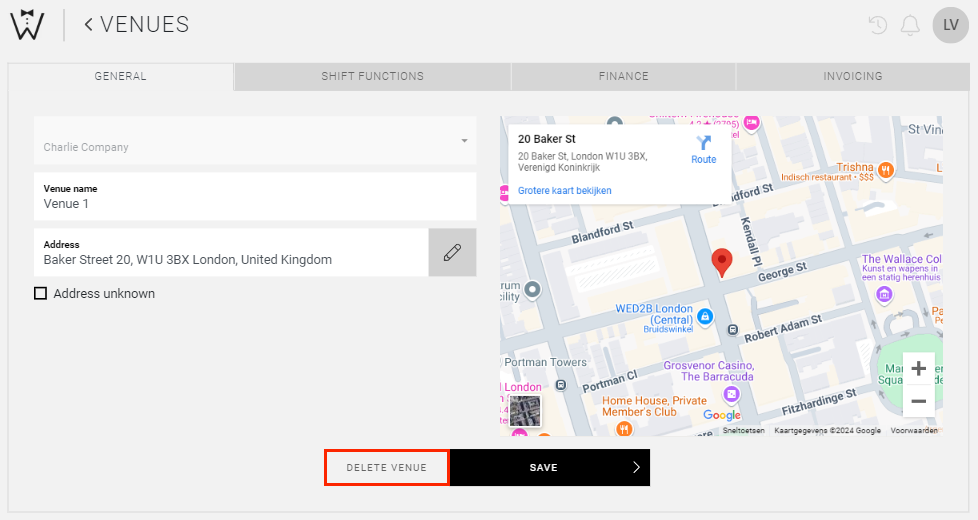
Once you select this option, you will be asked to confirm:
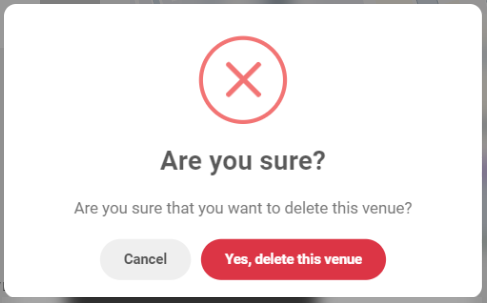
Once confirmed, the venue will be permanently deleted.
Please note that deleting a venue will impact all associated future projects, shifts, and work schedules, so proceed carefully. All projects and work schedules will be deleted and contracts and Dimona’s will be cancelled.
CrewTip! If you use our payrolling module and employees have been assigned to a venue, these employees will remain assigned to the payroll company when deleting the venue.
Information relating to past projects or work schedules will not be deleted and can still be consulted.
Company manager and venue permissions
Similar to being able to restrict permissions for your managers to one or more venues, it is possible to restrict a company manager’s permissions to one or more venues.
When inviting or adding a new company manager via the tab COMPANY MANAGER in the company file, you will have the option to make a selection of venues.
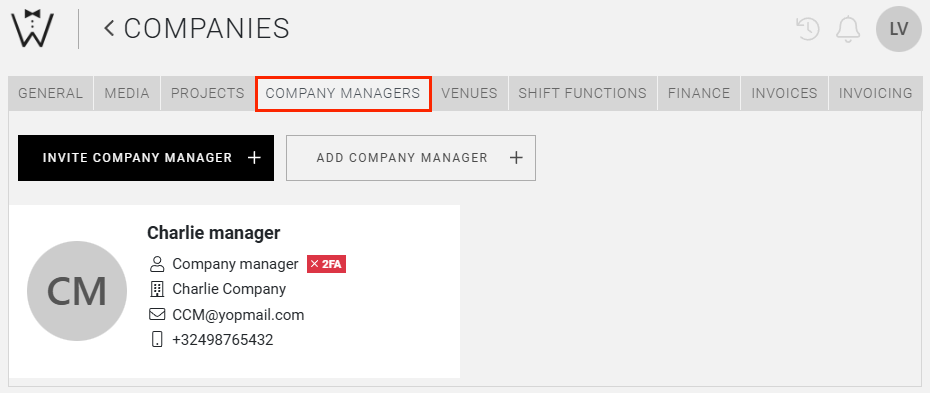
Select INVITE COMPANY MANAGER and you will notice the field Venue where you can select the appropriate venues for this manager:

If you select ADD COMPANY MANAGER, you will also notice the additional permissions field Venues:
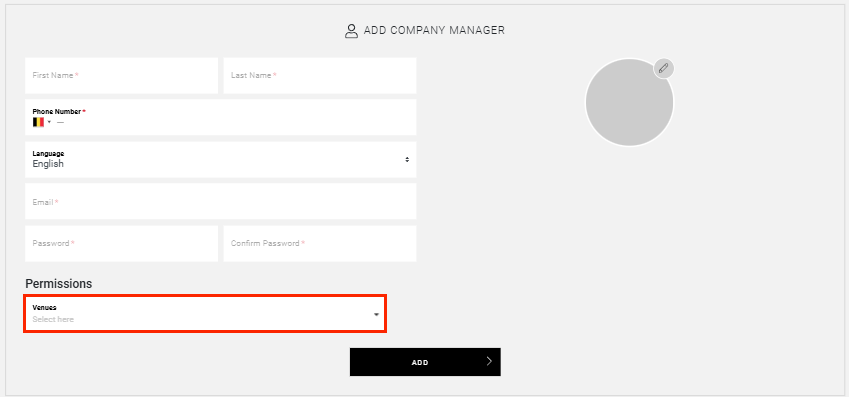
CrewTip! If no venue restrictions are required do NOT select all. This ensures that the company manager will be able to view and perform actions for all current AND newly added venues. Do note, company managers cannot create or amend venues, only managers with the appropriate permissions to manage venues can do so.
To amend venue permissions of existing company managers, open the manager’s profile by selecting the pencil icon and tick the appropriate venues in the Venue dropdown:
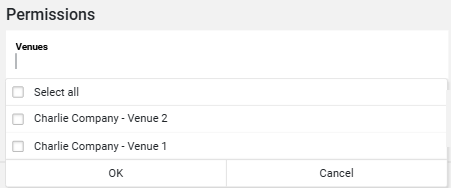
Select SAVE to apply the permissions.
Once your company managers have been created, in this tab you will have a complete overview of the company managers of the company.
CrewTip! Company managers without venue restrictions, so for whom no venue permissions have been set, only appear in the COMPANY MANAGER tab of the company file and not in the tabs of its venues.
Custom fields
As for companies, also for venues you will be able to collect additional information by creating a custom field.
To do so, simply select Venue in the Belongs to dropdown when creating a custom field:
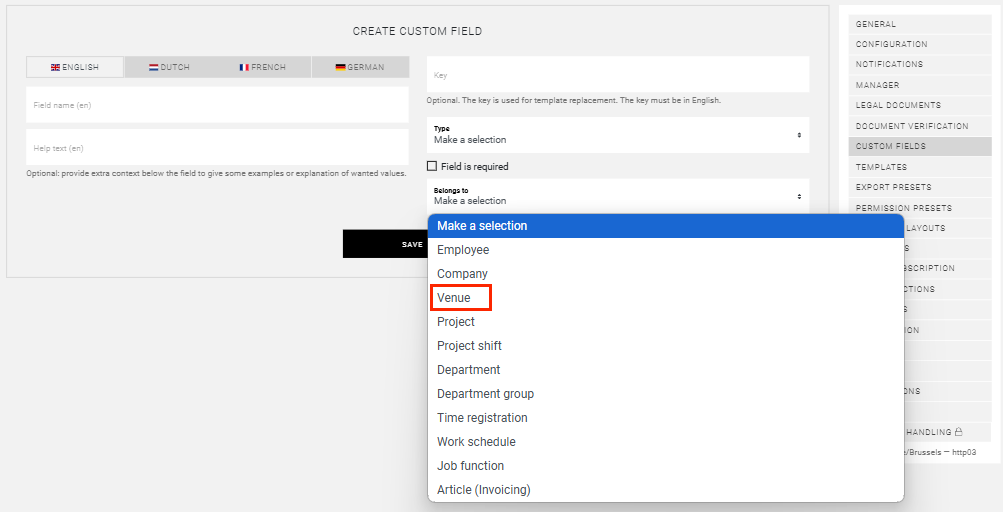
You can opt to make a venue custom field required to complete or not.
For more information on how to create custom fields, read here.
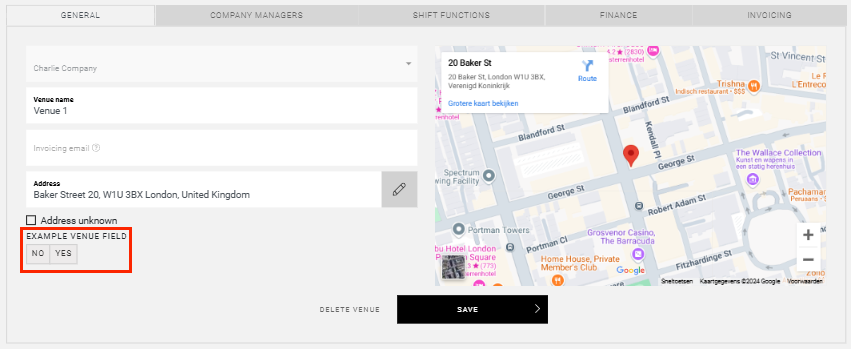
Once the custom field has been created, you will be able to enter information in the venue file here:
Venues for payrolling
If you make use of payrolling, you can also create venues for your payroll companies and payroll managers can be restricted to one or more venues, in the same way as we have explained in the previous chapters. You will notice however that venues for payroll companies have a few more tabs and therefore more options which we will discuss here in more detail.
Add venue
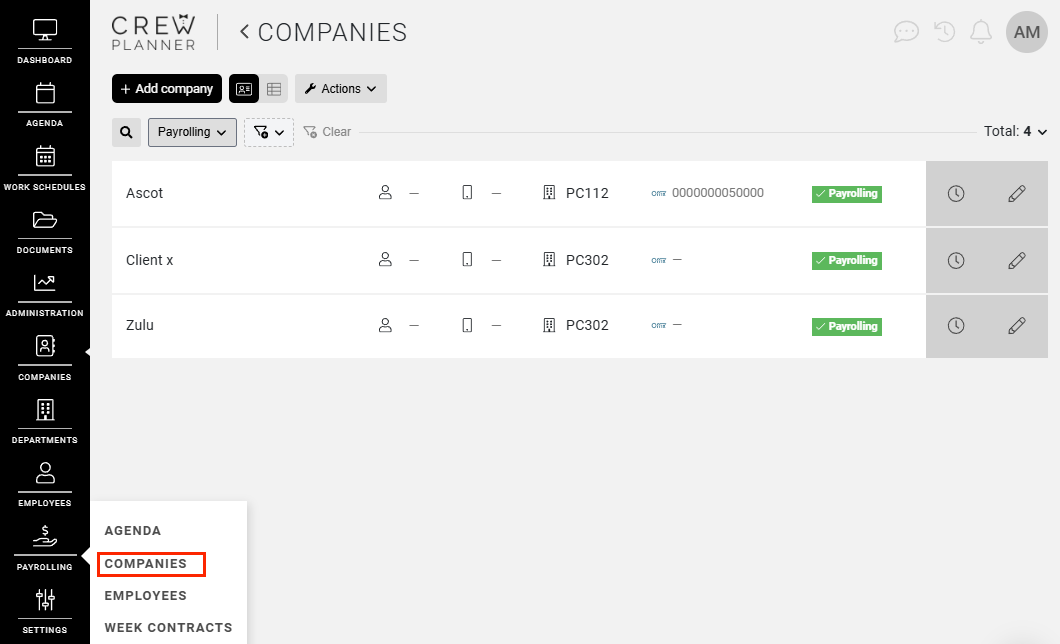
To add venues to payroll companies, you navigate to the required payroll company in the payroll company overview:
Where again you will find the tab VENUES:

To add a venue, you follow the steps explained above in the chapter Add venue.
However, once you have added a venue to a payroll company, you will have the option to add much more information.
To do so, select the pencil icon next to the relevant venue:

This will open the venue file and you will see the following tabs:
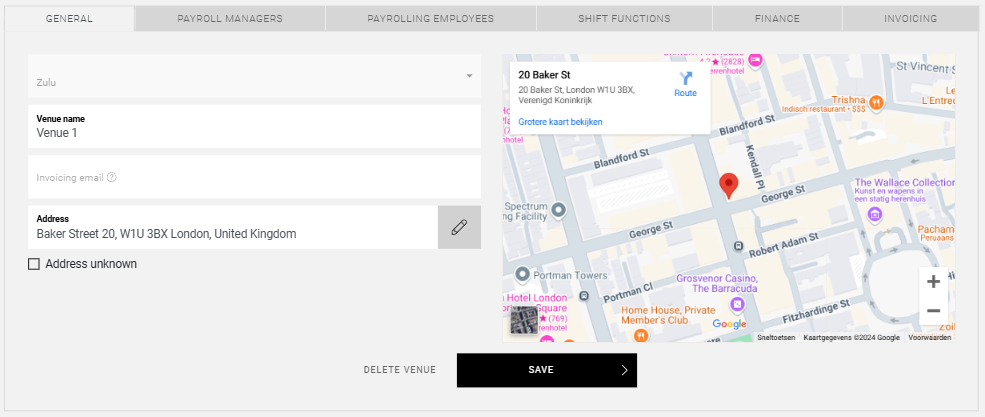
In the GENERAL tab you can amend or add any information relating to the venue itself.
Payroll manager
Similar to adding a venue company manager, here you are able to invite or add a PAYROLL MANAGER whose permissions will be limited to managing employees or planning for this venue only.

CrewTip! If you want to add or invite payroll managers with the permissions to manage multiple venues or you want to amend permissions for existing payroll managers, then navigate to the PAYROLL MANAGER tab on payroll company level instead. Here you will be able to select the appropriate venues in the venue dropdown.
If you want the payroll manager to be able to manage the whole company, do NOT select all for venues so permissions for newly created venues will be added.
Read this article for more information on how to invite or add external managers.
Payroll employees
Using venues for payrolling also makes it possible to assign payroll employees to one or more venues.
If you want to invite, add or assign employees to one venue only, you do so in the tab PAYROLL EMPLOYEES of this venue.

CrewTip! If you want to assign employees to multiple venues, then invite, add or assign the employees on payroll company level instead. Here you will be able to select the appropriate venues in the venue dropdown. Do note, assigning employees to multiple venues does not create new payroll profiles for this employee.
If you do not wish to assign an employee to one or more venues but to the whole company instead, then do NOT select any venues.
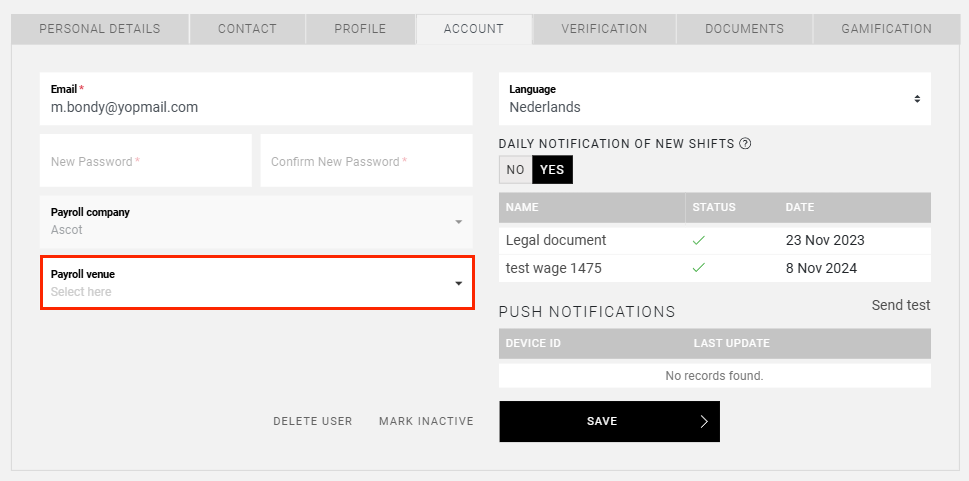
CrewTip! To assign existing payroll employee profiles to venues, open the edit view by selecting the pencil icon, navigate to the tab ACCOUNT and select the appropriate venues in the dropdown.
Shift functions
Also for venues of payroll companies, you have a tab SHIFT FUNCTIONS which allows you to create shift functions which can only be used for this venue.

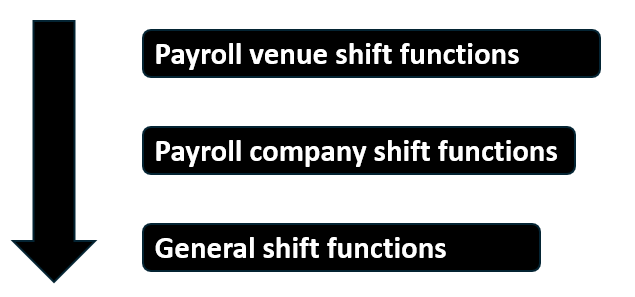
Do note, similar to company shift functions, once a venue shift function has been created, general shift functions or if present for this company, company shift functions, will no longer be available for this venue.
However, if no venue shift functions have been created, for Venue 2 for instance, the company shift functions will still be available for this venue, or if no company shift functions have been set, the general shift functions will be available.
Shift function logic:
Select CREATE FUNCTION and you will be led to the general SHIFT FUNCTIONS page, but you will notice that the company and venue are already prefilled.
For more information on shift functions and how to create them, read here.
Finance
Select the tab FINANCE if you merely want to allocate a deviating hourly price to an existing general or company shift function if it is only applicable for this venue.

To do so, select the shift function in the Function dropdown and add a new hourly price. Select the plus icon to add multiple and SAVE.
CrewTip! This offers you the option to limit the number of shift functions. Do note, if you want this deviating price to be available for the whole company instead of just one venue, then set a deviating price for a general shift function in the FINANCE tab of the company file instead.
Read this article to learn more about finance.
Invoicing
If you use our invoicing module, you will also have a tab INVOICING available, where you can set the invoicing requirements for this venue.
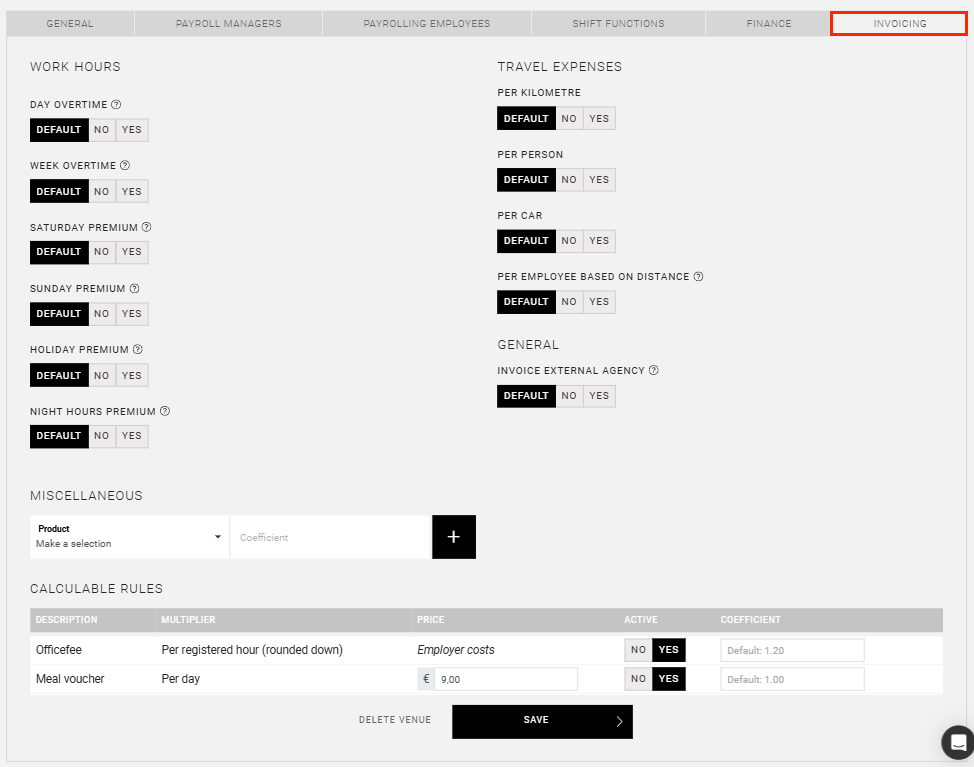
For more detailed information on how to set these options and their implications, read our invoicing module article.
Make sure to SAVE any changes.
We hope this article has helped you!
If you still have questions, take a look at our Crew Academy first. You might find the answer in one of our articles.