Catermonkey
Automatically convert your quotations from Catermonkey into a project in CrewPlanner.
Automatically convert your quotations from Catermonkey into a project in CrewPlanner.
Table of contents
Send a quotation from Catermonkey to CrewPlanner
Where to find confirmed quotes in CrewPlanner
Create a project from a confirmed quote
Modify, delete or cancel a quote
Introduction
Once you activate the link with Catermonkey, the quotations you have created there will automatically be forwarded to CrewPlanner as soon as you change them to a status for which you have set them to be allowed to appear in CrewPlanner. These quotes will appear as project requests in the Dashboard module External approved quotes in CrewPlanner and must be approved by a manager.
Integrate with Catermonkey
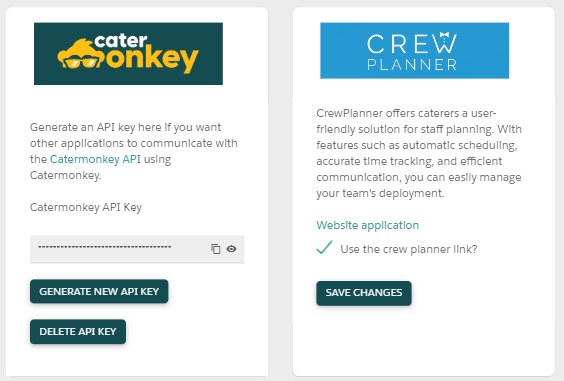
To integrate with Catermonkey, you will of course need an account with them first. More information can be found on their website www.catermonkey.com. Once this account is in order, navigate through SETTINGS to the LINKS & INTEGRATIONS page and select the option to generate an API Key:
To establish the link, then navigate in CrewPlanner to the INTEGRATIONS page from the SETTINGS menu, and there you will find the Catermonkey link under the Essential heading.
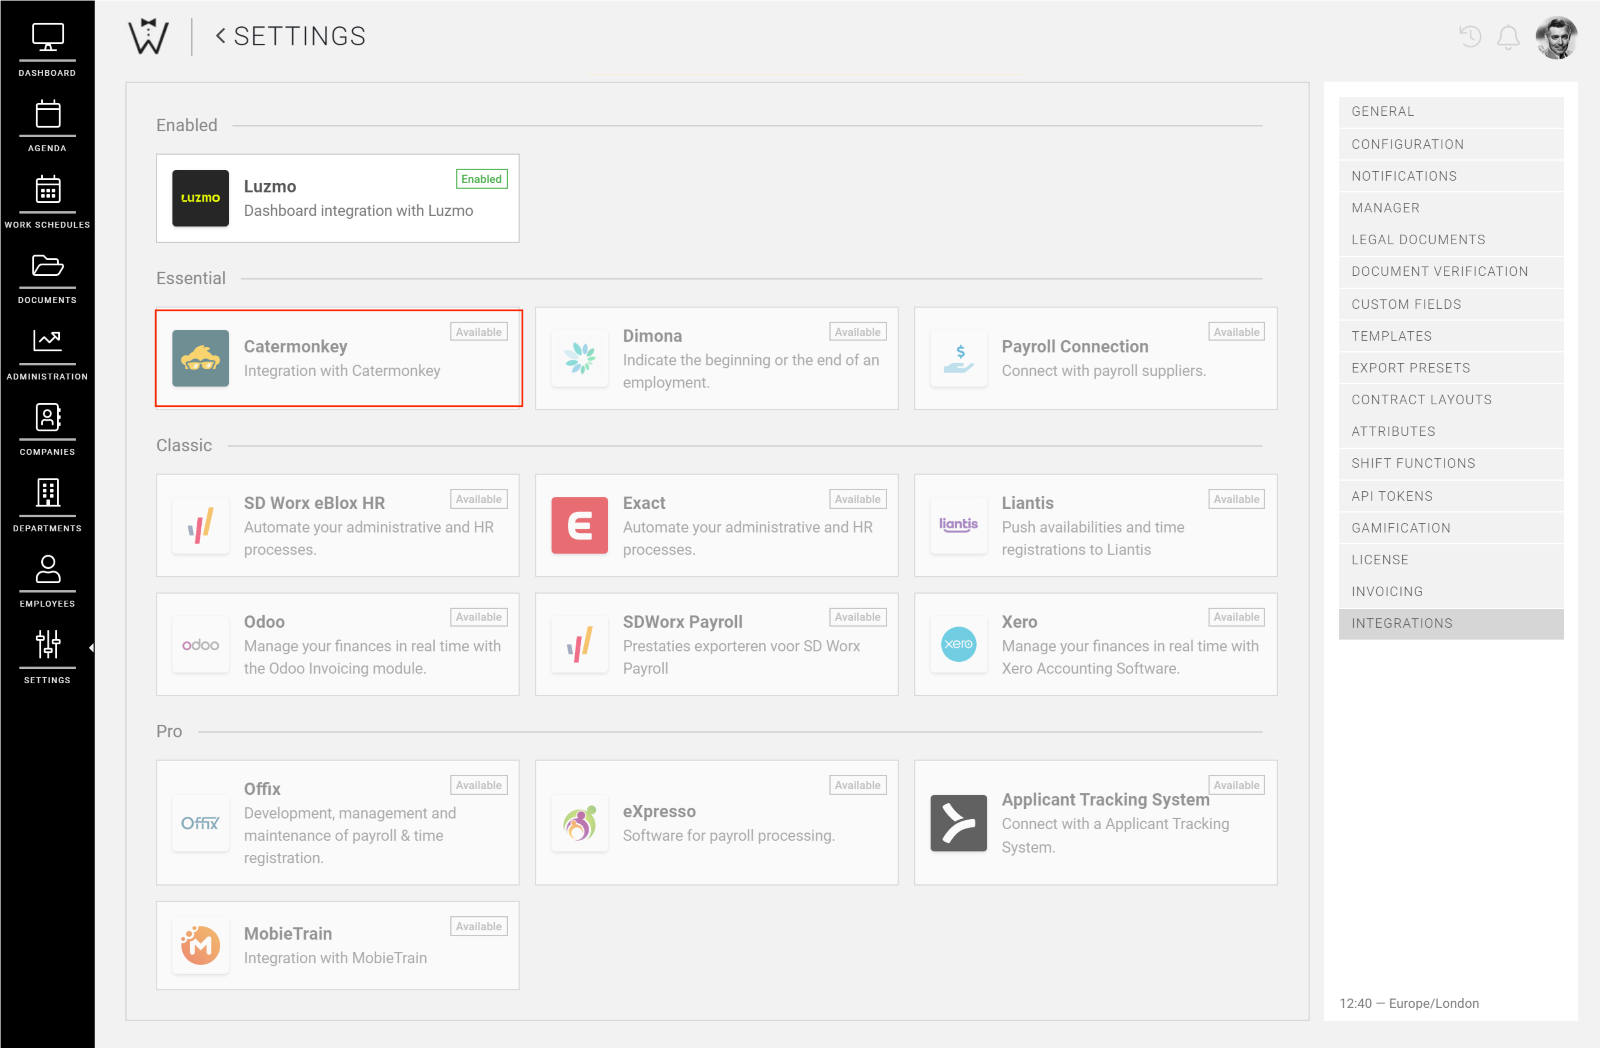
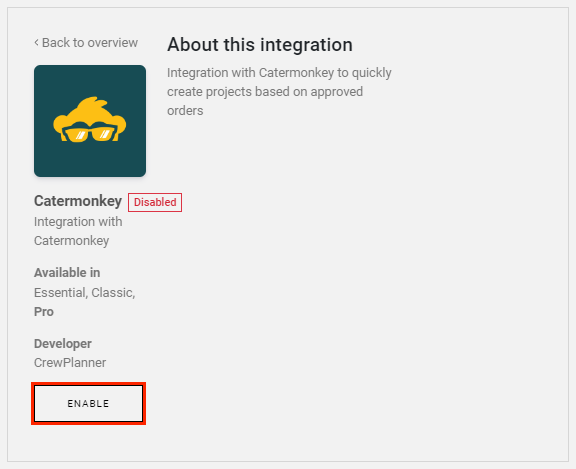
Select this link and on the next page on the left-hand side then select the ENABLE button.
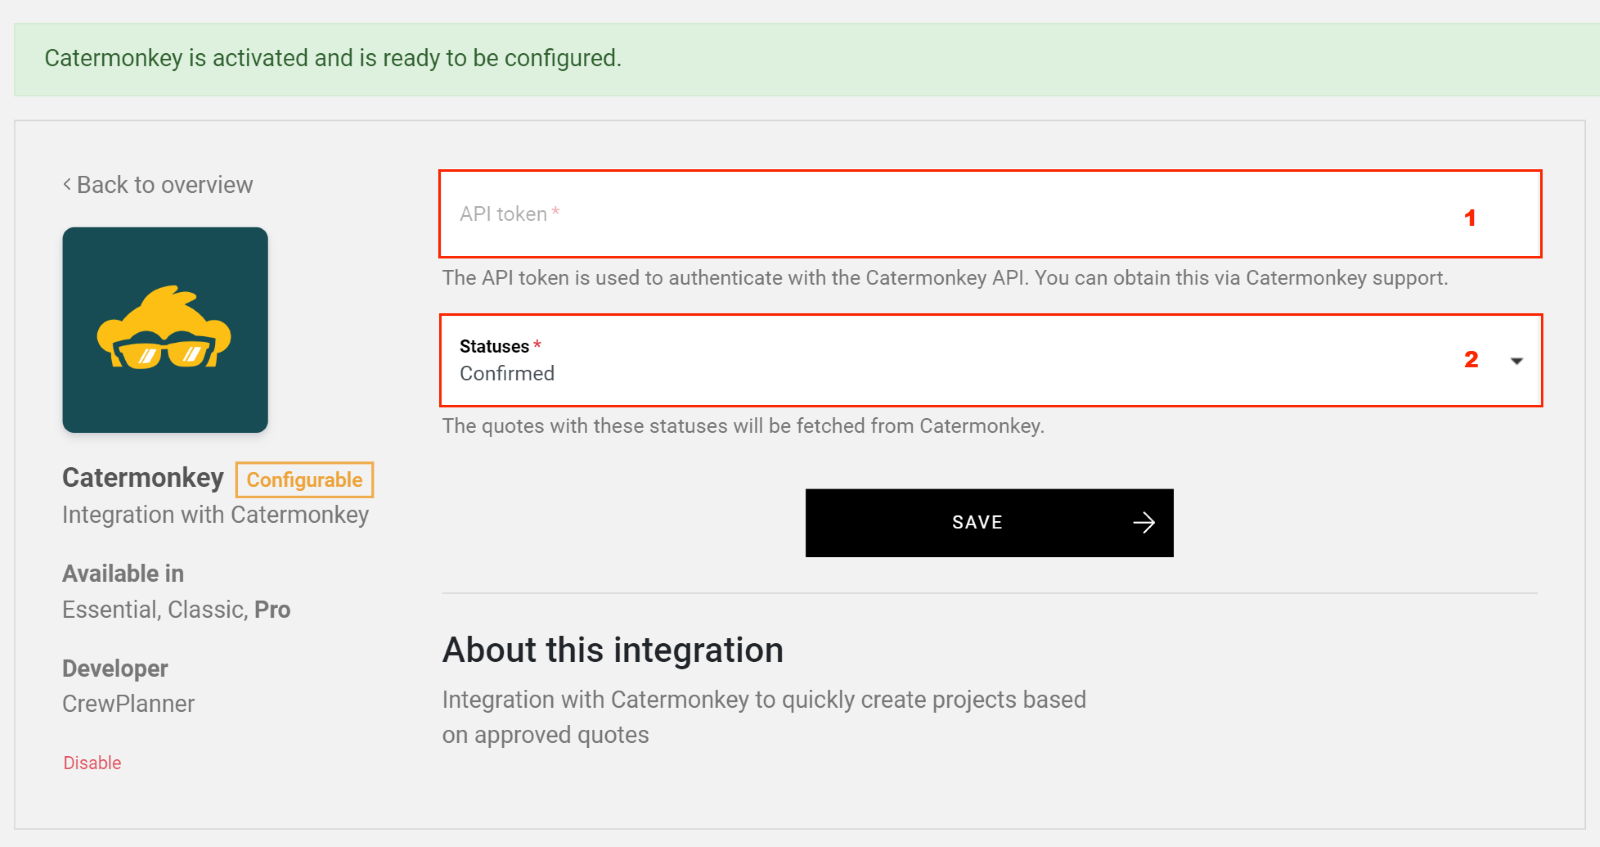
This opens the page below where you can enter the necessary settings:
-
Here you enter the API key or token copied from Catermonkey.
-
Under statuses, you determine which quotations from Catermonkey can be sent to CrewPlanner by ticking the allowed statuses and selecting OK. In CrewPlanner, you can then approve these quotes as projects.
Here you enter the API key or token copied from Catermonkey.
Under statuses, you determine which quotations from Catermonkey can be sent to CrewPlanner by ticking the allowed statuses and selecting OK. In CrewPlanner, you can then approve these quotes as projects.
Once you press SAVE, the link will be established.
Send a quotation from Catermonkey to CrewPlanner
A quotation you create in Catermonkey is not automatically sent to CrewPlanner, there are a number of things that have to be met for this to happen.
-
First of all, you have to enter at least a client and a date on the quotation to send it to CrewPlanner. So you don't need to complete all the information, but more on this later.
-
In addition, always select EVENT as the type in order to convert it to a project in CrewPlanner.
-
Finally, the quotation is only sent as soon as you change the status of the quotation to one of the statuses you have set up in the link in CrewPlanner. So feel free to create your quote and only change the status when you are ready to send it to CrewPlanner.
First of all, you have to enter at least a client and a date on the quotation to send it to CrewPlanner. So you don't need to complete all the information, but more on this later.
In addition, always select EVENT as the type in order to convert it to a project in CrewPlanner.
Finally, the quotation is only sent as soon as you change the status of the quotation to one of the statuses you have set up in the link in CrewPlanner. So feel free to create your quote and only change the status when you are ready to send it to CrewPlanner.
Once a quotation meets all the requirements, it appears in the EXTERNAL APPROVED QUOTES module of the DASHBOARD in CrewPlanner.
Which fields are linked
When formatting a quotation in Catermonkey, you have several fields at your disposal. In this chapter, we will discuss which fields in CrewPlanner these correspond to and are linked to.
As mentioned earlier, you don't need to enter all the information to send a quotation to CrewPlanner, but you do need to enter at least a client and a date.
CrewTip! As long as a project has not yet been approved in CrewPlanner, you can still add additional information to your quotation in Catermonkey and it will automatically be uploaded in CrewPlanner. This will look at all quotation with an event date up to 30 days in the past. This way, you can even add quotation for events that took place in the past.
Please note, in CrewPlanner, to create a project you need at least the following information: client company name, project name, date, minimum 1 shift.
If this information is not entered on the quotation, it will have to be completed manually in CrewPlanner to be able to approve and create a project.
We will briefly go over which fields in Catermonkey you can use to send information and with which fields they are linked in CrewPlanner:
-
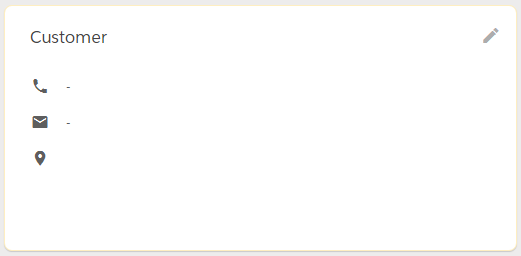
Customer = Company
Note that the client for whom the quotation was created can only be recognised by CrewPlanner if the name is the same 1:1. If the name is not recognised, no project request will be created as a result.
-
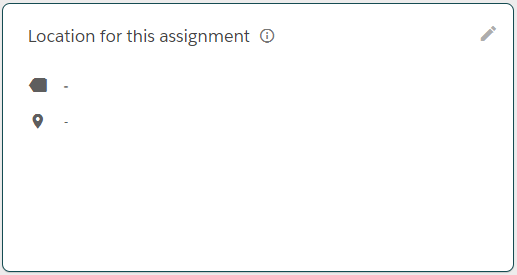
Location = Project address
If you enter an address in the Field 'Location', CrewPlanner will recognise it as the Project address. If you leave this field blank, the Address unknown option will be ticked for the project. -
Event date = Project date
Without a date, no information will be sent. The 'Eventdatum' will count in CrewPlanner as the Project date.
-
End date = Creation of Recurring project
If you enter an 'Einddatum' on your quotation, a project will be created on each day between the 'Eventdatum' and the 'Einddatum'. This allows you to request multi-day projects in CrewPlanner. -
Event name = Project name
The name you give to the assignment will be adopted as the name of the project. -
Number of people = Additional information
The number of persons entered on an offer refers to the number of guests. As this information can be used to determine how many staff are needed, it is displayed in CrewPlanner in the Additional information field. -
Reference = Additional information
The information you enter in the field 'Referentie' will appear in the Additional information field of the project (this field only appears if you select the pencil icon when entereing the event information). -
Event planning = Project timing + shift times + shift functions
The section 'Event planning' allows you to add both project timing and shifts to the project. You can read how in the next chapter.
Customer = Company
Note that the client for whom the quotation was created can only be recognised by CrewPlanner if the name is the same 1:1. If the name is not recognised, no project request will be created as a result.
Location = Project address
If you enter an address in the Field 'Location', CrewPlanner will recognise it as the Project address. If you leave this field blank, the Address unknown option will be ticked for the project.
Event date = Project date
Without a date, no information will be sent. The 'Eventdatum' will count in CrewPlanner as the Project date.
End date = Creation of Recurring project
If you enter an 'Einddatum' on your quotation, a project will be created on each day between the 'Eventdatum' and the 'Einddatum'. This allows you to request multi-day projects in CrewPlanner.
Event name = Project name
The name you give to the assignment will be adopted as the name of the project.
Number of people = Additional information
The number of persons entered on an offer refers to the number of guests. As this information can be used to determine how many staff are needed, it is displayed in CrewPlanner in the Additional information field.
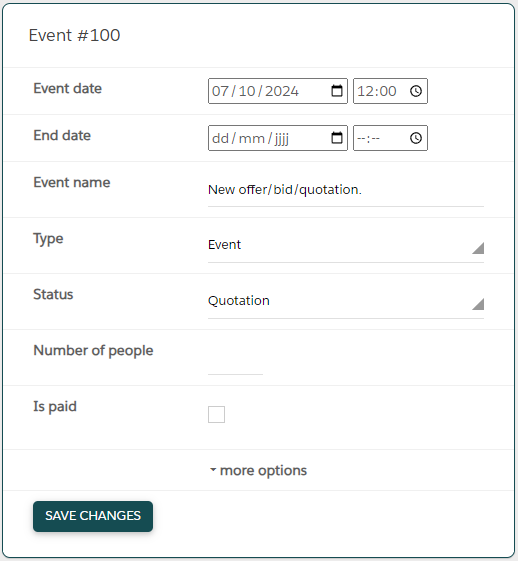
Reference = Additional information
The information you enter in the field 'Referentie' will appear in the Additional information field of the project (this field only appears if you select the pencil icon when entereing the event information).

Event planning = Project timing + shift times + shift functions
The section 'Event planning' allows you to add both project timing and shifts to the project. You can read how in the next chapter.
Add event planning
Through the event planning section, as indicated earlier, you can add both project timing and shifts to the quotation, which is then carried over into the project.
How to proceed:
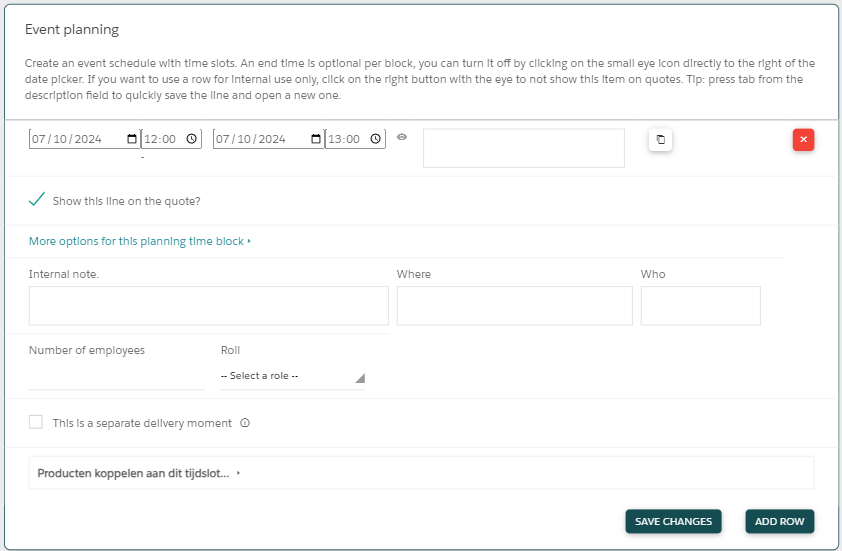
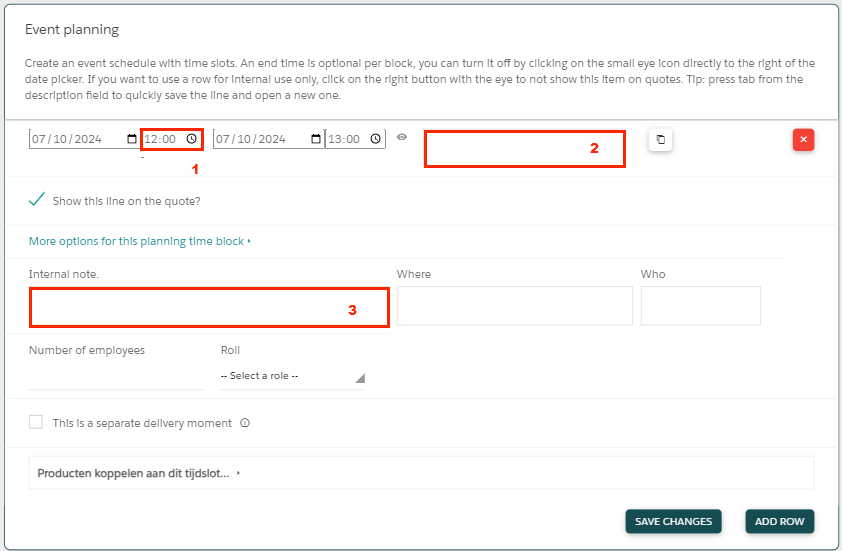
Select 'rij toevoegen' and then ‘Meer opties voor dit planningstijdsblok’ and the following overview will appear:
Add project timing
To add project timing to the quotation so that it is displayed correctly in the project:
-
Enter a time slot.
-
In the box to the right of the hours, enter the formula you want to use. If you want to use existing formulas from CrewPlanner, you will have to enter them here as they are known in CrewPlanner.
-
You can add a comment using the 'Interne opmerking' box.
Enter a time slot.
In the box to the right of the hours, enter the formula you want to use. If you want to use existing formulas from CrewPlanner, you will have to enter them here as they are known in CrewPlanner.
You can add a comment using the 'Interne opmerking' box.
CrewTip! Event planning and shifts must be added completely separately in Catermonkey. Use ADD ROW in Catermonkey to create a new row for each. Fill in the project timing and shift details in separate rows, ensuring you save each one separately. If you fill in the shift details in a row, it will NOT push the project timing from the same row.
Add shifts
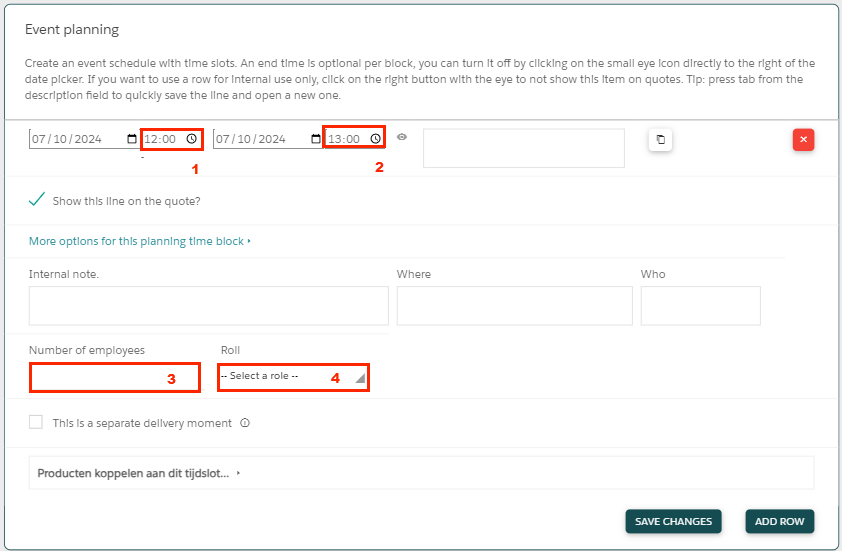
To add shifts to your quotation, which are automatically carried over to the Add Crew section of a project:
-
Enter the starting hour.
-
As well as the end time of the shift.
-
Here you note how many employees or shifts you need for this function.
-
Select the function of the shifts you wish to add. The names of these roles must again correspond one-to-one with the shift functions in CrewPlanner in order to be linked. You manage your roles in Catermonkey via your settings.
Enter the starting hour.
As well as the end time of the shift.
Here you note how many employees or shifts you need for this function.
Select the function of the shifts you wish to add. The names of these roles must again correspond one-to-one with the shift functions in CrewPlanner in order to be linked. You manage your roles in Catermonkey via your settings.
Press RIJ TOEVOEGEN to add more timing or shifts and finally press WIJZIGINGEN OPSLAAN to save.
Where to find confirmed quotations in CrewPlanner
Once you have activated the integration in CrewPlanner, as a manager you can add a new module called EXTERNAL APPROVED QUOTES on your dashboard. You can read how here.
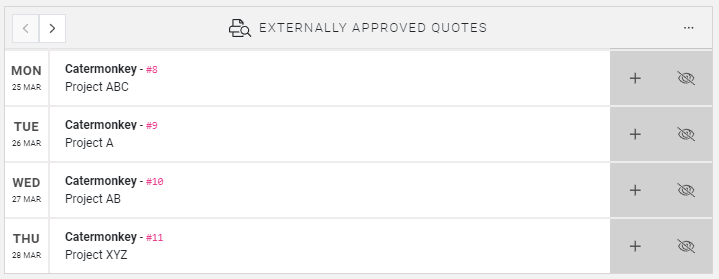
As soon as the status of a quotation in Catermonkey is changed to a status you selected when setting up the integration, the information is sent to CrewPlanner and the quote appears in the previously mentioned dashboard module.
CrewTip! We automatically retrieve all Catermonkey quotations from 30 days before the present day and up to 3 years after as long as they are marked as event, and this up to a 1000 quotations.
This way, we stay up-to-date with upcoming events and can plan more efficiently!
The module offers you 3 options:
-
Accept: select the plus sign to accept the quote, after which you can create the project.
Accept: select the plus sign to accept the quote, after which you can create the project.

-
Ignore: use the icon below to ignore the quote. Note that after you confirm, the quote disappears from the module and you can no longer create a project for it.
Ignore: use the icon below to ignore the quote. Note that after you confirm, the quote disappears from the module and you can no longer create a project for it.

View quote: select the relevant quote and a pop-up opens allowing you to view more information. Select the black bar with VIEW IN CATERMONKEY to reopen the quote in Catermonkey, if you have access to do so. Or use the buttons at the bottom to create the project as yet or ignore the quote.
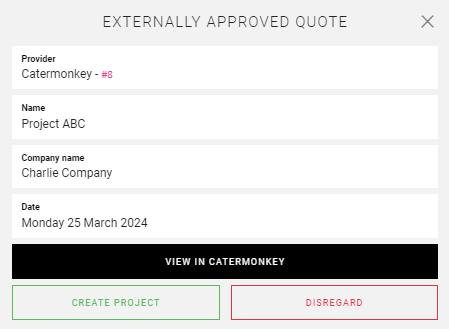
CrewTip! Quotes are arranged by Event or Project date, starting with the quote or event that takes place first. Use the arrows in the top-left corner to navigate to later quotes.
Create a project from a confirmed quote
As discussed in the previous chapter, you accept a quote by selecting the plus sign or the CREATE PROJECT button in the EXTERNAL APPROVED QUOTES dashboard module in the pop-up.
After this, the project opens with the information entered in Catermonkey displayed in the linked fields.
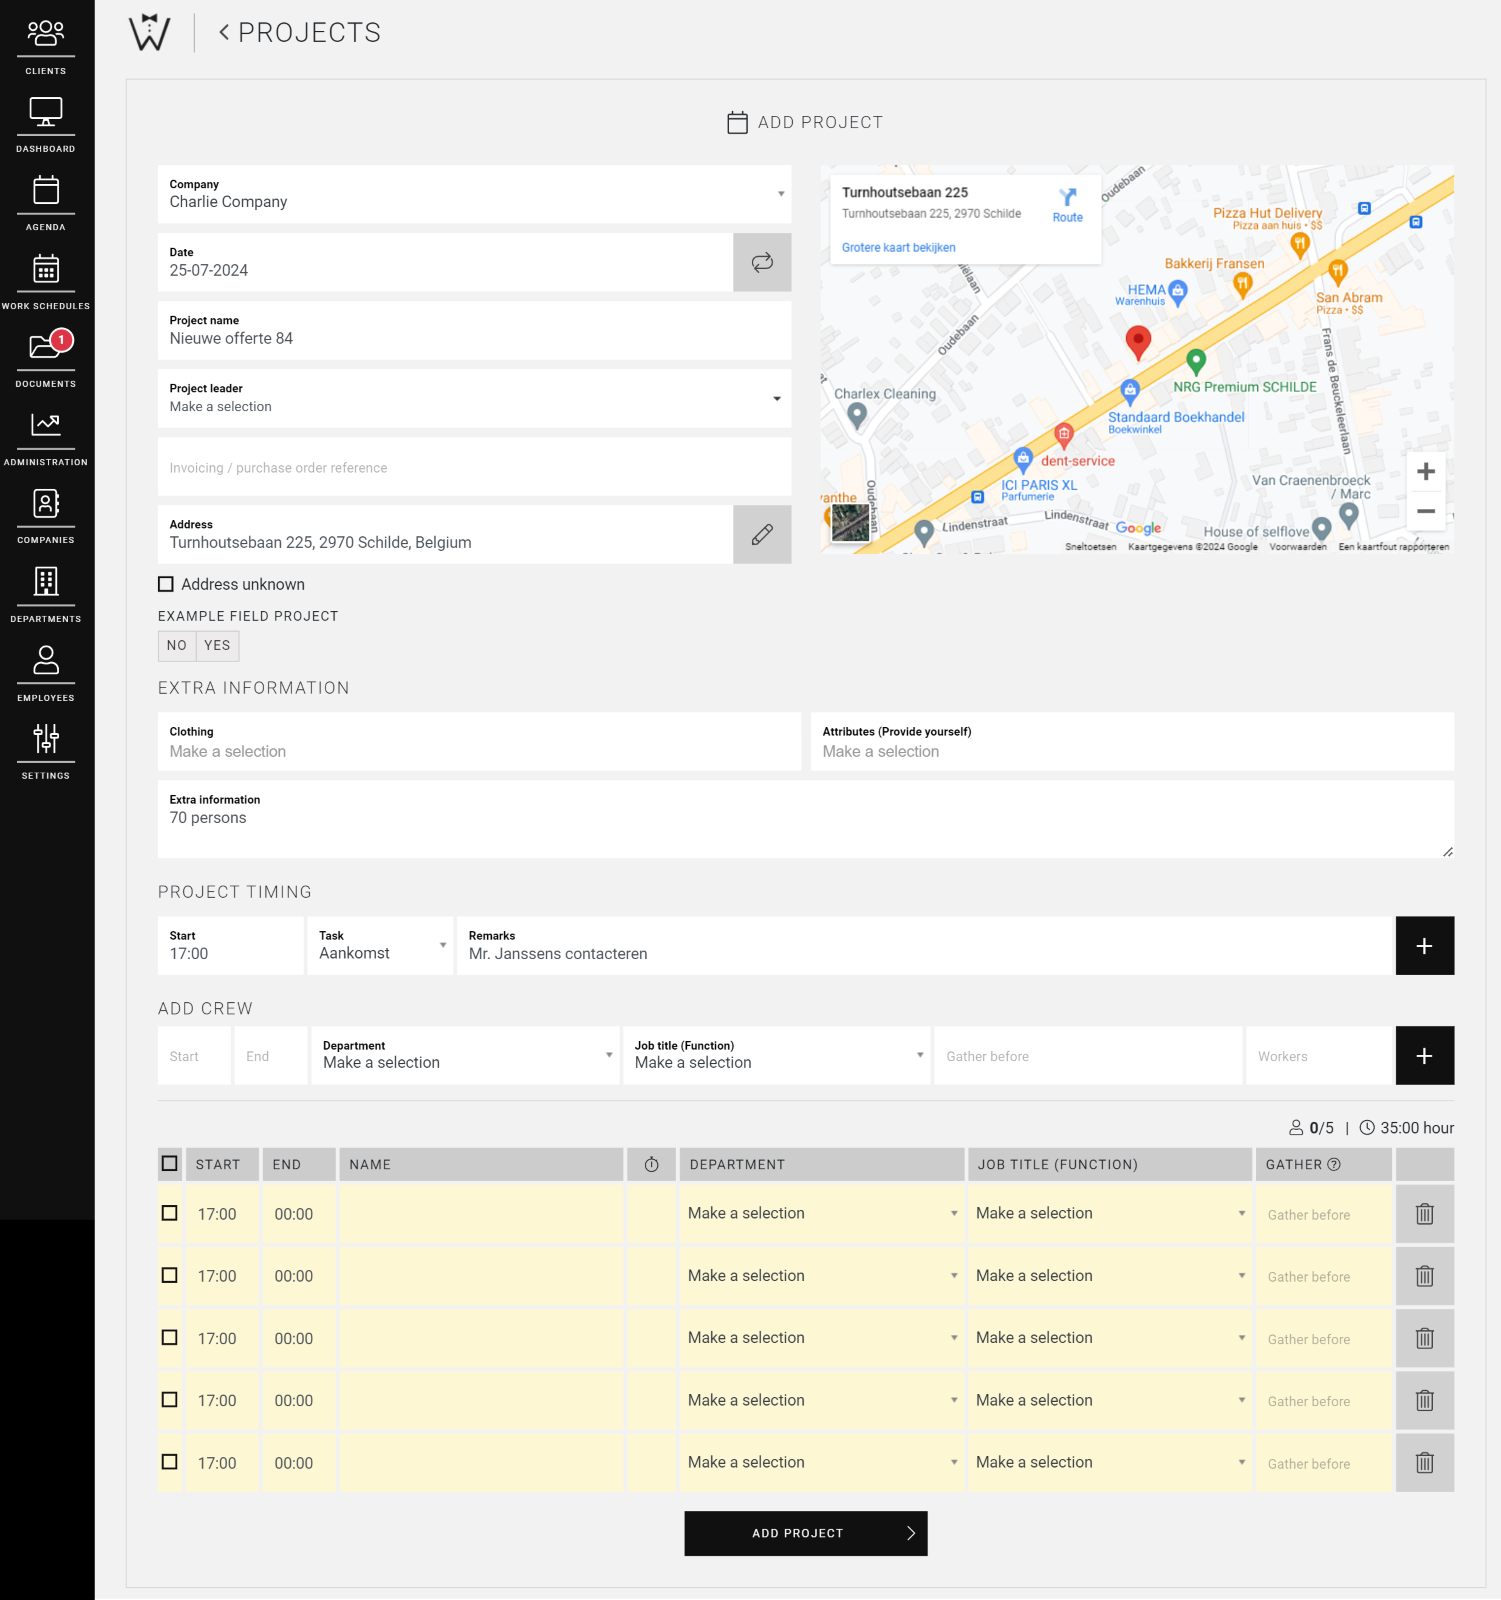
How to continue creating a project is explained here.
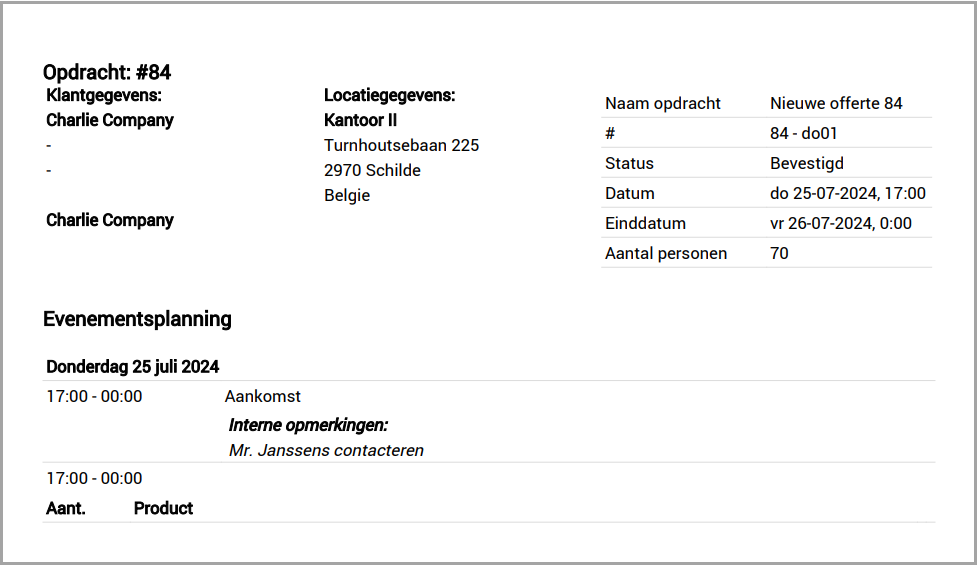
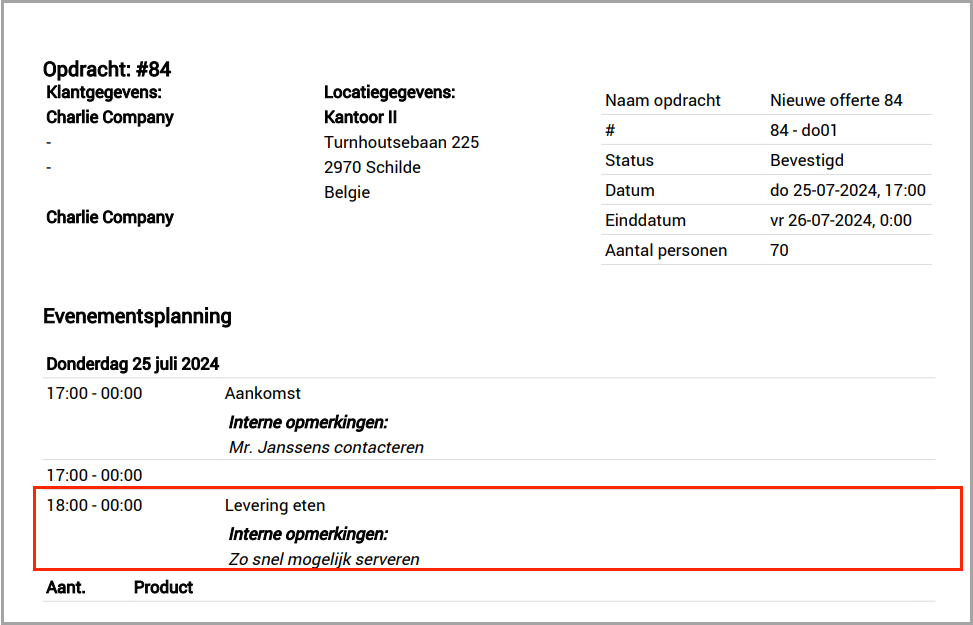
You will also find in the DOCUMENTS tab of the project an order summary with the information from Catermonkey.
Modify, delete or cancel a quote
If a quote is modified, deleted or cancelled in Catermonkey, the quote is only automatically modified or deleted from CrewPlanner if it has not yet been accepted and a project created.
Once a quote has been accepted and a project has been created, the project linked to this quote will NOT automatically update or disappear from CrewPlanner and will therefore have to be followed up manually.
Once a change has been made in Catermonkey, it will be indicated in the project in CrewPlanner by a red dot next to VIEW.
CrewTip! If you have just made changes in Catermonkey and they are not yet visible in CrewPlanner, navigate to the dashboard page in CrewPlanner and refresh it to push the changes through.
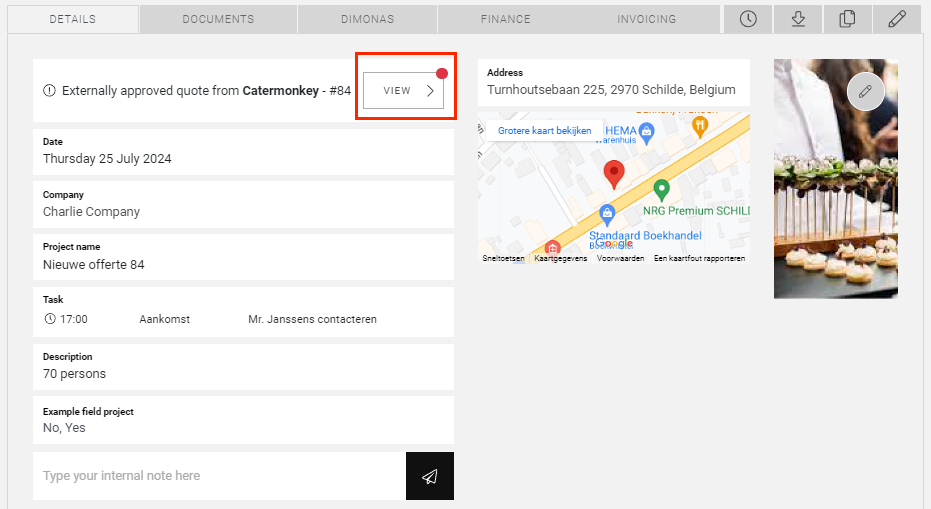
If you select this, the quote pop-up will open:
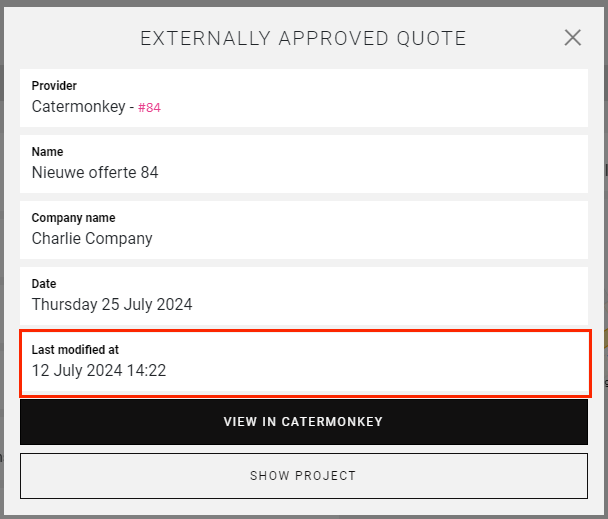
Here you can consult when the quote was last modified.
What was changed can be consulted in the order overview found in the DOCUMENTS tab. This document is always updated with the latest information.
We hope this article has helped you!
If you still have questions, take a look at our Crew Academy first. You might find the answer in one of our articles.


