Create a project
Learn the ins & outs of creating a project here!
Learn the ins & outs of creating a project here!
Table of contents
Create a project via the dashboard
Create a project via the agenda
A project on the employee side
Introduction
In this article, we will look at where you can create a project and the options you have when creating a project.
Where can I create a project
There are two different pages where you can create a project, on the DASHBOARD and on the AGENDA page.
Create a project via the dashboard
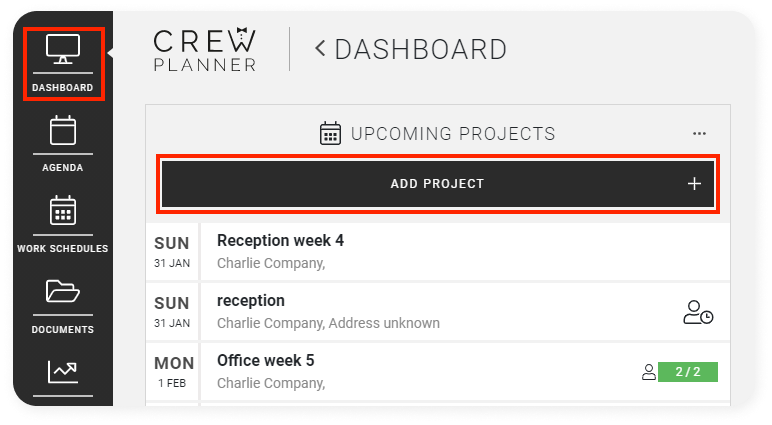
In the DASHBOARD you have several modules. At the top of the module UPCOMING PROJECTS you will find ADD PROJECT. If you select this, you will be redirected to the page where you can create a project.
CrewTip! If UPCOMING PROJECTS is not on your dashboard, you can add this module. How you do this, is explained here.
Create a project via the agenda
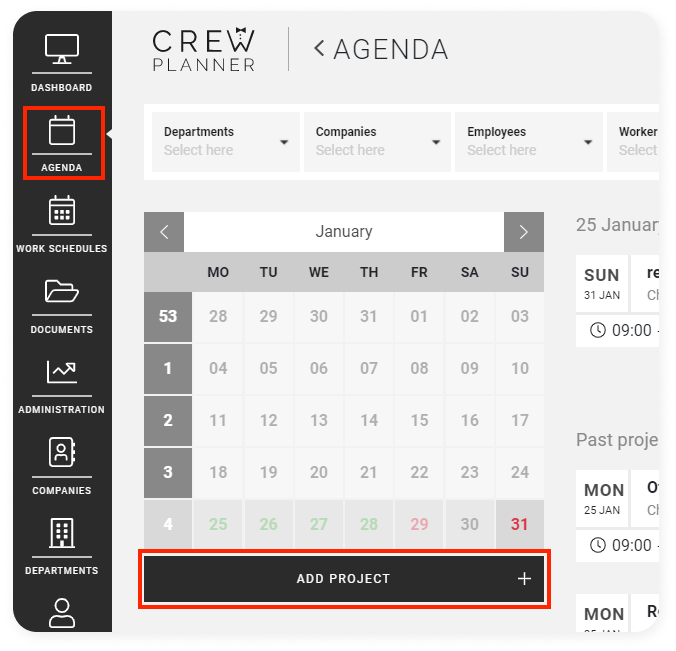
If you go to AGENDA in the menu bar, you will see ADD PROJECT in the bottom left corner of your calendar. If you select a specific day and then select ADD PROJECT, this date is already set on the page where you can create the project.
However, if you selected a week or month, the period is not filled in.
More information about creating recurring projects can be found here.
Create a project
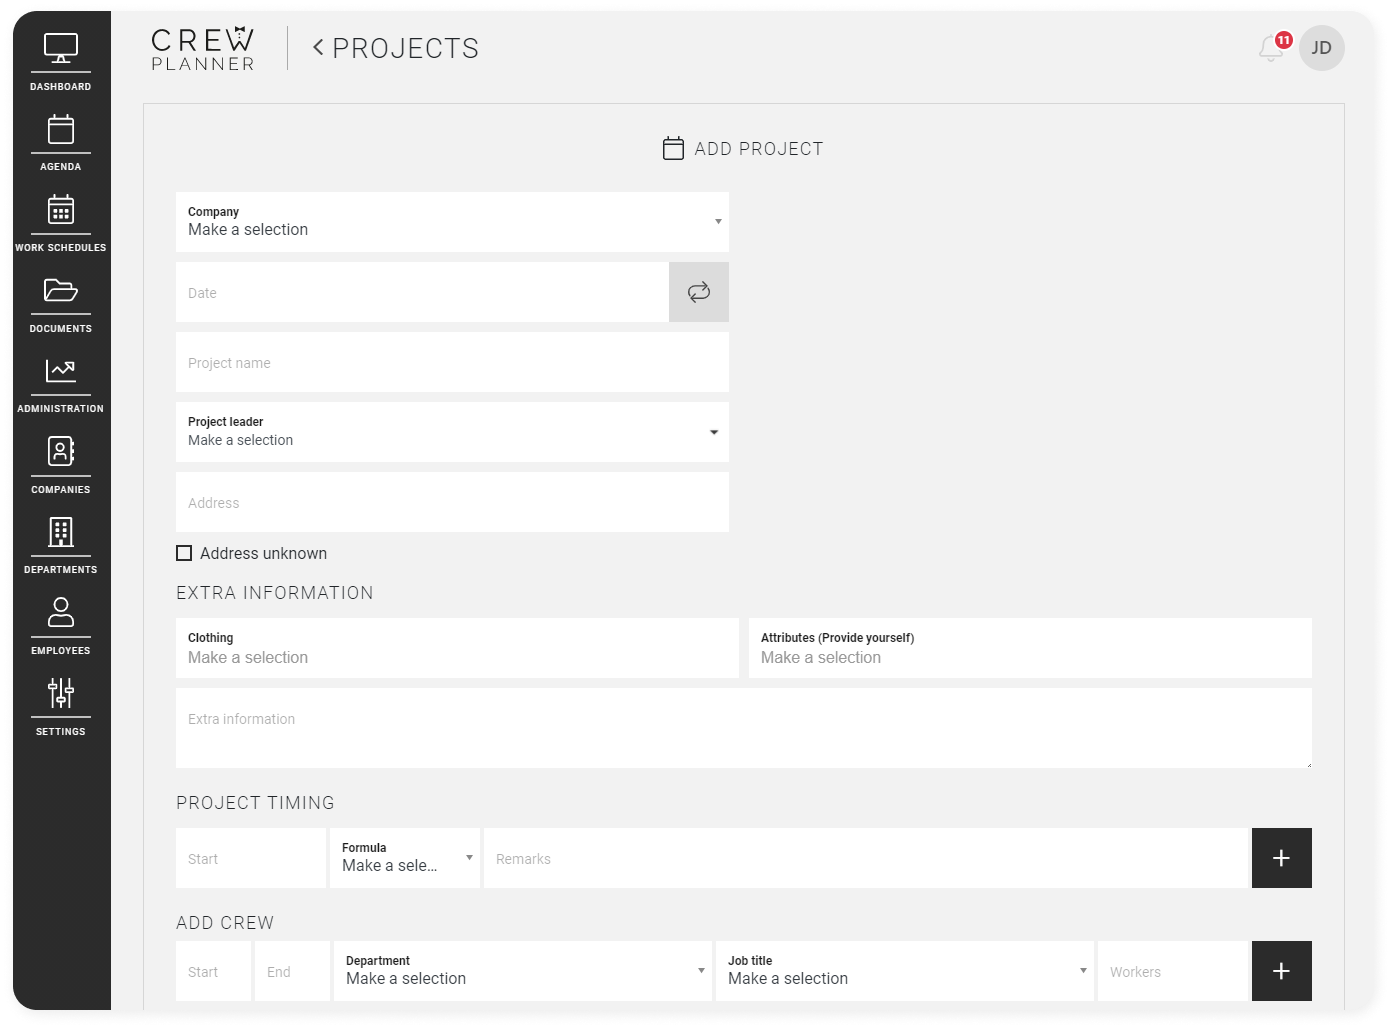
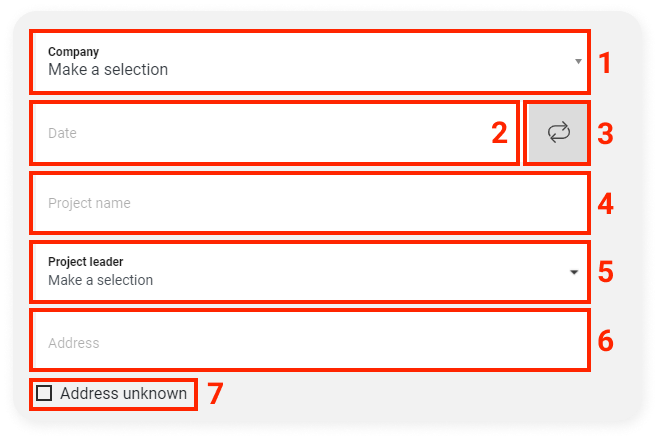
After selecting ADD PROJECT in the dashboard or the agenda you will see the following:
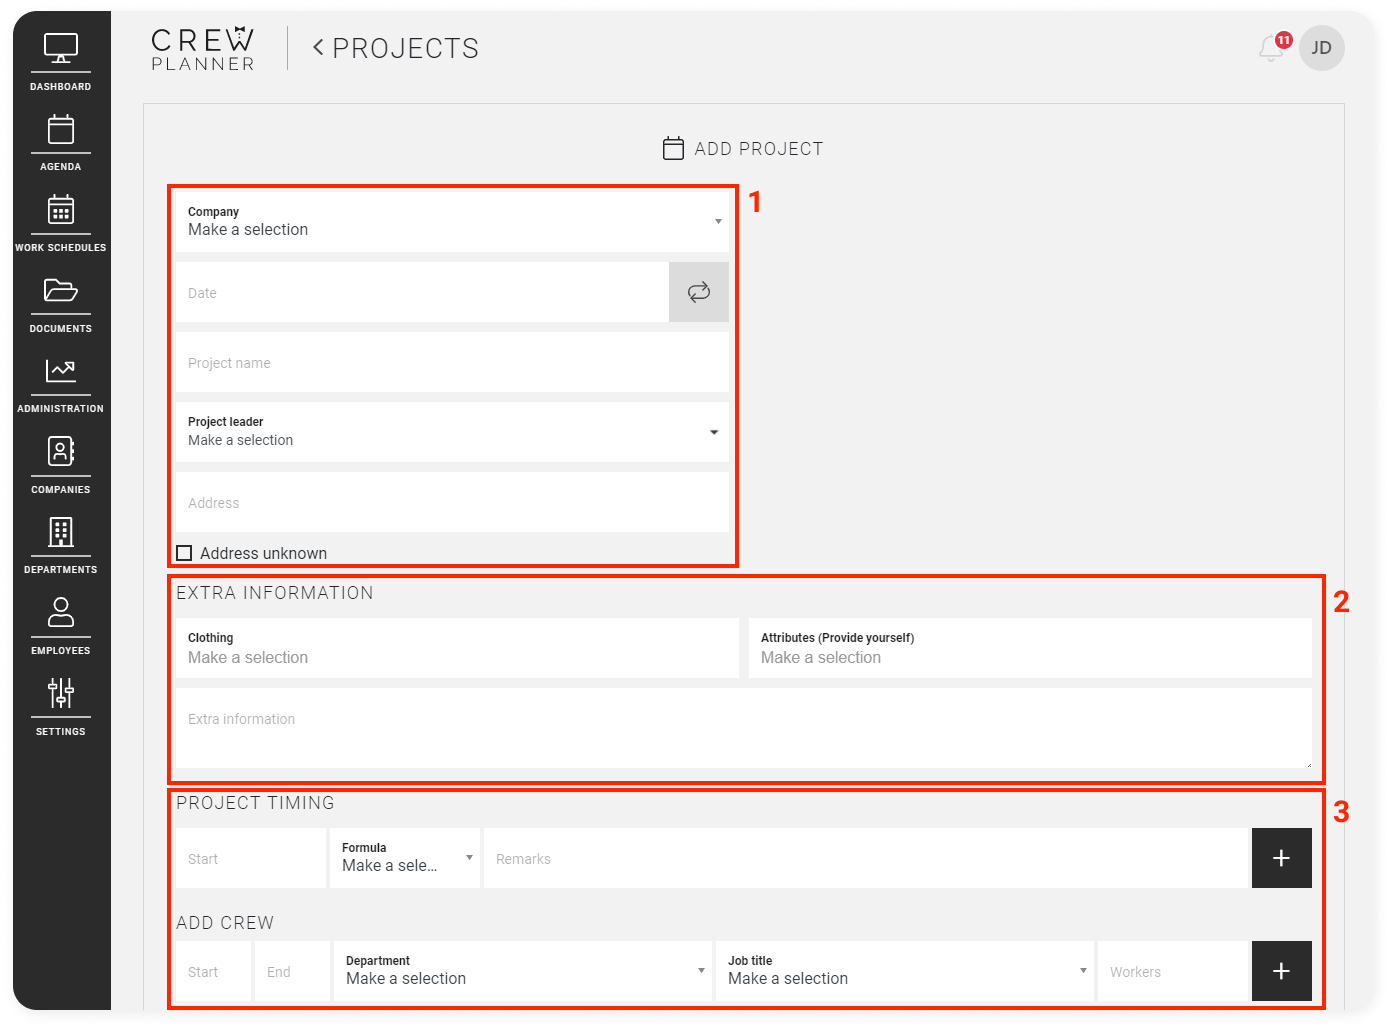
General information
-
Company: you select the customer for whom the project will be executed. How to create companies you find here. Or if you create a project for a new customer, you can easily add this company by entering the name and clicking add:
-
Date: you select the date on which the project takes place.
CrewTip! If you create a project incorrectly with a date in the past, you will only be able to delete this project for a period of 24h. After this period, you will no longer be able to delete the project or change the date. You will receive the following warning:
-
Recurring project: This way you can create a project that recurs on a regular basis. If this time-saving way to create repeating projects is right for you, you can read more about it in this article.
-
Name of the project: this is, like the title indicates, the name of the project
-
Project leader: this is the person responsible for this project and possibly, depending on your procedures, also the contact person for the employees working on this project. A project leader can access all the projects for which he is responsible in the app. Moreover, this person will be able to clock in and out all employees who are scheduled on the project and will be able to enter the timekeeping for this project.
CrewTip! A project leader has the same functionalities and rights as a supervisor, but he does not need to be scheduled on the project.
-
Address: this field is linked to 'Google Maps'. Once you start typing, suggestions are made. Read this article if you need help filling in the address.
CrewTip! When you select a customer that already existed, the address used in the last created project for this customer will be automatically entered here. You can of course adjust this if needed.
-
Address unknown: if you have a project that, for example, is planned further in the future and no definitive address is known yet, you can tick this box. A number of different times before the start of the project, you will be reminded to fill in this address, as your employees will of course need this information.
Company: you select the customer for whom the project will be executed. How to create companies you find here. Or if you create a project for a new customer, you can easily add this company by entering the name and clicking add:

Date: you select the date on which the project takes place.
CrewTip! If you create a project incorrectly with a date in the past, you will only be able to delete this project for a period of 24h. After this period, you will no longer be able to delete the project or change the date. You will receive the following warning:

Recurring project: This way you can create a project that recurs on a regular basis. If this time-saving way to create repeating projects is right for you, you can read more about it in this article.
Name of the project: this is, like the title indicates, the name of the project
Project leader: this is the person responsible for this project and possibly, depending on your procedures, also the contact person for the employees working on this project. A project leader can access all the projects for which he is responsible in the app. Moreover, this person will be able to clock in and out all employees who are scheduled on the project and will be able to enter the timekeeping for this project.
CrewTip! A project leader has the same functionalities and rights as a supervisor, but he does not need to be scheduled on the project.
Address: this field is linked to 'Google Maps'. Once you start typing, suggestions are made. Read this article if you need help filling in the address.
CrewTip! When you select a customer that already existed, the address used in the last created project for this customer will be automatically entered here. You can of course adjust this if needed.
Address unknown: if you have a project that, for example, is planned further in the future and no definitive address is known yet, you can tick this box. A number of different times before the start of the project, you will be reminded to fill in this address, as your employees will of course need this information.
Extra information

-
Clothing: mandatory dress code
If you click on the field below, and you have already added clothing for example to your attributes, you will get a list here from which you can make a selection:
If you want to add a new clothing rule, just start typing and select ADD:
This complete list of clothing can also be found in ATTRIBUTES in SETTINGS. Here you can also add clothing instructions and if you only needed something once, remove it from the database.
-
Attributes (Provide yourself)
If you select this field, you also get a list of attributes that you have already added:
As with clothing, it is again possible to add something by typing and then selecting ADD:
The complete list of attributes can also be managed under ATTRIBUTES in SETTINGS.
-
Extra information: here you have the possibility to communicate other additional information to your employees. Information about the daily schedule is added below, as will be discussed in a moment.
Clothing: mandatory dress code
If you click on the field below, and you have already added clothing for example to your attributes, you will get a list here from which you can make a selection:

If you want to add a new clothing rule, just start typing and select ADD:

This complete list of clothing can also be found in ATTRIBUTES in SETTINGS. Here you can also add clothing instructions and if you only needed something once, remove it from the database.
Attributes (Provide yourself)
If you select this field, you also get a list of attributes that you have already added:

As with clothing, it is again possible to add something by typing and then selecting ADD:

The complete list of attributes can also be managed under ATTRIBUTES in SETTINGS.
Extra information: here you have the possibility to communicate other additional information to your employees. Information about the daily schedule is added below, as will be discussed in a moment.
Add project and crew timing

1. Project timing
This is a handy way to display the course of your event for your employees in a brief overview using formulas. All formulas for which employees are scheduled are entered in their profile (see: employee pop-up), so you can easily see who already has experience with specific formulas.
In the box with Start you enter the start time of a task and select or create the appropriate task. For example, a list of the tasks may look like this:
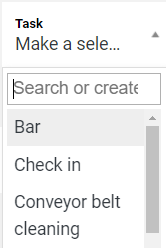
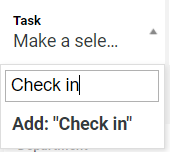
You can add new options here again. Simply start typing and then select ADD:
If you wish to add an additional line with a different formula, click the plus sign. An example of a project timing looks like this:

2. Add a crew
Adding the shifts is the last crucial part of a project. We explain this with the use of departments, you find more information about departments here. If you have chosen to work without the departments, you will still follow the same principle as described below, without the departments.
-
You start by entering the start and end time of this shift.
-
Then select a department. After you have created this project, the shifts of the employees who are in this department will appear in the app. This way, the right employees are contacted to work.
-
After entering the department, select a Job title. Like departments, the job title helps you schedule the right person for the right shift. You have the option to choose from existing job titles, but you can also add job titles that have not yet been created.
If you click on Add: "Sous-chef", you create a new job title. An overview of these job titles can be found under SHIFT FUNCTIONS in SETTINGS.
CrewTip! The job titles that are linked to shifts on which you schedule employees, are listed in their skills, just like the formulas, in the employee pop-up. When planning, you have the option to group the projects by 'Function'. You will find more information about this here.
-
Finally, you determine how many employees you need who work from start to end time, who are in a particular department and who must perform the selected job title.
-
If you wish to add extra shifts, click on the white plus sign on the right. An elaborated example looks like this:
CrewTip! You can add a maximum of 250 shifts per project. If you add more, you will receive an error message as soon as you select ADD PROJECT at the bottom.
-
It is always advisable to go over your project again in order to be as clear and complete as possible for your employees. All that remains is to create the project. To do so, click on this button:
You start by entering the start and end time of this shift.
Then select a department. After you have created this project, the shifts of the employees who are in this department will appear in the app. This way, the right employees are contacted to work.
After entering the department, select a Job title. Like departments, the job title helps you schedule the right person for the right shift. You have the option to choose from existing job titles, but you can also add job titles that have not yet been created.
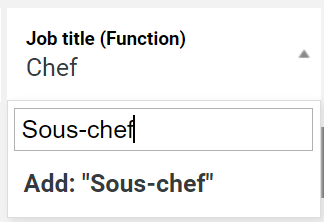
If you click on Add: "Sous-chef", you create a new job title. An overview of these job titles can be found under SHIFT FUNCTIONS in SETTINGS.
CrewTip! The job titles that are linked to shifts on which you schedule employees, are listed in their skills, just like the formulas, in the employee pop-up. When planning, you have the option to group the projects by 'Function'. You will find more information about this here.
Finally, you determine how many employees you need who work from start to end time, who are in a particular department and who must perform the selected job title.
If you wish to add extra shifts, click on the white plus sign on the right. An elaborated example looks like this:
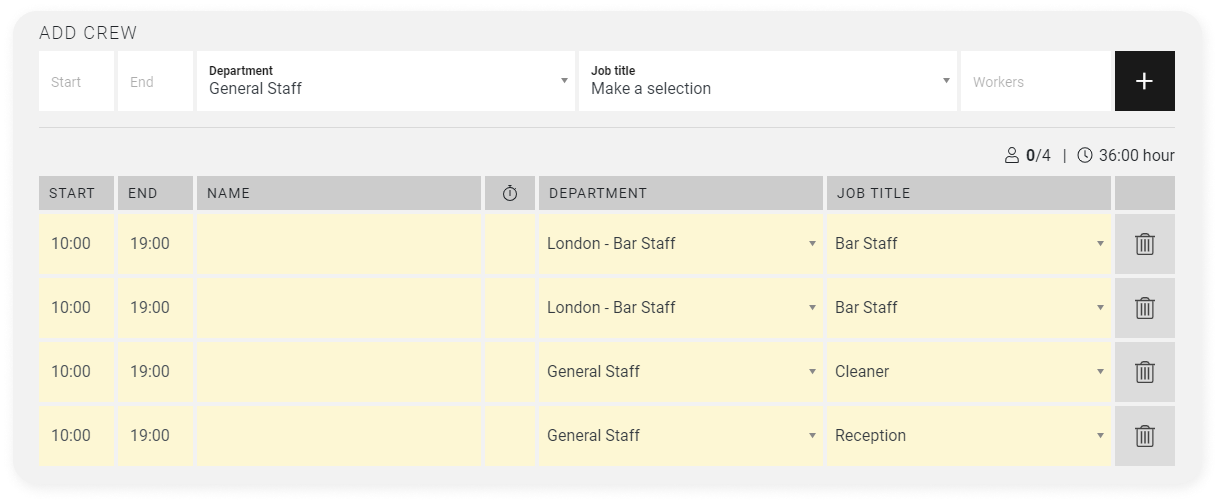
CrewTip! You can add a maximum of 250 shifts per project. If you add more, you will receive an error message as soon as you select ADD PROJECT at the bottom.
It is always advisable to go over your project again in order to be as clear and complete as possible for your employees. All that remains is to create the project. To do so, click on this button:

CrewTip! You can add a comment to a particular shift, so that only the employee scheduled on this shift will receive the comment. More information can be found here.
Edit a project
It is possible to edit your project after it has been added. You will find more information about this here.
Consult a project
Would you like to consult a project and see what else is possible? You can do that here.
A project on the employee side
If you use our functionality to request availability for upcoming projects from your employees through the application, after saving, your new project will be visible to your employees. They can then indicate whether they are interested in the available shifts.
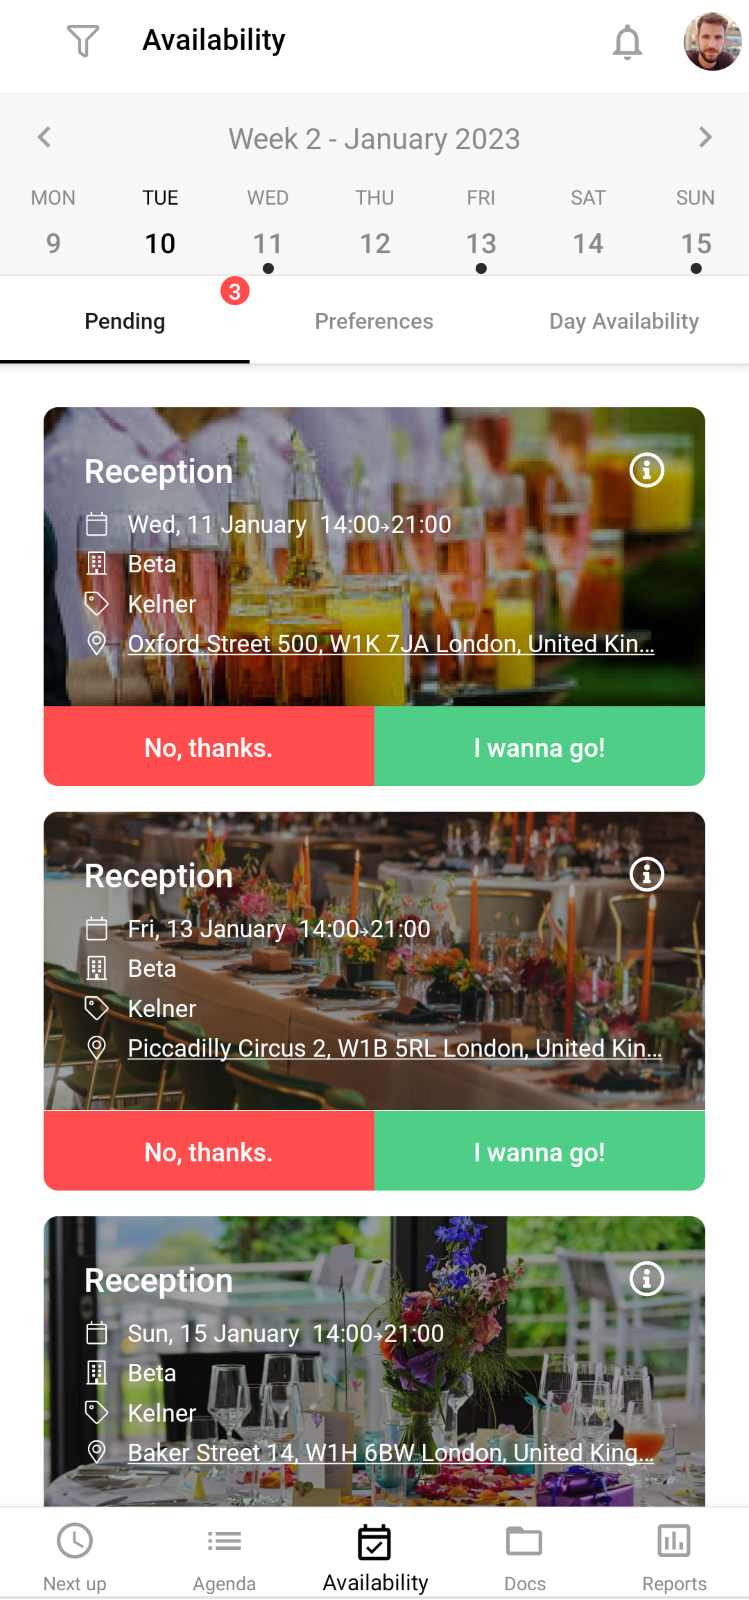
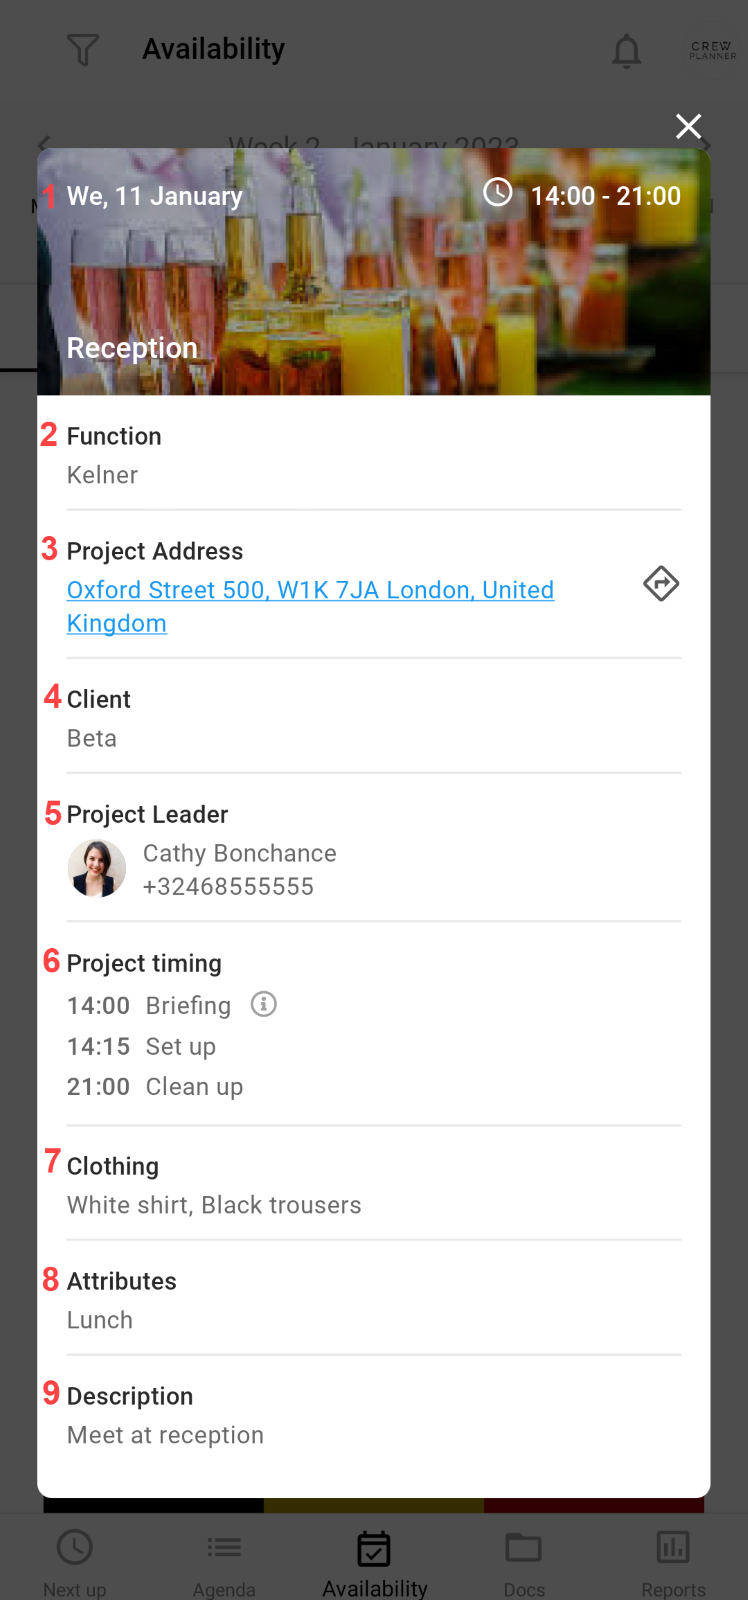
The information entered related to this project can also be viewed by the employee.
-
Date, timing and name of the project
-
Function of the shift
-
Project Address: if your employee selects the address, a route planner will start
-
Client
-
Project Leader and their contact details
-
Project Timing: here the tasks are displayed
-
Clothing
-
Attributes that an employee must provide themselves
-
Description: the information you have filled in at Extra information when creating the project.
Date, timing and name of the project
Function of the shift
Project Address: if your employee selects the address, a route planner will start
Client
Project Leader and their contact details
Project Timing: here the tasks are displayed
Clothing
Attributes that an employee must provide themselves
Description: the information you have filled in at Extra information when creating the project.
Would you like to learn more about our employee application? Consult our articles on how to use the employee application in our Crew Academy.
We hope this article has helped you!
If you still have questions, take a look at our Crew Academy first. You might find the answer in one of our articles.


