Departments
Great planning starts with a well thought out structure, for which you can use department groups and departments.
Table of content
Difference between a department group and a department
Assign employees to a department and manage them
Assign a department to a department group
Managers' permissions and department groups
Introduction
Planning should and can be simple. That is why creating a good structure using department groups and departments that best corresponds to how your business works is very important. Your layout will determine how you can group, easily manage and schedule employees with desired characteristics.
Dividing employees into departments will also determine which shifts are shown to employees via the app. Once you have created a project, the employee will be able to view these shifts immediately via the Availability page, if they are part of the department you created the shift for.
Provided you have the necessary permissions, you manage your departments on the DEPARTMENTs page from the menu bar. A default department was created by CrewPlanner containing all active employees. You can change this department as required, create multiple departments or start by creating department groups. If desired, you can then assign or copy departments to a department group.
In addition, you can restrict managers' permissions to managing one or more department groups. You can read how to proceed in this article.
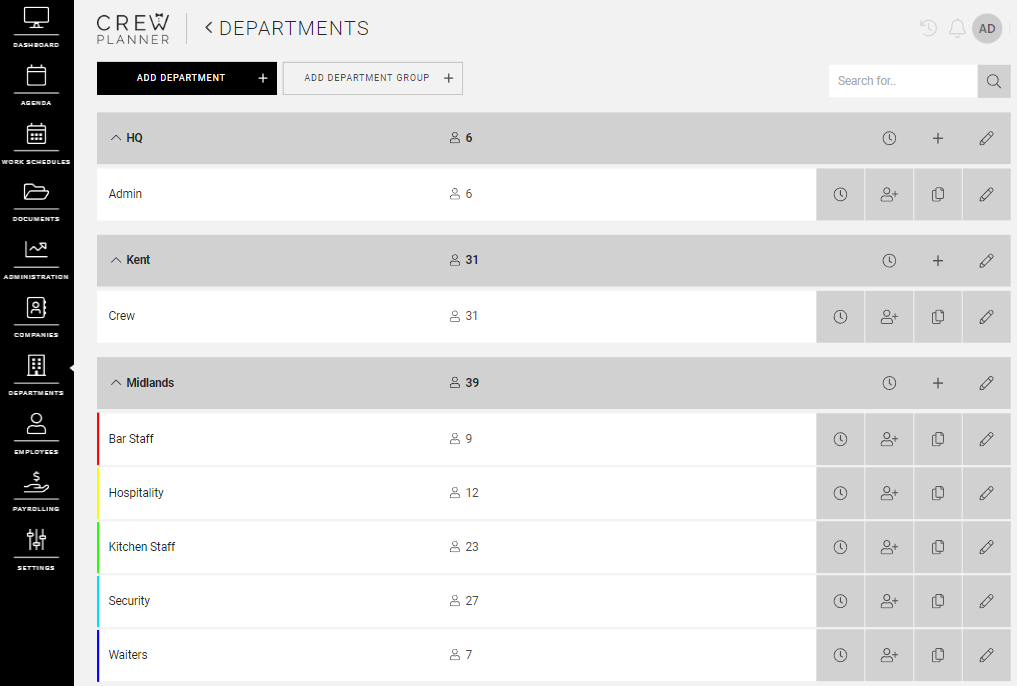
Difference between a department group and a department
A department group, as the word suggests, is a method of grouping departments with similar characteristics. Departments can be the same in each group, or they can be unique to a particular group. You can even use departments that are not assigned to any group.
If you wish, you can assign an address to a group, which will then be linked to its departments. This allows you to group departments with the same location, for example. Both department and department group names can be set in the 4 languages CrewPlanner supports.
Employees can be assigned to several departments in different groups, but employees cannot be assigned directly to a group, only to a department.
You can divide your structure into department groups and/or departments in many different ways.
Here are a few examples:
-
HQ
-
Managers
-
Staff
-
-
London
-
Kitchen
-
Transport
-
-
Store
-
Office
-
Warehouse
-
Sales
-
HQ
-
Managers
Managers
-
Staff
Staff
London
-
Kitchen
Kitchen
-
Transport
Transport
Store
-
Office
Office
-
Warehouse
Warehouse
-
Sales
Sales
On the DEPARTMENTS page, department groups are presented in a grey bar, departments in a white bar. The departments in a group are listed alphabetically under this group.

Department groups
Department groups help you to have a better overview and distribution of your staff. As mentioned earlier, you can add the same departments to each group or the departments can be unique to a particular group. However, you should always add at least one department to a group as you can only assign employees or financial information to a department.
For example: You work with 4 departments, namely: All round, Room, Bar and Cash desk.
You have projects all over the country and logically, for projects in the west of the country, you do not want to schedule anyone from the east. You can therefore create department groups per region: North, East, Central, South, West.
Add department group
On the DEPARTMENTS page, select ADD DEPARTMENT GROUP at the top:
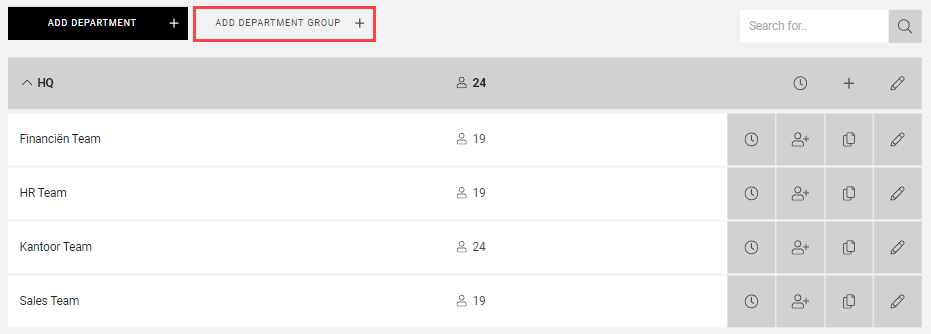
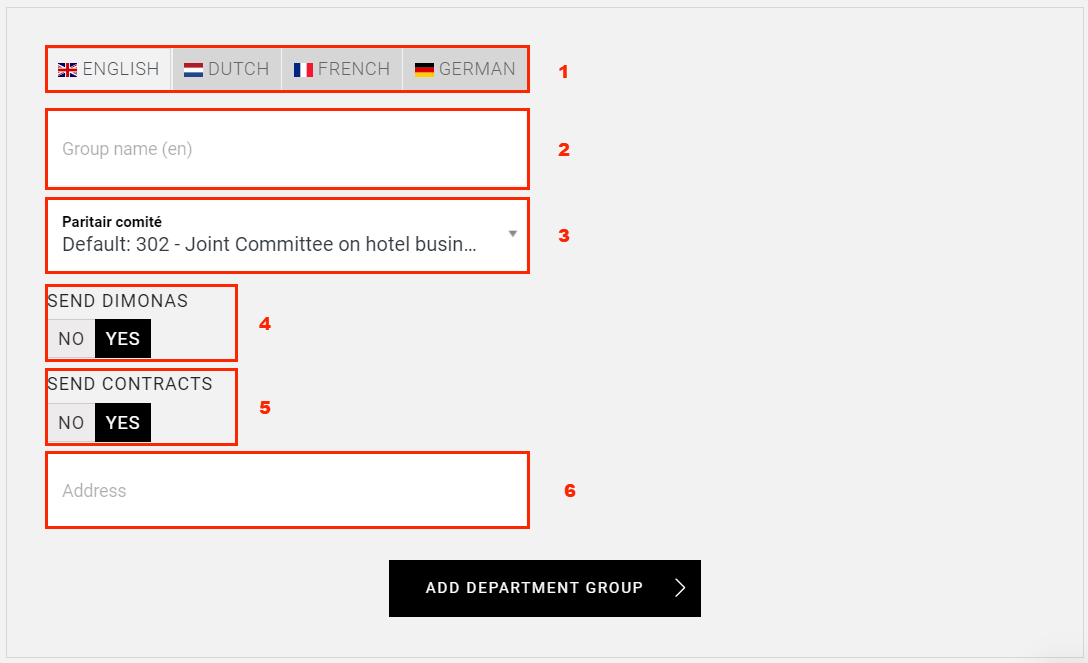
On the next page, enter the following information:
-
Here you have the language options for the group name. If you only enter a name in the first tab English, this name will apply to all languages where no translation has been entered. If you want to use the language function, you have to enter the desired translation for each language. The name displayed is determined by the manager's account language setting.
-
In this field you enter the group name
-
Under Paritair comité (Joint Committee) the committee of your company is taken by default. However, you can change this, so that you can assign a different company to each group. (Applies only to Belgium)
-
Send Dimona's: If you are using our Dimona module, you have the option here to disable this functionality for this department group and all associated departments. For example, if you want to create a group to which you only provide training.
-
Send contracts: If you use our contract module, you have the option here to also disable this functionality for this department group and all associated departments.
-
Here you can enter an address for this group. This address will then be used to calculate the kilometre allowance, if you use 'organised transport'. Or if you are using our gather time functionality, this address will be used as the collection point.
Here you have the language options for the group name. If you only enter a name in the first tab English, this name will apply to all languages where no translation has been entered. If you want to use the language function, you have to enter the desired translation for each language. The name displayed is determined by the manager's account language setting.
In this field you enter the group name
Under Paritair comité (Joint Committee) the committee of your company is taken by default. However, you can change this, so that you can assign a different company to each group. (Applies only to Belgium)
Send Dimona's: If you are using our Dimona module, you have the option here to disable this functionality for this department group and all associated departments. For example, if you want to create a group to which you only provide training.
Send contracts: If you use our contract module, you have the option here to also disable this functionality for this department group and all associated departments.
Here you can enter an address for this group. This address will then be used to calculate the kilometre allowance, if you use 'organised transport'. Or if you are using our gather time functionality, this address will be used as the collection point.
CrewTip! Be ware, because all the information and functionalities above are linked to departments and department groups, it is very important that you first remove your employees from any scheduled shifts before changing departments or department groups, and then reschedule them.
As soon as you add the department group, you will have an overview of all the created groups and any already created departments on the DEPARTMENTS page. You can then link departments to the department group.

Department group icons
In the grey bar of the department group, you have 4 icons next to the name:

-
This is the total number of employees in all departments assigned to this group. Selecting this will take you to the employee overview of this group on the employee page. We will discuss employees later in this article.
-
Via the clock icon you can generate a code for the time clock, this code is only valid for this group. More information about the time clock here.
-
With the plus icon you can add departments to this group. More about this later.
-
After selecting the pencil icon, you can change the name or address of this group. Depending on your settings and activated modules, you may also be able to enter a different gather location or assign Dimona and contract settings to this group.
This is the total number of employees in all departments assigned to this group. Selecting this will take you to the employee overview of this group on the employee page. We will discuss employees later in this article.
Via the clock icon you can generate a code for the time clock, this code is only valid for this group. More information about the time clock here.
With the plus icon you can add departments to this group. More about this later.
After selecting the pencil icon, you can change the name or address of this group. Depending on your settings and activated modules, you may also be able to enter a different gather location or assign Dimona and contract settings to this group.
Modify department group
Once you have created a department group, you can change it and/or add information at any time by selecting the pencil icon on the right-hand side.

After selecting this, you will see at least one tab at the top, GENERAL.
General
In the GENERAL tab, the same information is displayed as when creating a department group, and you can change it here.
Optional tabs
Depending on your settings and the modules you use, you may have a number of additional tabs here, such as GATHER LOCATION, DIMONA, EXACT or EASYPAY. More information can be found in the relevant articles.

Delete department group
You also have the option of deleting a department group. However, this is only possible if no more departments are linked to the department group. Read here how to assign departments to another department group.
Once there are no more departments linked to the department group, select the pencil icon on the right-hand side in the department overview and you will notice that at the bottom, in the GENERAL tab next to save, you have the option DELETE GROUP.
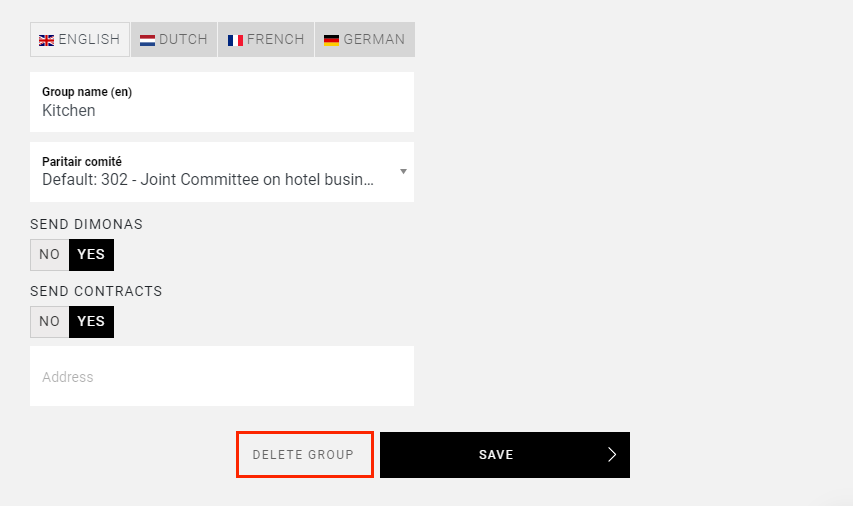
After selecting this, the following pop-up appears:
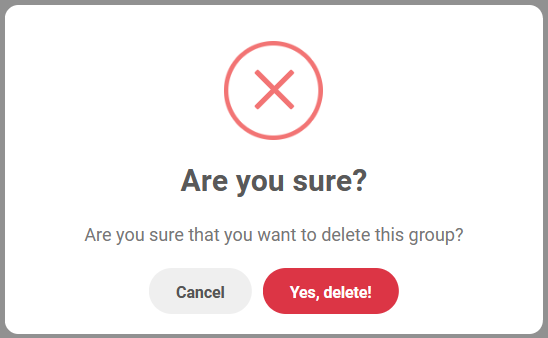
After you confirm, the department group is permanently deleted.
Departments
As mentioned before, the structure you create in CrewPlanner is very important and departments are necessary to classify employees according to the needs of your company. When you first view the departments page, you will notice that a Default Department has already been created, and existing employees are immediately linked to it. This department can be modified according to your needs, but first let us explain how to create a new department and what the department icons can be used for.

Add department
To add new departments, select ADD DEPARTMENTS on the departments page:

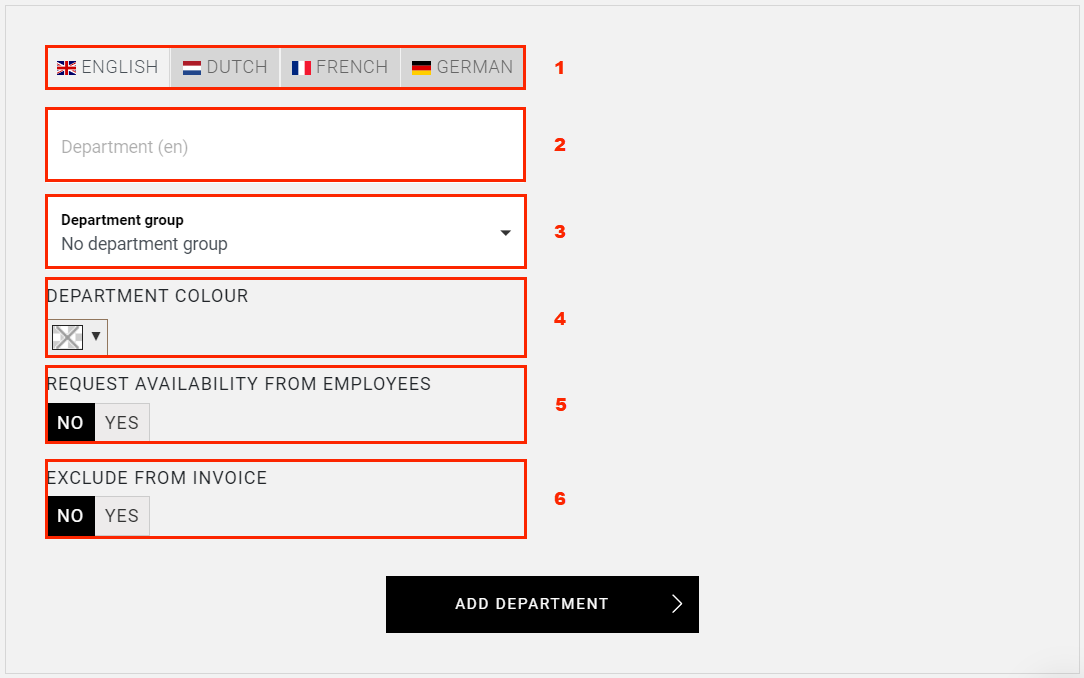
You will then be directed to the page below:
-
As with the department group, here you have the language options for the department name, which are determined by the manager's account language setting. Use the name field in the English tab if you want to use the same name for all languages, or customise the name for each language. If you leave the name field blank for one of the languages, the name from the English tab will be displayed.
-
Under Department, enter the name of our department.
CrewTip! If you want to be able to import data using an Excel or CSV-file, do not use a hyphen "-" in the name of a department.
-
Here you can immediately select a department group to which you want to assign the department. Or you can create a department on its own, without a department group, by selecting No department group.
-
You also have the option of assigning a colour to a department. This makes it easier to see which departments are scheduled in the AGENDA.
CrewTip! If you want to see this department colour in the project overview on the agenda page, you should select Group by Department in the filter.
-
If YES has been selected for Request availability from employees, the employees from this department will be able to share their availability with you for upcoming projects via the employee app. Of course, this functionality does not need to be activated if it does not apply to your company. If you select NO, available projects will not be shown to the employee in the app to share their preferences with you. In addition, no confirmation will be asked when an employee from this department is scheduled nor will the employee be able to withdraw from the shift.
-
If you use our invoicing module, you can also choose to exclude a department from invoicing by selecting YES here. The hours worked or costs for this department will therefore not be included in the invoice.
As with the department group, here you have the language options for the department name, which are determined by the manager's account language setting. Use the name field in the English tab if you want to use the same name for all languages, or customise the name for each language. If you leave the name field blank for one of the languages, the name from the English tab will be displayed.
Under Department, enter the name of our department.
CrewTip! If you want to be able to import data using an Excel or CSV-file, do not use a hyphen "-" in the name of a department.
Here you can immediately select a department group to which you want to assign the department. Or you can create a department on its own, without a department group, by selecting No department group.
You also have the option of assigning a colour to a department. This makes it easier to see which departments are scheduled in the AGENDA.
CrewTip! If you want to see this department colour in the project overview on the agenda page, you should select Group by Department in the filter.
If YES has been selected for Request availability from employees, the employees from this department will be able to share their availability with you for upcoming projects via the employee app. Of course, this functionality does not need to be activated if it does not apply to your company. If you select NO, available projects will not be shown to the employee in the app to share their preferences with you. In addition, no confirmation will be asked when an employee from this department is scheduled nor will the employee be able to withdraw from the shift.
If you use our invoicing module, you can also choose to exclude a department from invoicing by selecting YES here. The hours worked or costs for this department will therefore not be included in the invoice.
To add the new department, press ADD DEPARTMENT.
Department icons
Next to the name of a department, you see 5 icons, some of which are similar to the icons of department groups.

-
This is the number of employees assigned to this department. If you select this, a pop-up opens that allows you to add, delete or copy employees from another department. More on this later.
-
Via the clock icon you can again generate code for the time clock, this time only valid for this department. More information about the time clock here.
-
If you select this icon, a pop-up opens that allows you to manage your employees, as in point 1. If you select this, a pop-up opens which allows you to add, delete or copy employees from another department. More on this later.
-
This icon allows you to copy this department to another department group and give it a new name.
-
The pencil icon allows you to modify department details, delete the department and, depending on your settings and activated modules, add additional financial information. More on this in the next chapter.
This is the number of employees assigned to this department. If you select this, a pop-up opens that allows you to add, delete or copy employees from another department. More on this later.
Via the clock icon you can again generate code for the time clock, this time only valid for this department. More information about the time clock here.
If you select this icon, a pop-up opens that allows you to manage your employees, as in point 1. If you select this, a pop-up opens which allows you to add, delete or copy employees from another department. More on this later.
This icon allows you to copy this department to another department group and give it a new name.
The pencil icon allows you to modify department details, delete the department and, depending on your settings and activated modules, add additional financial information. More on this in the next chapter.
Modify department
As previously mentioned, select the pencil icon on the right-hand side of the department to modify the department.

Next, you are directed to the department file where you have at least one tab at the top, GENERAL.
General
Here you can change all the information previously discussed in the chapter add department.
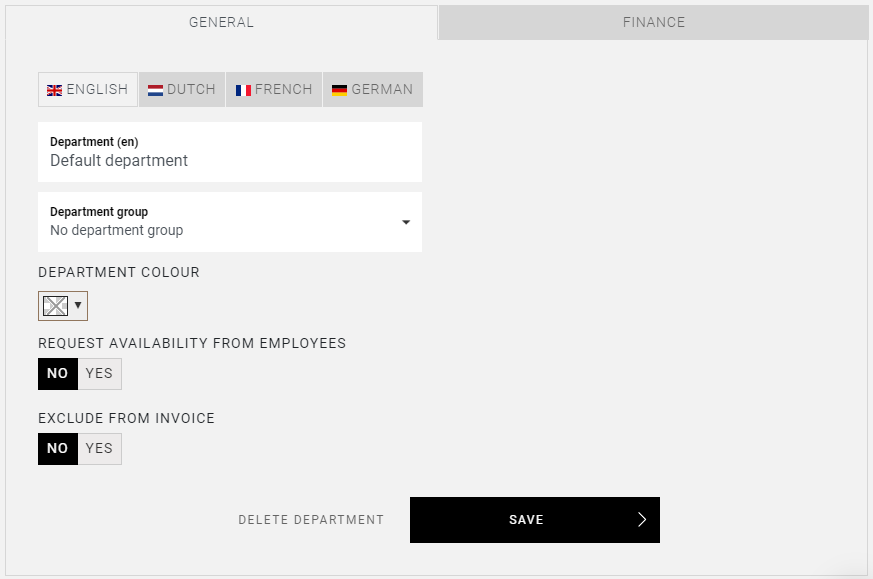
Select SAVE to make these changes.
Optional tabs
Depending on your settings and the modules you use, you may have a number of additional tabs here, such as FINANCE and EASYPAY. More information can be found in the relevant articles.

Delete department
Just as you can add and modify departments, you can also delete departments. To delete a department, use the pencil icon:

You are taken to the GENERAL tab of the department file, where you can see the option DELETE DEPARTMENT at the bottom.
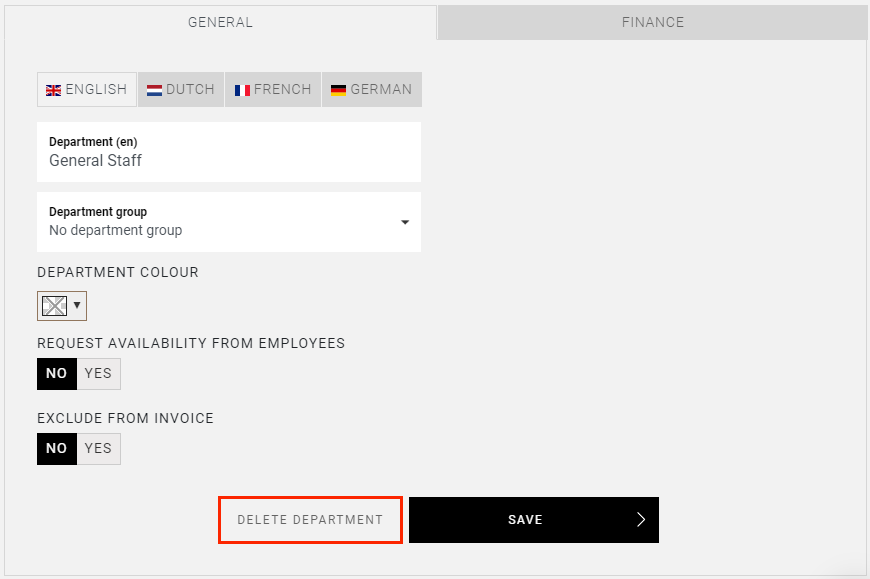
If no employees are added to the department and it is not used in the current or future planning, you can delete the department immediately. If not, the following pop-up appears asking you to select another department so that the departments can be merged. This prevents information from being lost:
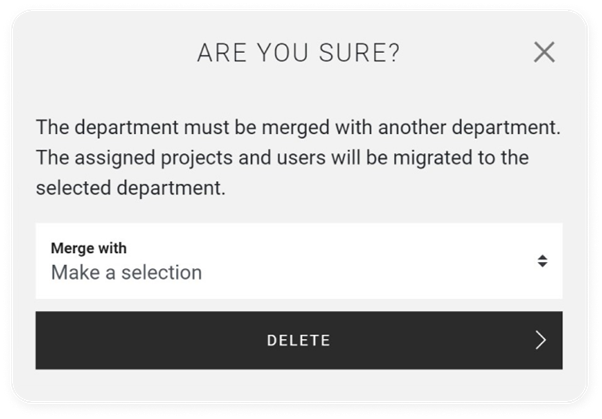
By merging these departments, you ensure, on the one hand, that no problems arise with projects in the future. On the other hand, you prevent employees who are only assigned to this department from disappearing from all departments afterwards.
CrewTip! because all kinds of financial and administrative functionalities are linked to departments and department groups, it is very important that you first remove your employees from any scheduled shifts before changing departments or department groups, and then reschedule them.
Assign employees to a department and manage them
After you have added your departments, you can assign your employees. How to invite, add or import workers in CrewPlanner you can read in the article EMPLOYEES, only then can you assign them to a department.
As discussed earlier, you assign employees to a department by selecting one of the following icons of this department:

This will open the following pop-up:
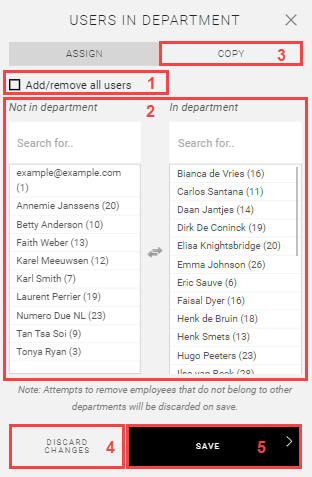
Here you have the following options:
-
Add/remove all users: As soon as you tick this, all employees are assigned to this department. Uncheck it again and all employees will be removed from the department.
-
Manage specific employees: As indicated, the list on the left contains all employees that are not part of the department, the employees on the right have already been assigned to the department. At the top of both lists, you can search for specific employees and then select them. Once you select the name, this person is moved to the other side.
CrewTip! An employee must belong to at least one department. So you can only delete employees from a department if they also belong to another department. If this is not the case, the employee will not be removed and you will have to assign them to another department first.
-
Copy: if you select this, you will be given the option to copy all employees from another department into this one.
-
Discard changes: This option still allows you to undo the changes you made before selecting save.
-
Save: As soon as you select SAVE, the changes are implemented.
Add/remove all users: As soon as you tick this, all employees are assigned to this department. Uncheck it again and all employees will be removed from the department.
Manage specific employees: As indicated, the list on the left contains all employees that are not part of the department, the employees on the right have already been assigned to the department. At the top of both lists, you can search for specific employees and then select them. Once you select the name, this person is moved to the other side.
CrewTip! An employee must belong to at least one department. So you can only delete employees from a department if they also belong to another department. If this is not the case, the employee will not be removed and you will have to assign them to another department first.
Copy: if you select this, you will be given the option to copy all employees from another department into this one.

Discard changes: This option still allows you to undo the changes you made before selecting save.
Save: As soon as you select SAVE, the changes are implemented.
CrewTip! because all kinds of financial and administrative functionalities are linked to departments and department groups, it is very important that you first remove your employees from any scheduled shifts before changing departments or department groups, and then reschedule them.
Assign a department to a department group
As you can only assign employees to departments, a department group must contain at least one department. You can assign a department through 4 different ways:

-
Via the pencil icon next to the department, you are directed to the department file:
In the GENERAL tab you can select the desired department group and after clicking on SAVE, the department appears under the appropriate department group: -
When you select ADD DEPARTMENT, you are directed to a page similar to the one in point 1. However, with this option you create a new department and it will appear under the selected group after saving.
-
By selecting the plus icon next to a group, you can once again create a department. On the next page, however, the department group will already be completed:
Give your new department a name and choose a colour if required, then select ADD DEPARTMENT to create your new department. -
If you select the copy icon, the following pop-up appears:
Here you have the option to copy an existing department and its employees to a department group. You can still change the name of the department here, as this is actually creating a new department.CrewTip! The general settings are also copied. If you use the finance module, the data in the tab FINANCE will not be copied. If you have a connection with our service partner Offix, the settings in the tab EASYPAY will be reduced to the default settings.
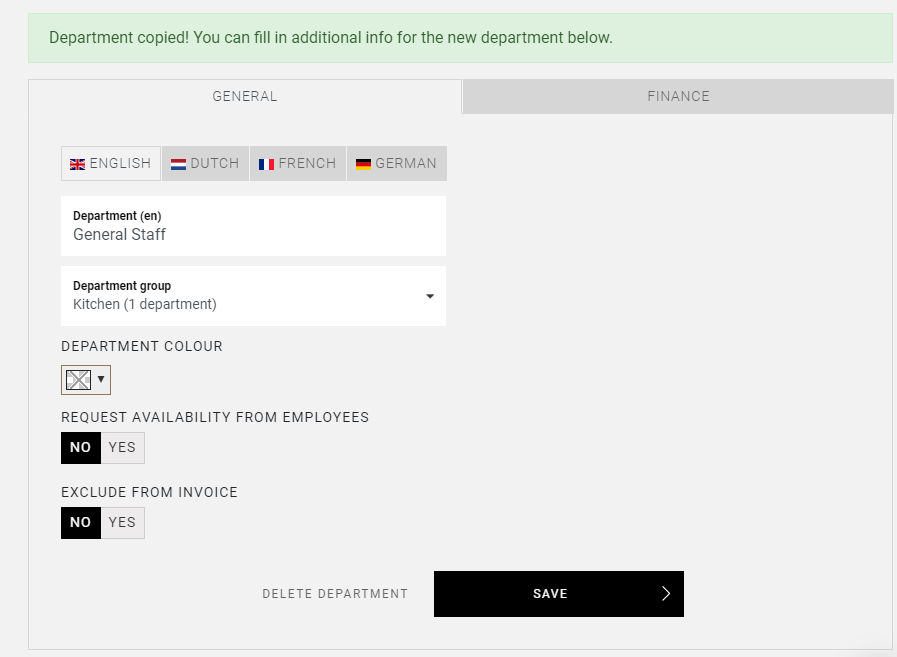
As soon as you select COPY, a copy will be made and you will be taken immediately to the department file where you can change the necessary data:
Via the pencil icon next to the department, you are directed to the department file:
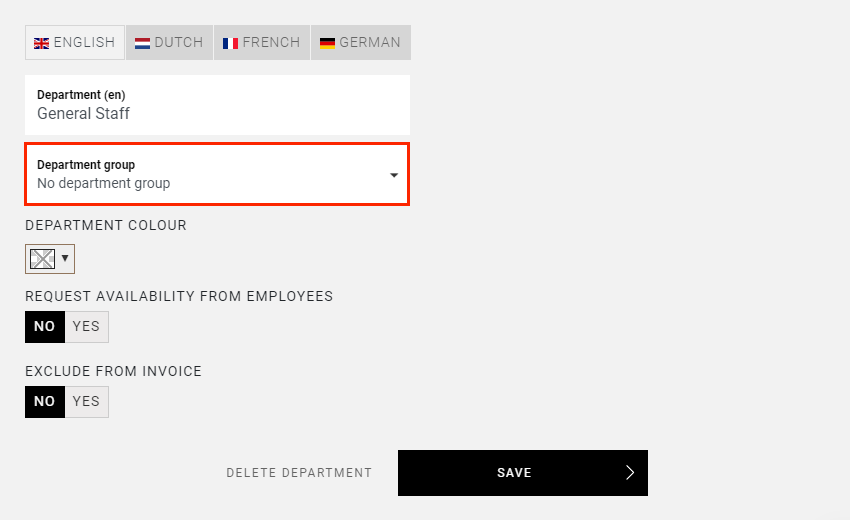
In the GENERAL tab you can select the desired department group and after clicking on SAVE, the department appears under the appropriate department group:

When you select ADD DEPARTMENT, you are directed to a page similar to the one in point 1. However, with this option you create a new department and it will appear under the selected group after saving.

By selecting the plus icon next to a group, you can once again create a department. On the next page, however, the department group will already be completed:
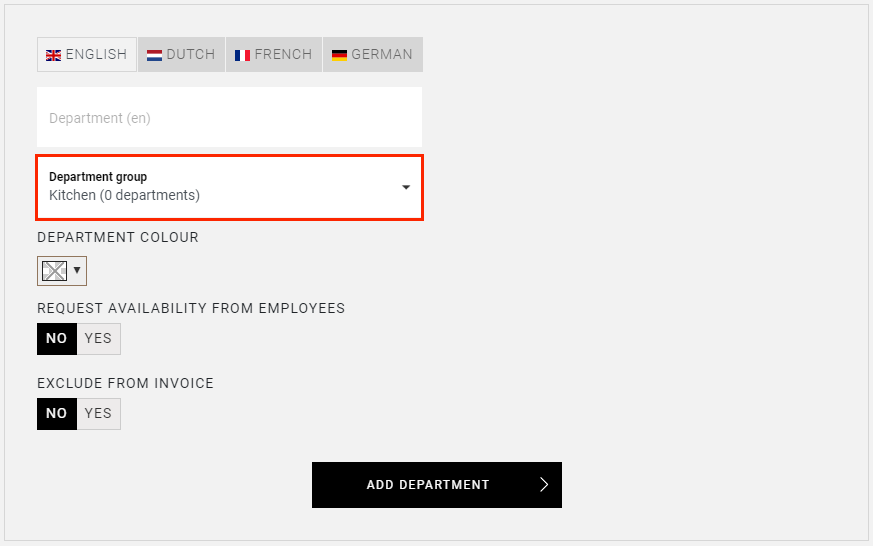
Give your new department a name and choose a colour if required, then select ADD DEPARTMENT to create your new department.
If you select the copy icon, the following pop-up appears:
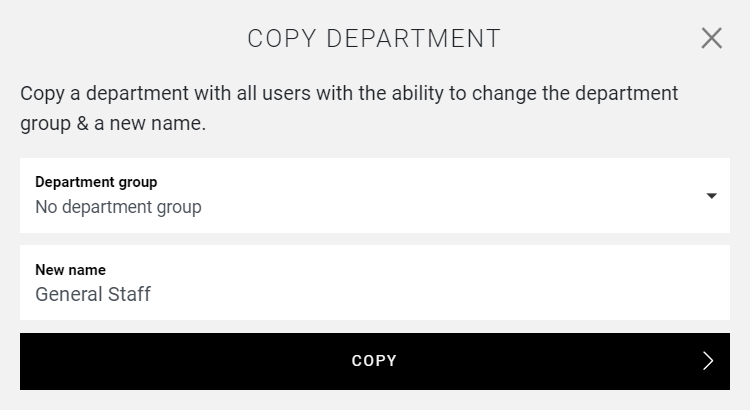
Here you have the option to copy an existing department and its employees to a department group. You can still change the name of the department here, as this is actually creating a new department.
CrewTip! The general settings are also copied. If you use the finance module, the data in the tab FINANCE will not be copied. If you have a connection with our service partner Offix, the settings in the tab EASYPAY will be reduced to the default settings.
As soon as you select COPY, a copy will be made and you will be taken immediately to the department file where you can change the necessary data:
Managers' permissions and department groups
You can set a manager's permissions so that you limit these to one or more department groups.
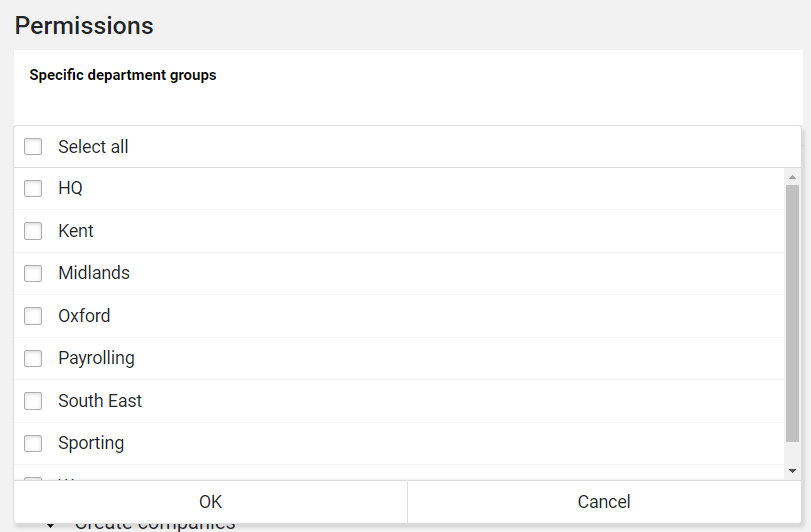
This article provides more information on permissions and how to modify them.
Please note that you have a number of managers included in your licence. The overview of these can be found in the USAGE tab under LICENSE in SETTINGS. If you have reached the number of managers and wish to add more managers, you will receive a warning and the extra cost will be automatically billed in your current billing period.
Invite or add managers
Learn here how to invite or add managers.
Did you find this interesting?
We have more very educational articles for you! Take a look:
Or are you more interested in some practical topics:
