Table of content
Error resolutions: resolving a rejected Dimona
Changing employee contract types
Requesting a social security number for a non-Belgian employee
Introduction
In this article, we assume that you are familiar with Dimonas, for whom you must make these immediate declarations and the legal implications that Dimonas entail if they are not reported correctly.
If you still want more information about this subject, we advise you to take a look at this website.
In this article we explain how Dimonas module is integrated into CrewPlanner, which can make your work much easier. If you would like to make use of this link, please contact your account manager, give our team a call via chat, or mail to [email protected] .
Process Dimonas
Process Dimonas automatically
General settings
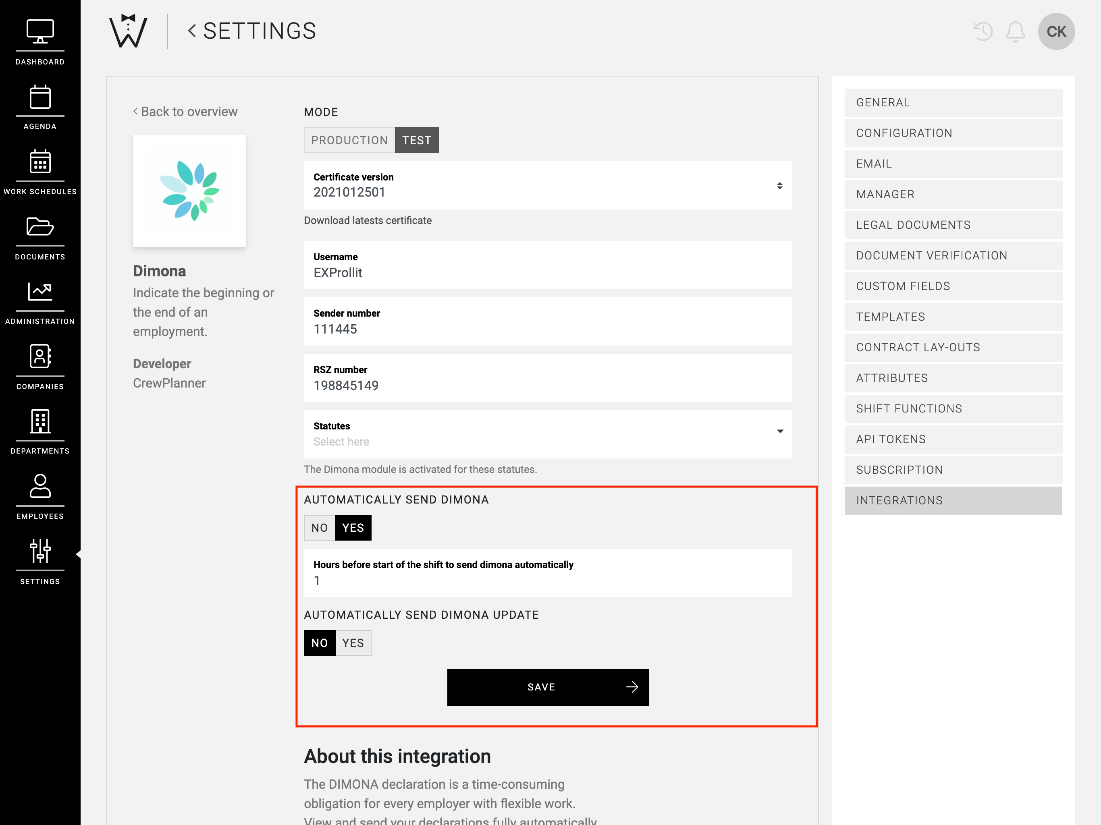
The processing of Dimonas can be done automatically, by indicating this in settings. Navigate to SETTINGS and select INTEGRATIONS. Here you will find the Dimona link and you can enter settings.
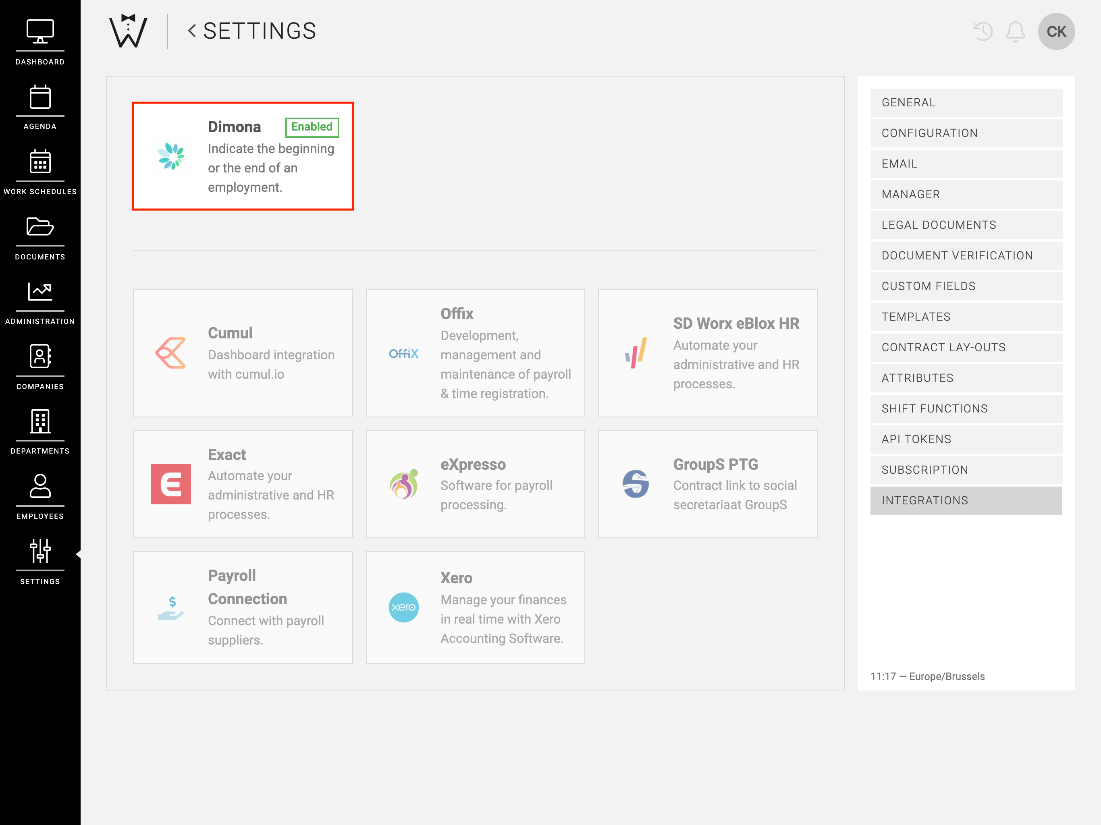
Here you can decide whether Dimona should be sent automatically and how long before the shift starts.
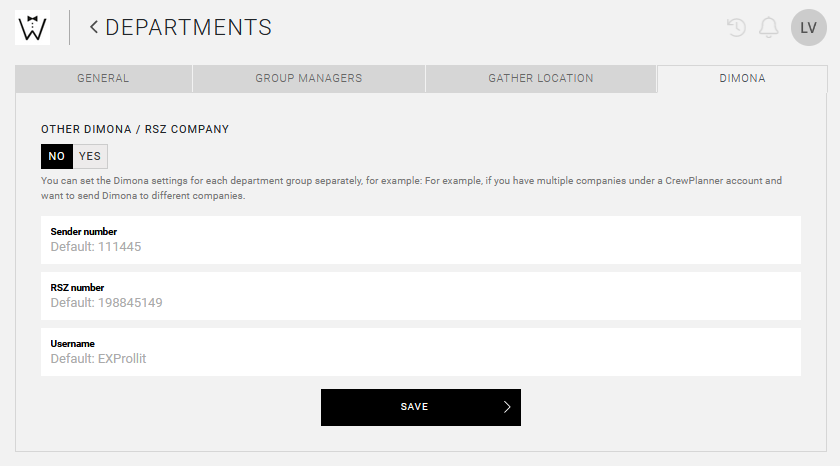
Settings per department group
You also have the option of specifying your Dimona settings for each department group. For example, you can use this if you have one CrewPlanner account for several of your companies (or several Paritaire Comités) and you want to send Dimona for these companies as well.
Select the pencil icon next to the desired department group and in the DIMONA tab note the desired settings.
Process Dimonas in a project
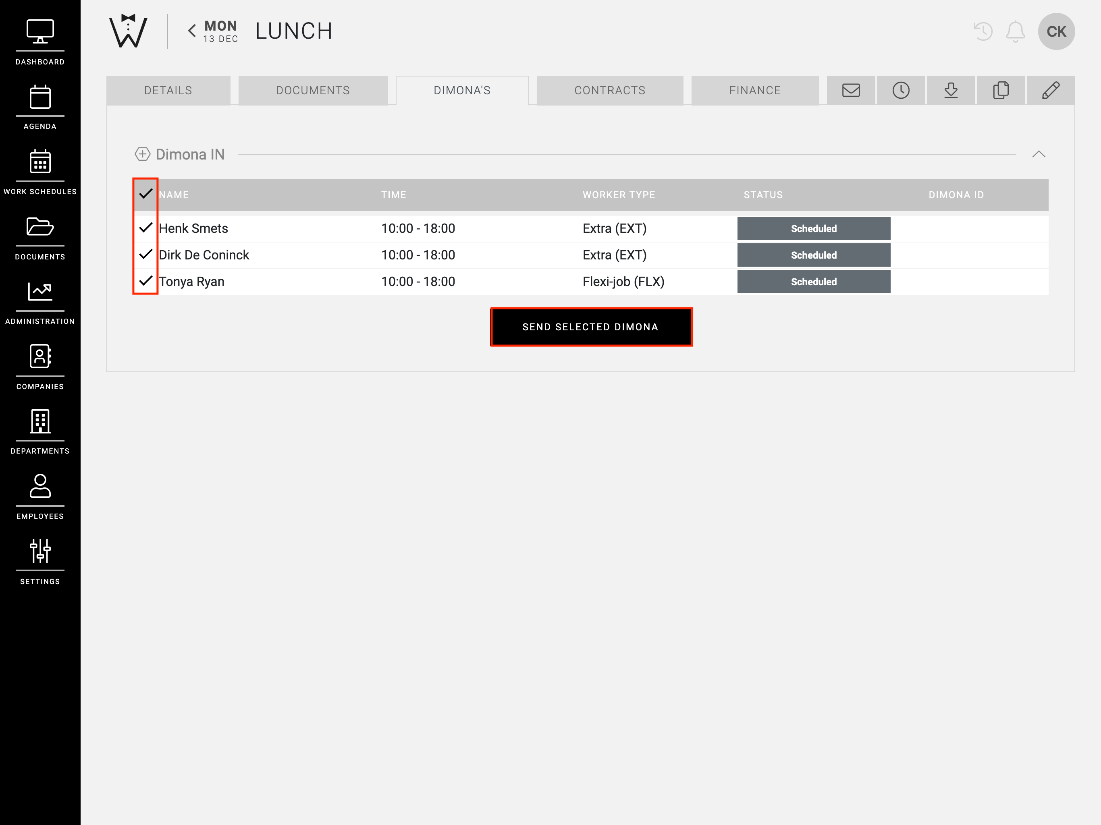
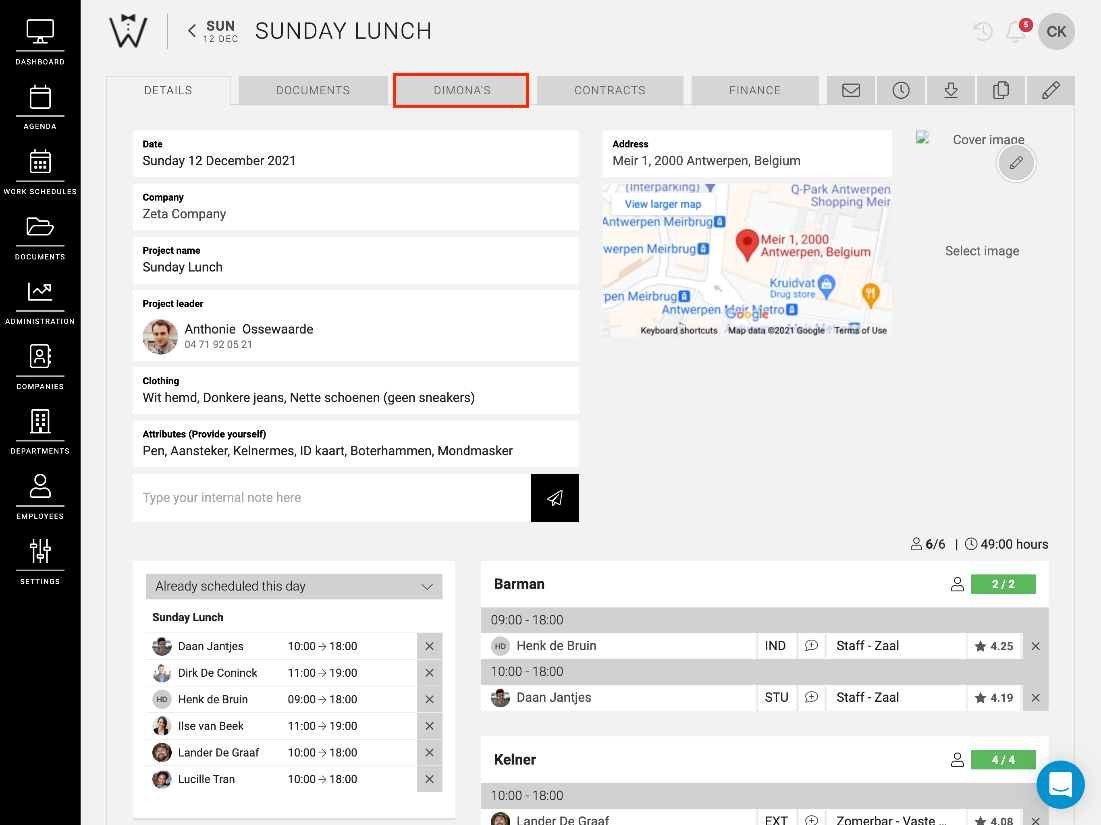
You can also manually process your Dimonas for a project at any time. In the project page, navigate to the DIMONAS tab.
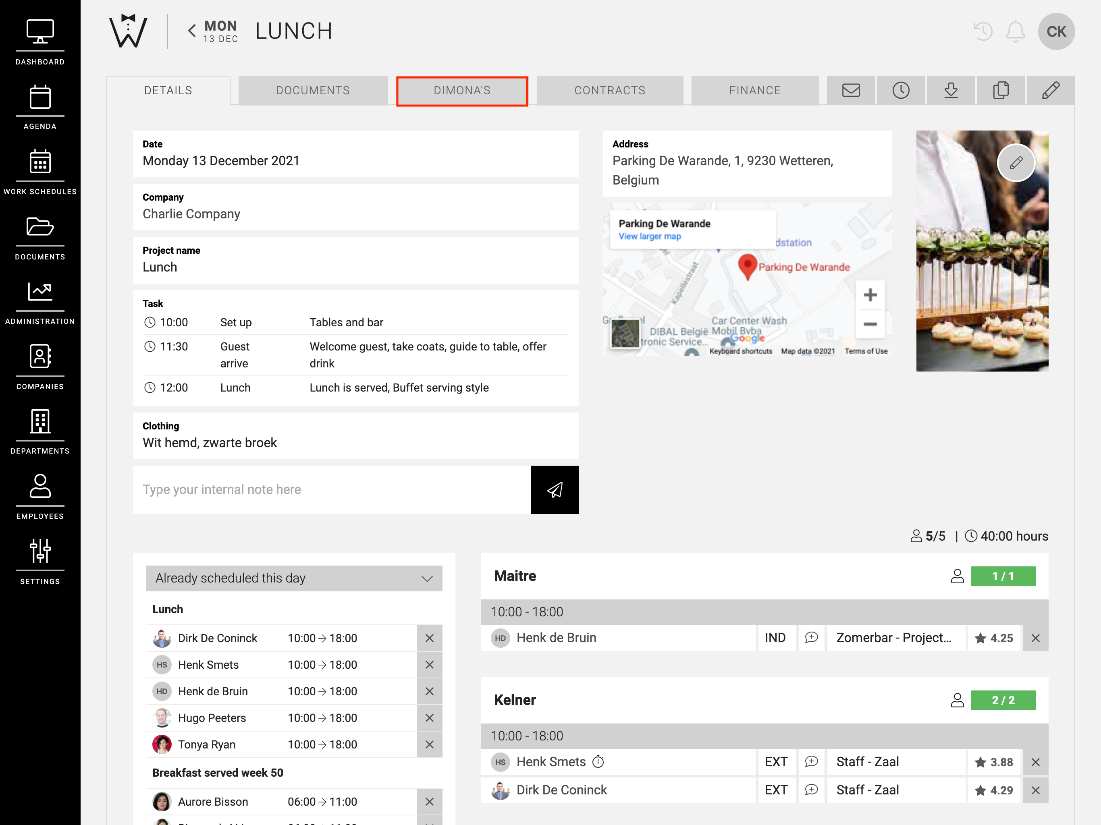
Here you can make a selection of the Dimonas you would like to send manually.
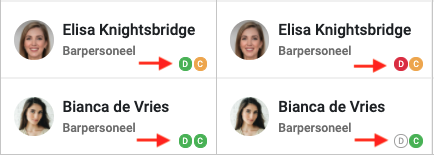
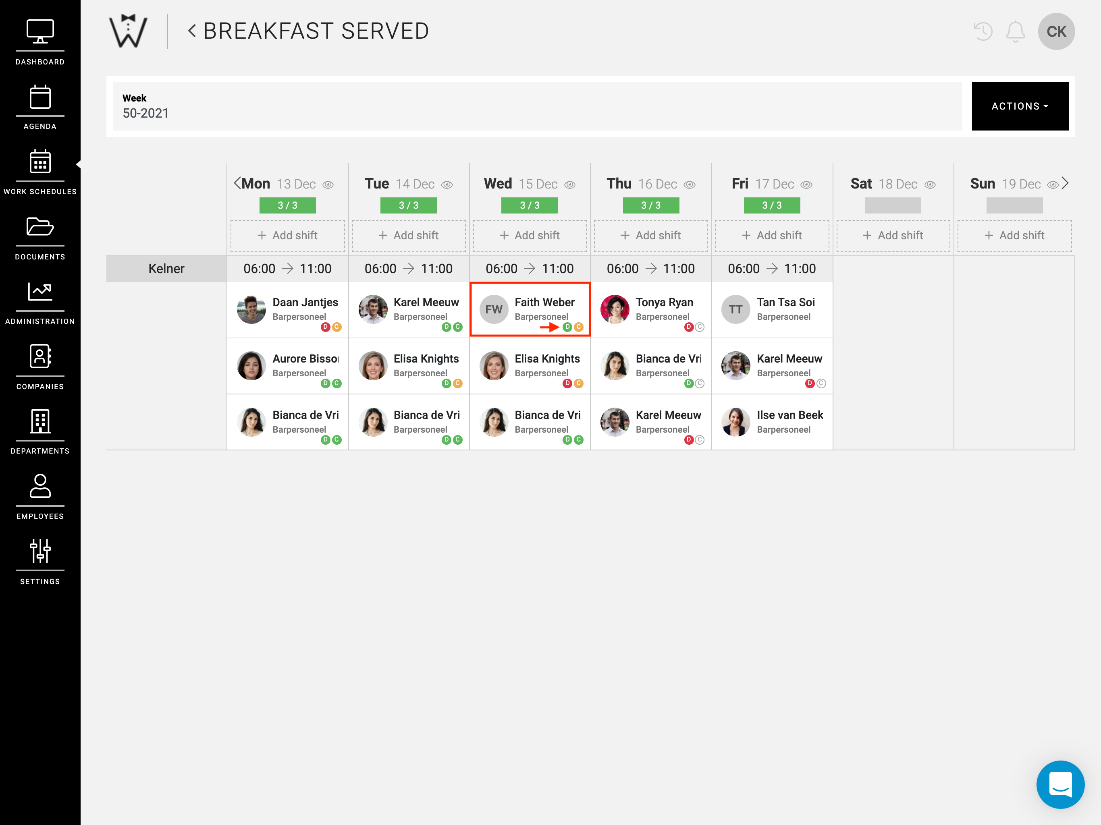
Process Dimonas in a work schedule
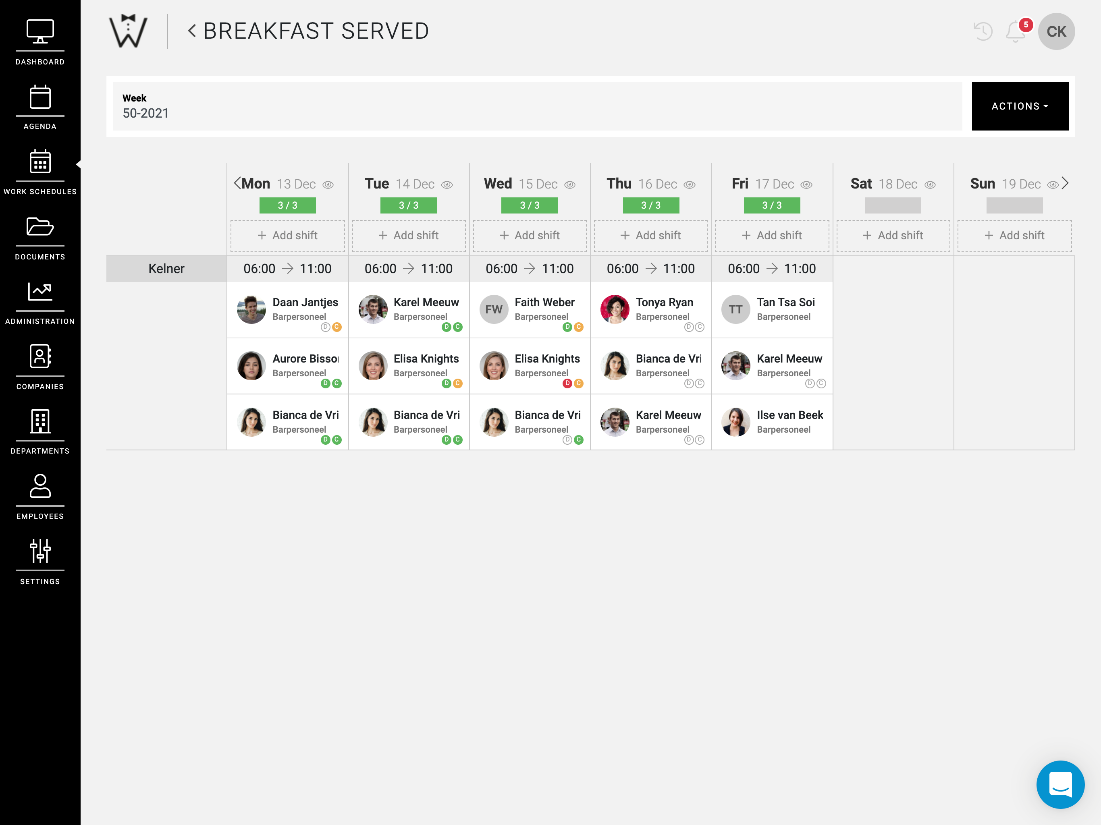
When you use work schedules for your planning, you can consult the status of your Dimona in the work schedule. This is represented by a circle containing the letter 'D', to the right of the employee's name and using colour codes. We explain this briefly below:
-
White: Dimona not yet sent
-
Green: Dimona accepted
-
Orange: Dimona warning
-
Red: Dimona refused
You can also consult the Dimona of a work schedule by day via the project page.
Process Dimonas in bulk
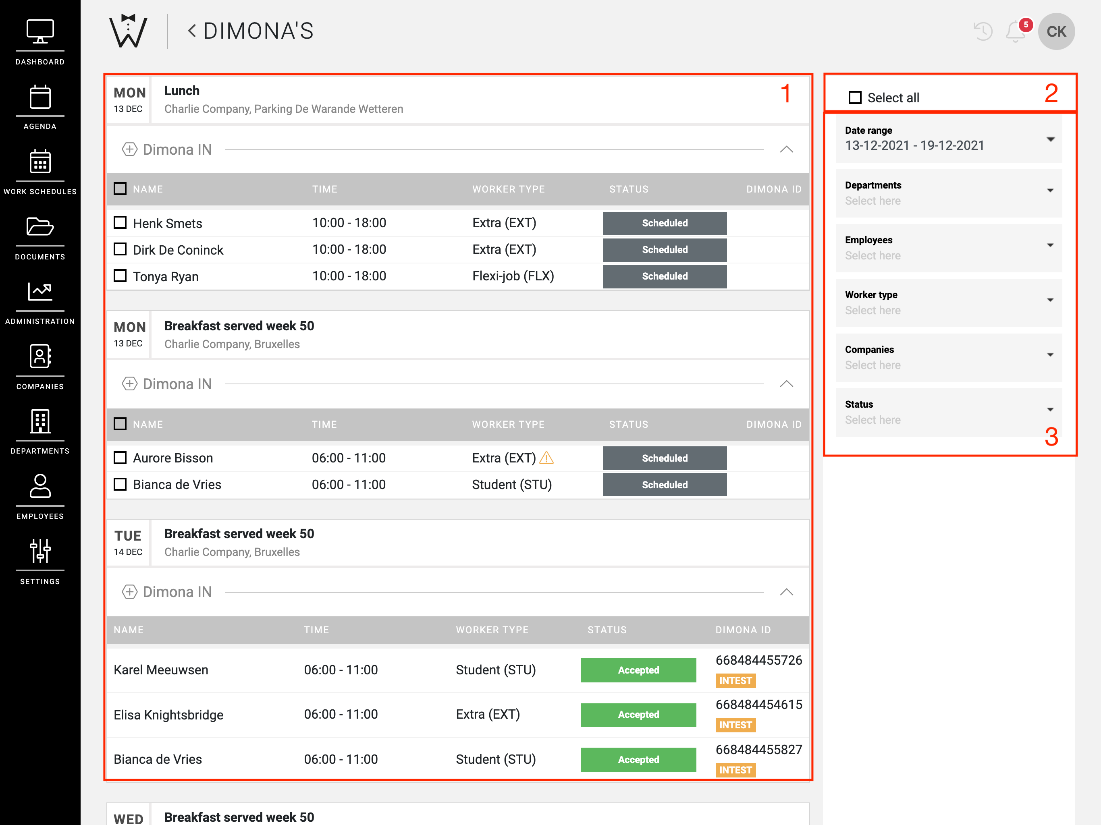
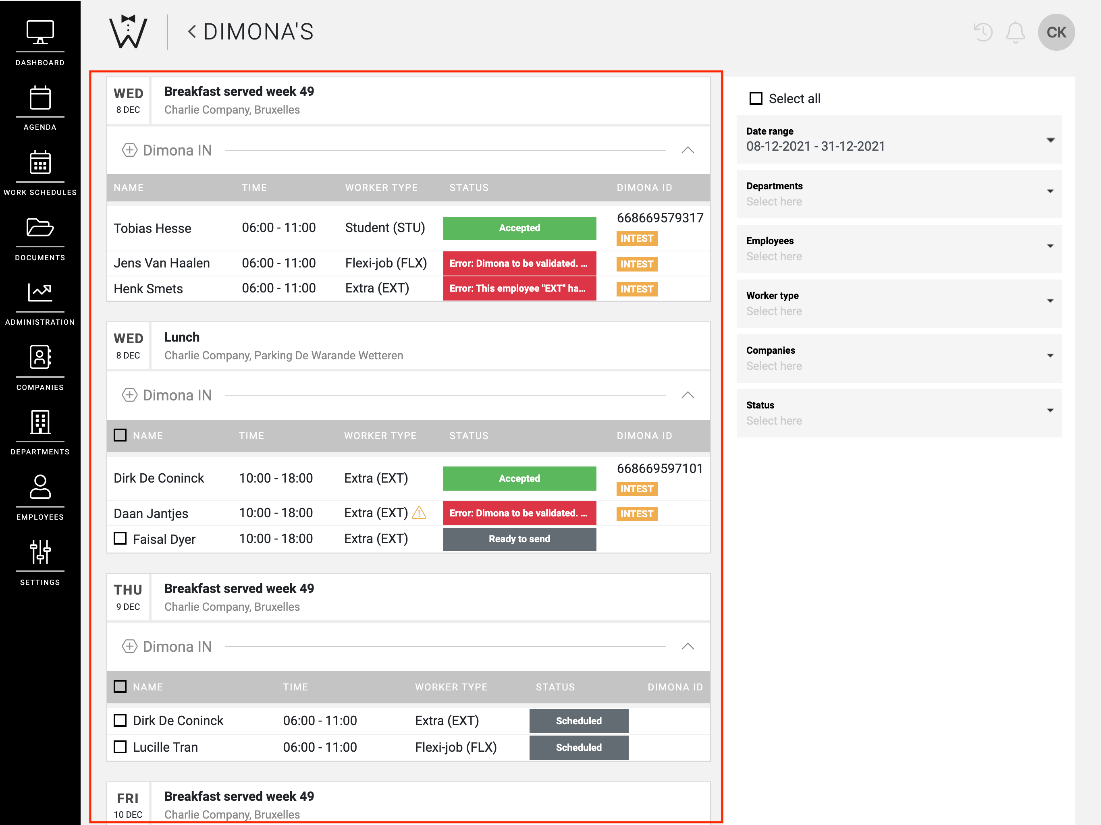
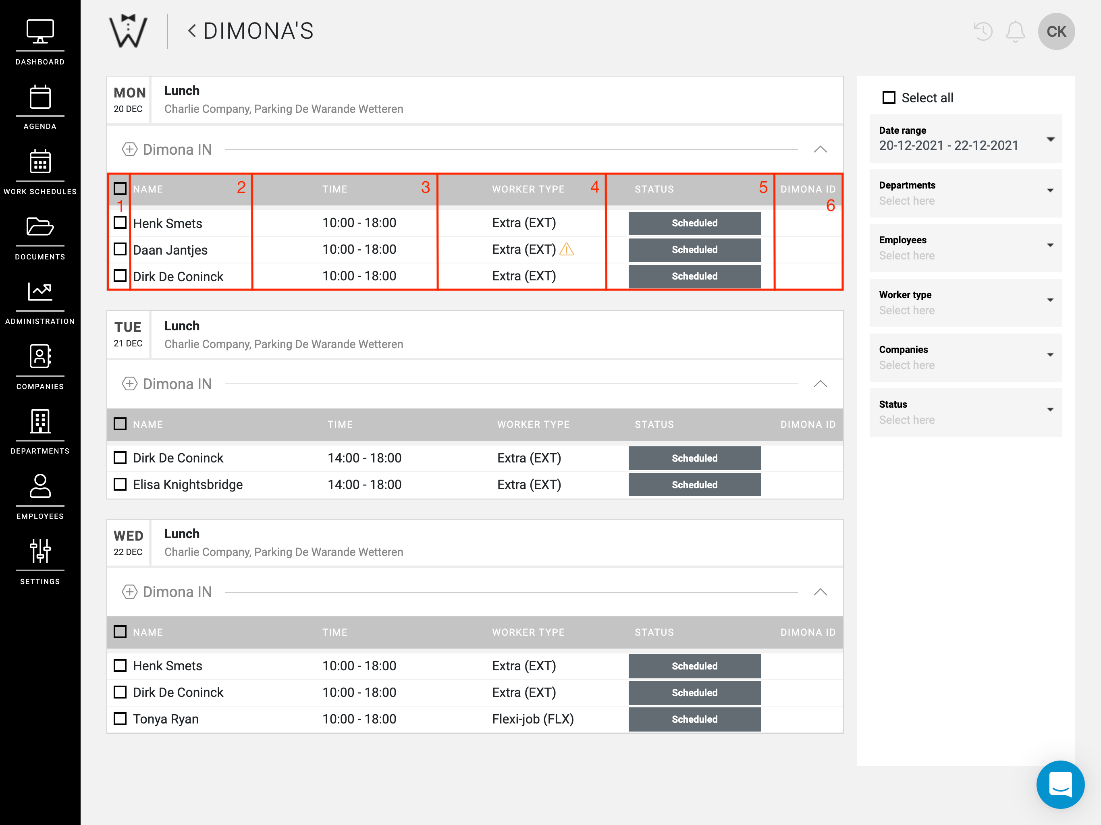
If you wish to process Dimonas in bulk, navigate to the DIMONAS page in ADMINISTRATION.
-
Overview of your Dimona
-
Select all Dimonas: You have the option of using Select All in order to select and send all Dimonas in the overview at once.
-
Filter: Use the filters to consult Dimona in a targeted manner. You can filter by Date range, Departments, Employees, Worker type, Companies, Dimona Status.
Where to consult the Dimonas
You can consult Dimonas in 3 places in CrewPlanner:
Project:
For each project that requires Dimonas, you will find a DIMONAS tab on the project page.
Work schedule:
You can see the status of the Dimonas in the work schedule.
General Dimona Page:
Under ADMINISTRATION in the menu bar you will find the option DIMONAS. This page forms, as it were, the central nervous system of the Dimonas.
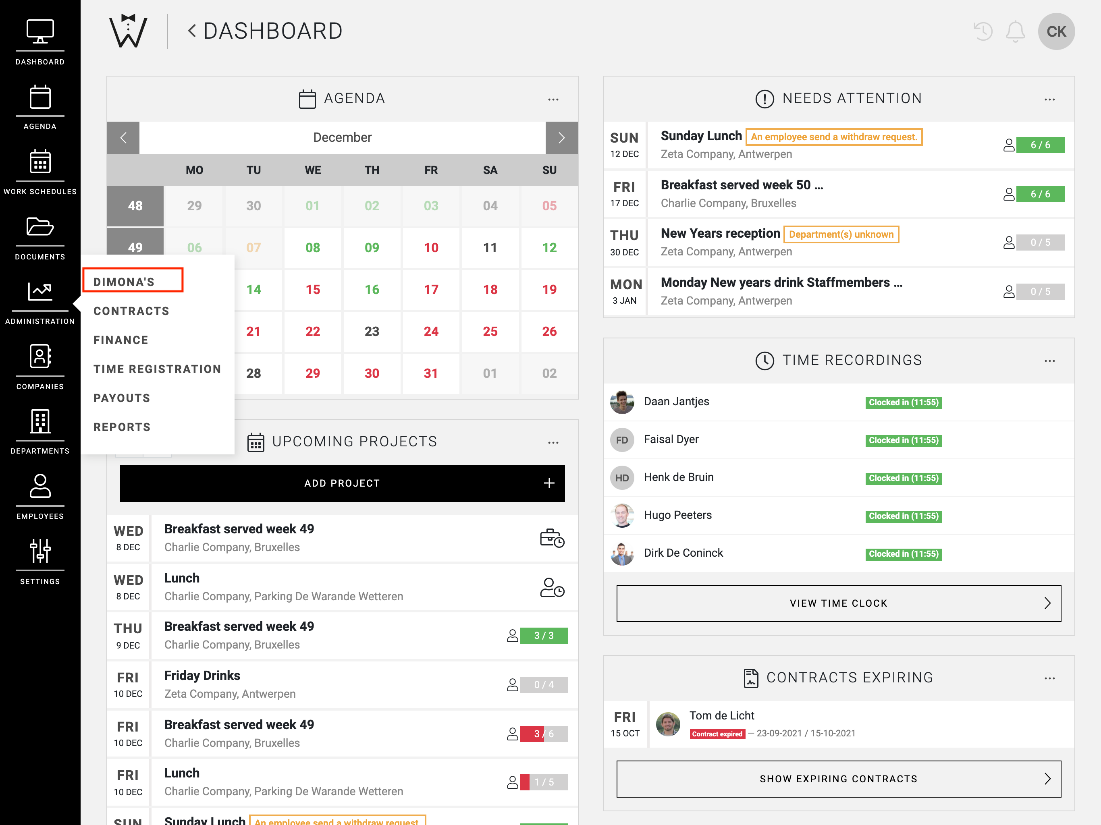
Here you can process and consult all Dimona. In the centre of the page you can see an overview of all projects on which employees are scheduled to work and for which a Dimona must be submitted.
How to consult the Dimonas
When you look at the DIMONAS page you will see the following:
-
Tick boxes: You can select the Dimona to be sent by employee by ticking them or you can choose to select everyone by ticking the box in the grey bar next to 'Name'.
-
Name of employee
-
Planned start and end time
-
Contract type of the employee
-
Status: Based on the status you can see in which phase of processing a Dimona is.
-
Dimona ID: If a Dimona is Accepted or an Adjustment is required, an official ID will be created by the public authority. This ID is displayed in this column.
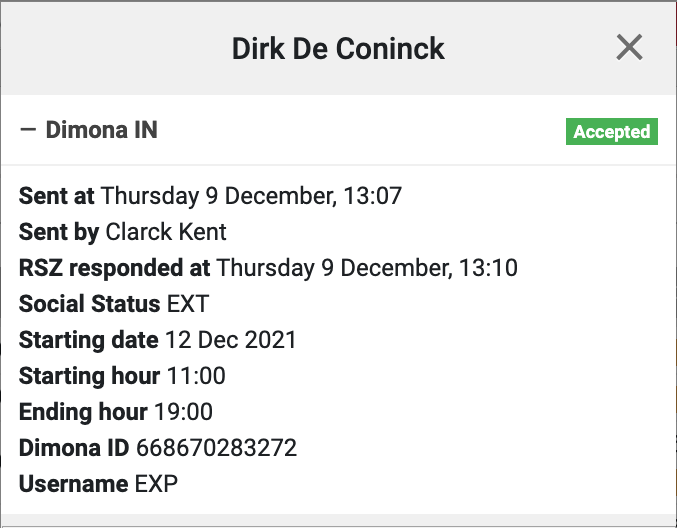
When you select the Dimona status, a pop-up with additional information opens.
Status of a Dimona
Unprocessed:
These Dimonas have the status Ready to send or Scheduled:


Created:
The Dimona is then given the status Created:

When it is sent, the status Sent will be shown:

As soon as the NSSO has received and is going to process the application, the Dimona gets the status Processing:

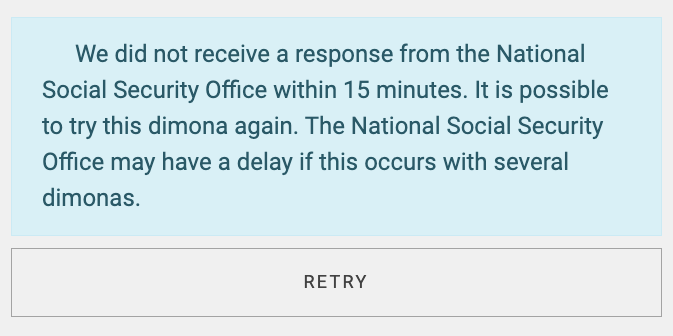
CrewTip! The Dimonas are processed one by one. If you experience delays with the processing by the NSSO, you can process the Dimona again after 15 minutes. This will be shown to you in the pop up of the Dimona.

Accepted:
Once the Dimona has been accepted by the NSSO, the status Accepted appears:

Requires attention:
In order to follow up your Dimonas easily and correctly, we have added the filter Requires attention to the status filter. If you select this filter, you will get an overview of all Dimonas for which you need to take action. Like Dimonas for which you did not receive a reaction or a warning from the NSSO, or which were refused.
Dimonas are processed one by one by the NSSO so you might experience delays once a Dimona has been sent. If the status of the Dimona 15 minutes after sending is still showing Sent with a little triangle on the right side, this means that the NSSO has not yet processed the Dimona. You should then process the Dimona again.

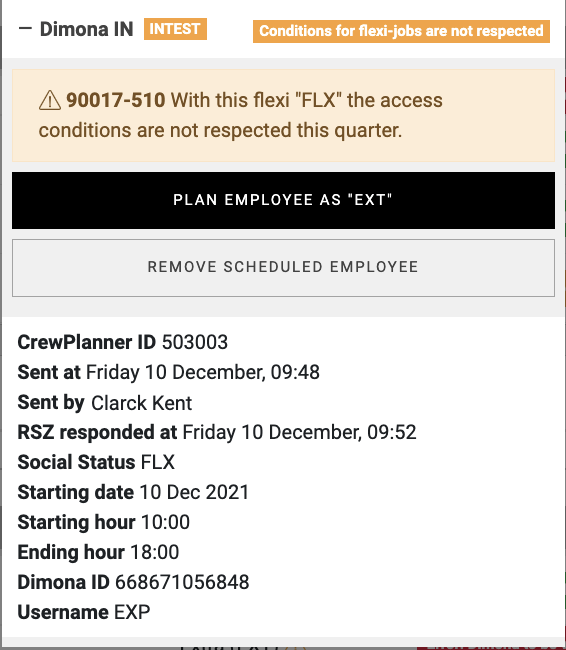
Warning:
If you see the warnings Conditions for flexi-jobs not respected or Technical problem at NSSO, the Dimona was sent and accepted, but you may still need to take action to process this Dimona correctly. You will receive suggestions on how to solve this. A Dimona ID has already been created.


Refused:
The Dimona has been refused, no Dimona ID was created. You will get suggestions to make sure that the Dimona can be accepted. CrewPlanner does not automatically fix a rejected Dimona however, this remains a manual action that you have to take yourself.

Late:
It is possible that a Dimona or an update is sent after the allowed period has expired. This Dimona will then receive the status Late declaration from the NSSO. If you would like to receive an overview of these late declarations, select Late in the status filter.

Error resolutions: resolving a rejected Dimona
If you receive a rejected status or a warning from the NSSO. In CrewPlanner you have the possibility to solve this through the error resolution. By selecting the status a pop-up will appear with a number of possible solutions.
Refused:
In this example a student has reached the maximum number of 600 hours for the calendar year. How you wish to follow up on this denied Dimona remains your choice and will therefore never be automatically remedied by CrewPlanner.
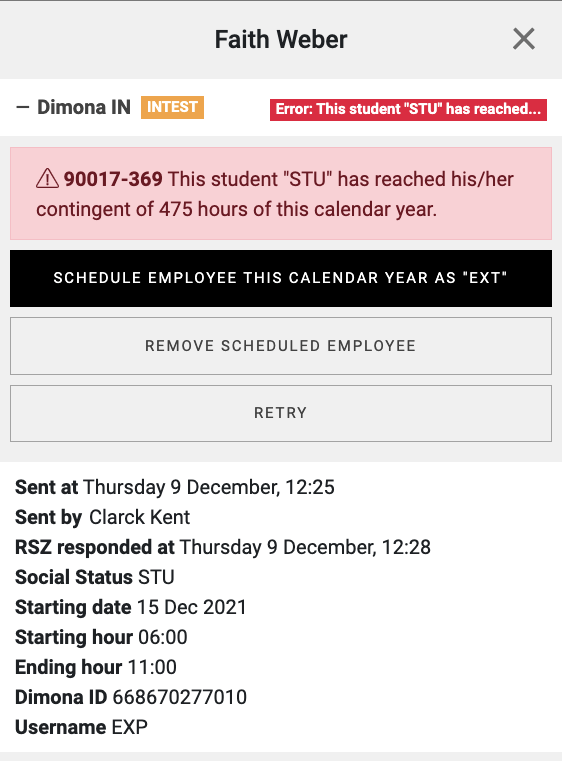
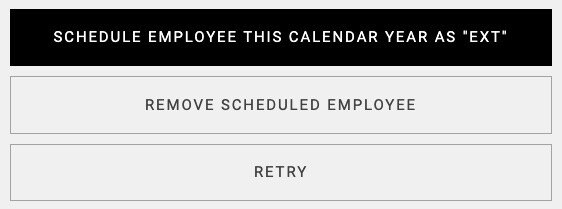
In the middle, you are given three options that can offer you a solution, so it is up to you to choose how to solve the Dimona rejection.
If you carry out an error resolution in which the contract type is adjusted, you will see this on the DIMONA page by means of an orange triangle. If you rest your cursor on this triangle, you will see how the contract type was modified.

Warnings
You will also get the same pop-up in case of warnings:
If there are possible solutions for the warning, CrewPlanner will also offer you these.
Mark Dimonas manually as sent
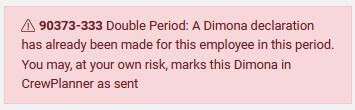
It is always possible for an employee to be scheduled twice in one day either by yourself or by another employer. The dimona for the second shift will then be refused because of a double period. You therefore have the option in your own planning to mark this refused Dimona as already sent to take care of this formality.
After you select the status, in the pop-up that opens up you have in the middle three buttons at your disposal, the first of which MARK DIMONA AS SENT gives you this option.

CrewTip! caution should be taken when performing this functionality!
Process Dimona Updates
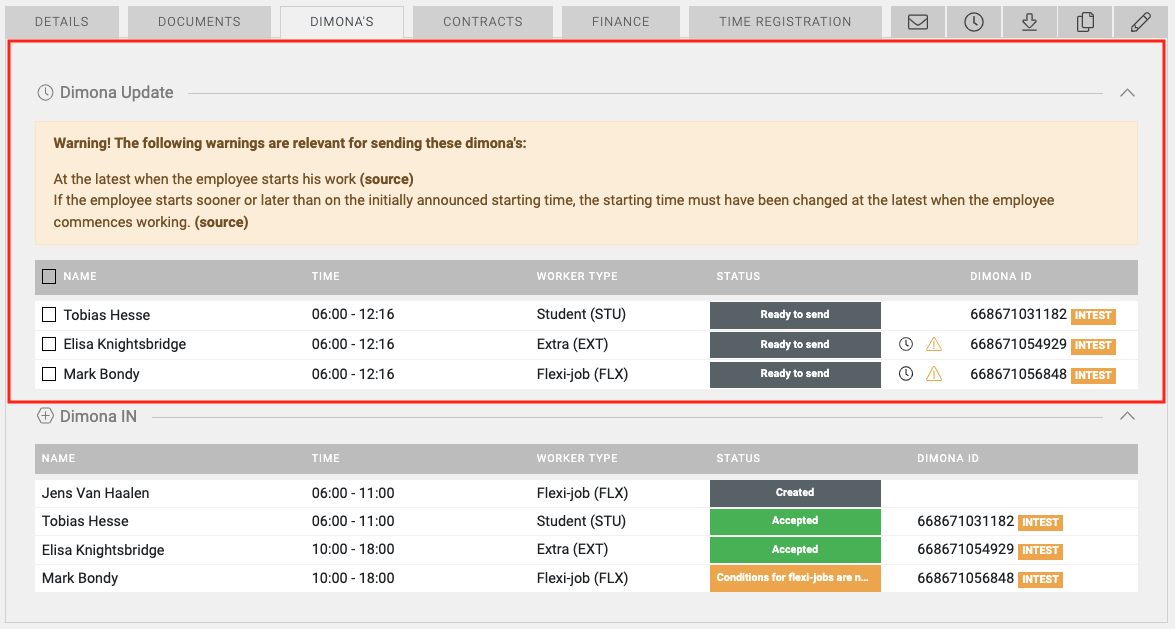
As soon as you save or complete a time registration, the hours actually worked are prepared as a Dimona update. To do this, navigate to the DIMONAS tab in the project again.
CrewTip! Refresh the page after you have completed the time registration.
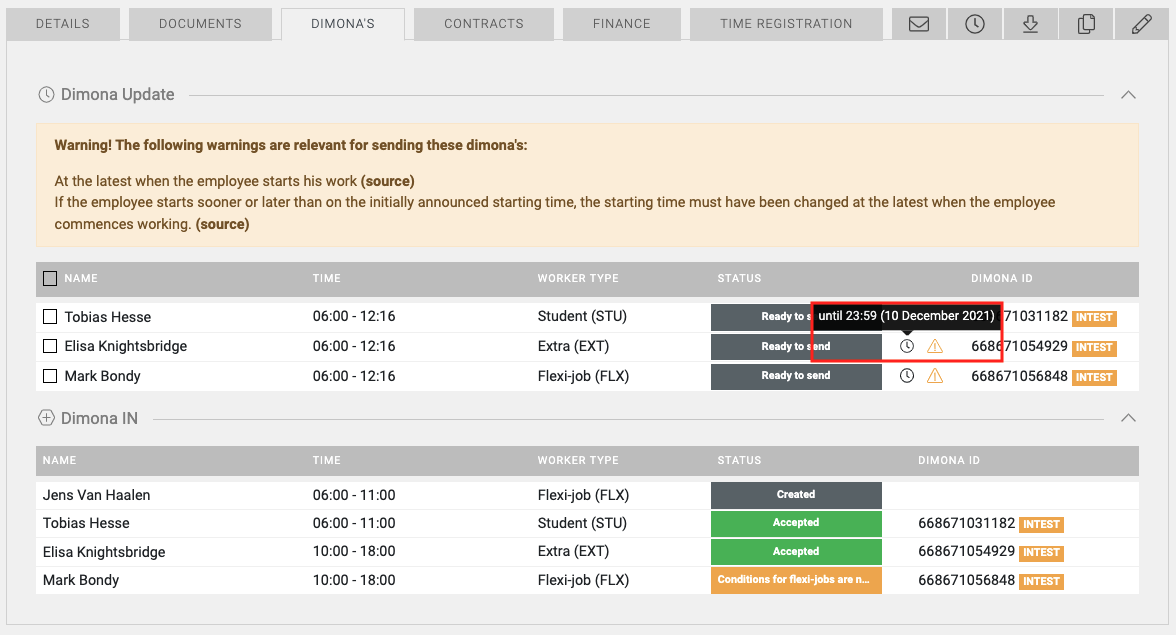
To the right of the status of the Dimona ready to send, you may have two icons if applicable for the contract type.

In this case, the clock icon will indicate how much time you have left to send the update for Dimona.

The warning triangle indicates that your attention is required before sending the Dimona update.
If you stay with your cursor on one of these icons, a pop-up will provide you with more information.
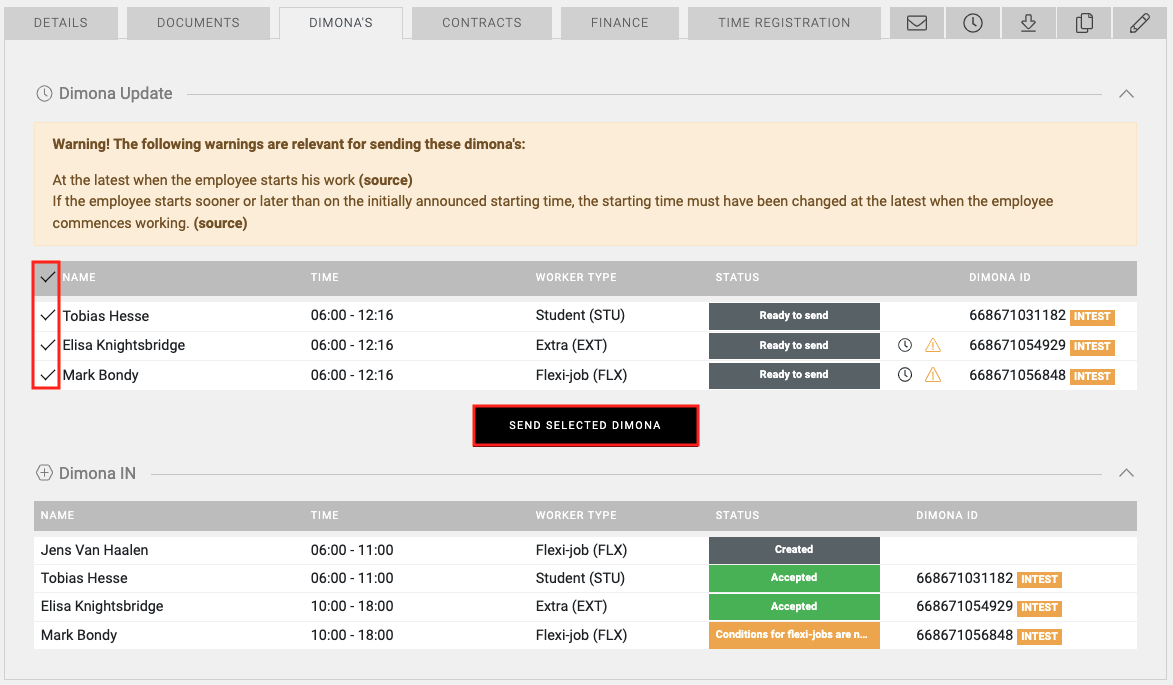
Once you are ready to process the Dimona updates, all you have to do is select them and send them off.
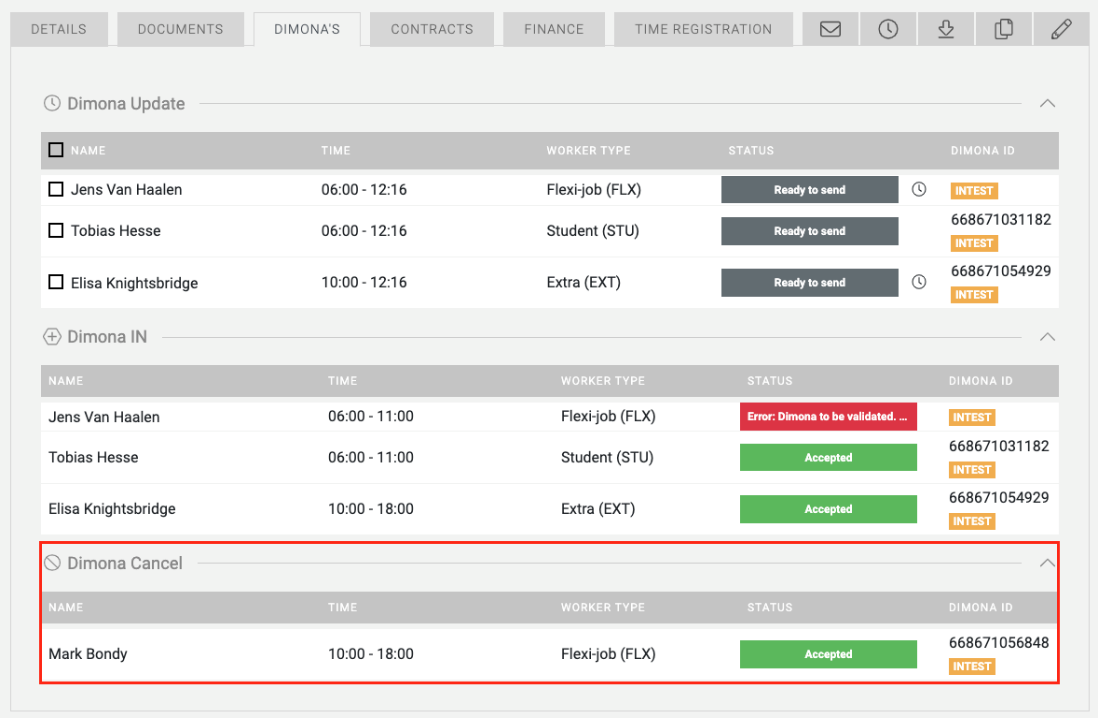
Dimona Cancel & No shows
Before the start of shift
If you want to send a Dimona cancel for an employee before the shift starts, all you have to do is remove that employee from the shift. You can then see the cancelled Dimona in the DIMONAS tab of the project.
No show
If an employee has not reported for a shift, you can enter a No show for this employee via the time registration. A Dimona cancel for the employee will then be sent immediately. You do this by selecting the bin icon next to an employee.

As soon as you select the bin icon, a pop-up appears asking you to confirm this no show.
Please note! If you have entered a No-show for an employee via the time registration, this cannot be reversed.
Changing employee contract types
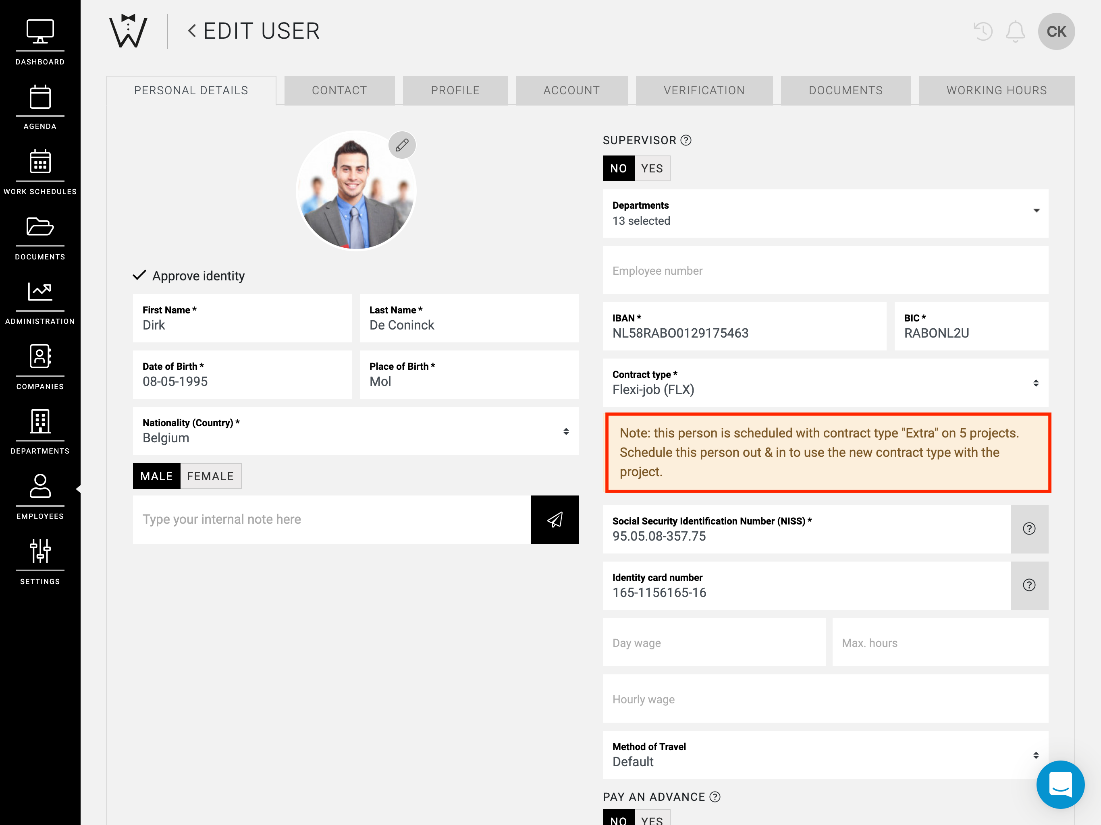
You always have the possibility of changing the contract type of an employee. However, if this employee is already scheduled, you will first have to schedule them out of future shifts.
As soon as you change an employee's profile and contract type, you receive an alert stating how many projects the employee is still assigned to. If you do not schedule the employee first, the Dimona processing may not be correct.
Contract types
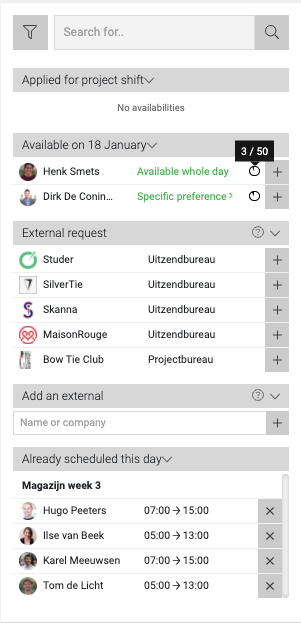
When scheduling employees, some contract types have a pie chart next to the employees based on their contract type.
For flexi-workers, there is no single answer to how many days or hours they may work, which is why there is no pie chart next to flexi-workers.
Students, on the other hand, have a pie chart, which shows how many hours they have already been scheduled by you in this calendar year. The full diagram represents 600 hours, as required by law.
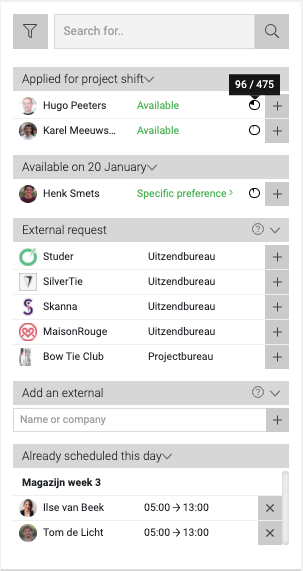
Extra's also have a pie chart next to their name. In their case, this diagram is based on the maximum permitted 50 days per calendar year.
Requesting a social security number for a non-Belgian employee
Employees who do not have the Belgian nationality should apply for an SSIN number to be allowed to work in Belgium. A temporary SSIN number can be requested trough CrewPlanner.
During the registration process, the non-Belgian employee can skip the field National number. Normally it is obligatory for an employee to fill in this field, but when the employee has never worked in Belgium before, this is not known.
After approving the identity of the employee a manager can schedule the employee. When the first Dimona is sent for the employee from CrewPlanner, a SSIN number will be requested. How does this work; after sending this first Dimona you will receive an error.
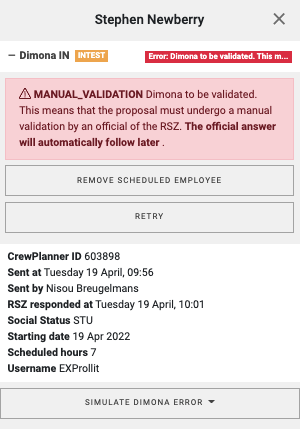
The error indicates that a manual validation is needed to approve the Dimona. We therefore advise to process a first Dimona for a non-Belgian employee without social security number 48 hours before the start of a shift.
After the manual validation by the NSSO, the Dimona will be accepted and a temporary SSIN number will be assigned to the employee. This number is stored in the profile of the employee for the processing of future Dimonas.
Please note that this temporary SSIN allows the employee to start work, but it is the employer's responsibility to request a permanent SSIN from the NSSO as soon as possible. For further details, consult Belgian ID Pro.
We hope this article has helped you!
If you still have questions, first take a look at our Crew Academy. Here you might find the answer in one of our articles.