Companies
Manage your customers and their data.
Table of contents
Introduction
Planning is always linked to a company in CrewPlanner. However, you don't have to take this term literally, this could be a customer but also, for example, a location.
If you have the necessary permissions, you can add companies in COMPANIES in the menu bar, import a list or export companies. You will find all the information about your companies/customers/locations and you can also make changes here. It is even possible to generate a time clock code at company level.
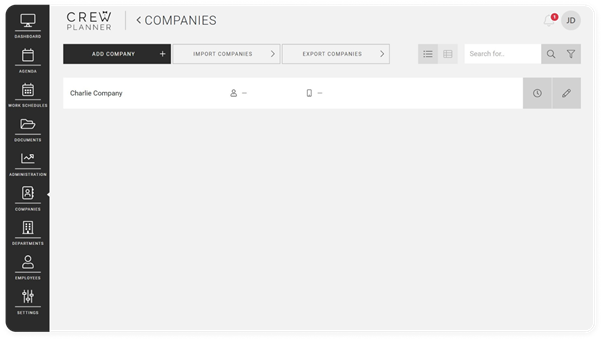
Add company
Adding a company can be done in two different ways. Often, a company is added during the creation of a project or work schedule where you only need to provide a name, but it can add value to further complete the company details. As this will direct you to the company page, we will first discuss how to add a company via the company page.
Via the company page
Via the menubar, navigate to COMPANIES and here select ADD COMPANY.
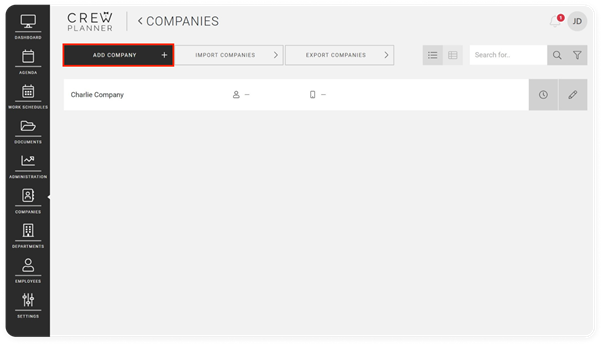
You will then be redirected to this page:
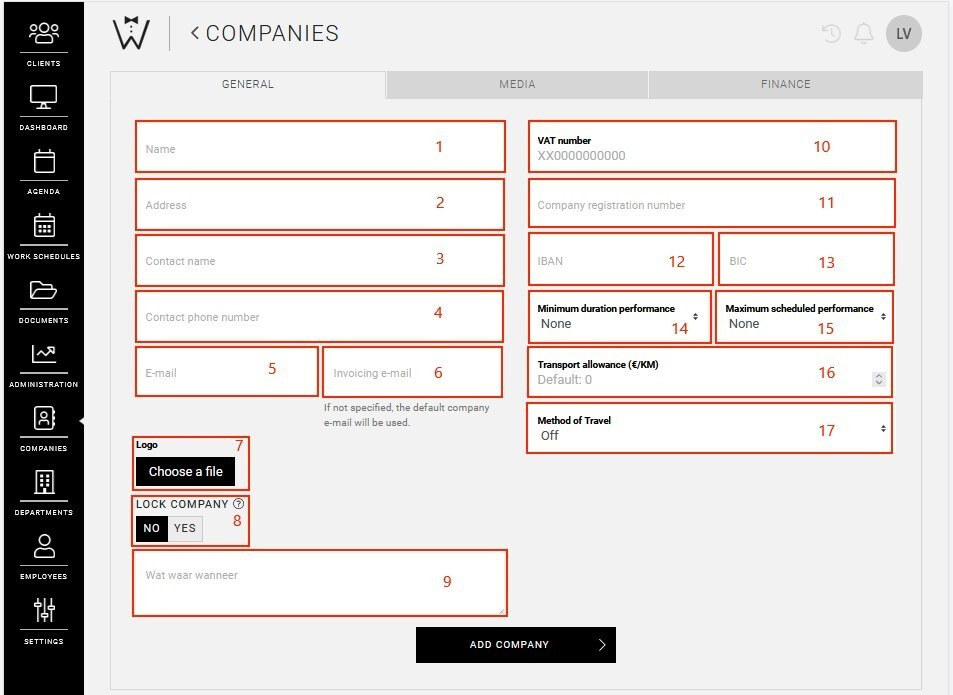
As mentioned earlier, you are not required to complete all the information, but we briefly explain the fields and tabs available to you:
General
In the GENERAL tab, you can note general information about your customers:
-
Company name: even if you have already entered a name, you can still edit it here.
-
Address: is automatically linked to Google Maps. More info, read here.
-
Contact name: name of contact person for this company.
-
Contact phone number: phone number of contact person.
-
E-mail: e-mail of contact person or a default e-mail address.
-
Invoicing e-mail: the e-mail address on which your customer wishes to be invoiced, this may differ from the previous e-mail address.
-
Logo: here you can add your customer's logo.
-
Lock company: this function allows you to lock a company, preventing company managers from logging in. Employee accounts will still remain accessible.
-
Custom fields: If you have set up custom fields for your companies, you can also find them here.
-
VAT number: enter the company's VAT number here.
-
Company registration number: in Belgium this is the VAT number, in the Netherlands it is the KVK number.
-
IBAN: here you can note the IBAN number of the customer's bank account. Normally found on a customer invoice.
-
BIC: if the IBAN number is entered correctly, the BIC code will appear automatically.
-
Minimum duration performance : here you can set a minimum number of hours for a shift of a project to be performed. If employees perform fewer hours than this minimum, you will receive an error message and you will not be able to complete until the minimum number of hours is entered in the time registration.
-
Maximum scheduled performance: here you can set a maximum number of hours for a shift of a project for which they can be scheduled. Consequently, if you try to schedule a shift with a higher number of hours, it will be blocked. This does not prevent employees from working outside these maximum planned hours if necessary.
-
Transport allowance: here you can possibly change your default setting for this company. Read more about transport allowances here.
-
Method of Travel: here you can set how people commute to this customer at company level. More information can also be found in the article on transport allowance.
Company name: even if you have already entered a name, you can still edit it here.
Address: is automatically linked to Google Maps. More info, read here.
Contact name: name of contact person for this company.
Contact phone number: phone number of contact person.
E-mail: e-mail of contact person or a default e-mail address.
Invoicing e-mail: the e-mail address on which your customer wishes to be invoiced, this may differ from the previous e-mail address.
Logo: here you can add your customer's logo.
Lock company: this function allows you to lock a company, preventing company managers from logging in. Employee accounts will still remain accessible.
Custom fields: If you have set up custom fields for your companies, you can also find them here.
VAT number: enter the company's VAT number here.
Company registration number: in Belgium this is the VAT number, in the Netherlands it is the KVK number.
IBAN: here you can note the IBAN number of the customer's bank account. Normally found on a customer invoice.
BIC: if the IBAN number is entered correctly, the BIC code will appear automatically.
Minimum duration performance : here you can set a minimum number of hours for a shift of a project to be performed. If employees perform fewer hours than this minimum, you will receive an error message and you will not be able to complete until the minimum number of hours is entered in the time registration.
Maximum scheduled performance: here you can set a maximum number of hours for a shift of a project for which they can be scheduled. Consequently, if you try to schedule a shift with a higher number of hours, it will be blocked. This does not prevent employees from working outside these maximum planned hours if necessary.
Transport allowance: here you can possibly change your default setting for this company. Read more about transport allowances here.
Method of Travel: here you can set how people commute to this customer at company level. More information can also be found in the article on transport allowance.
Media
In the MEDIA tab, you can upload images, which then become standard for this company.
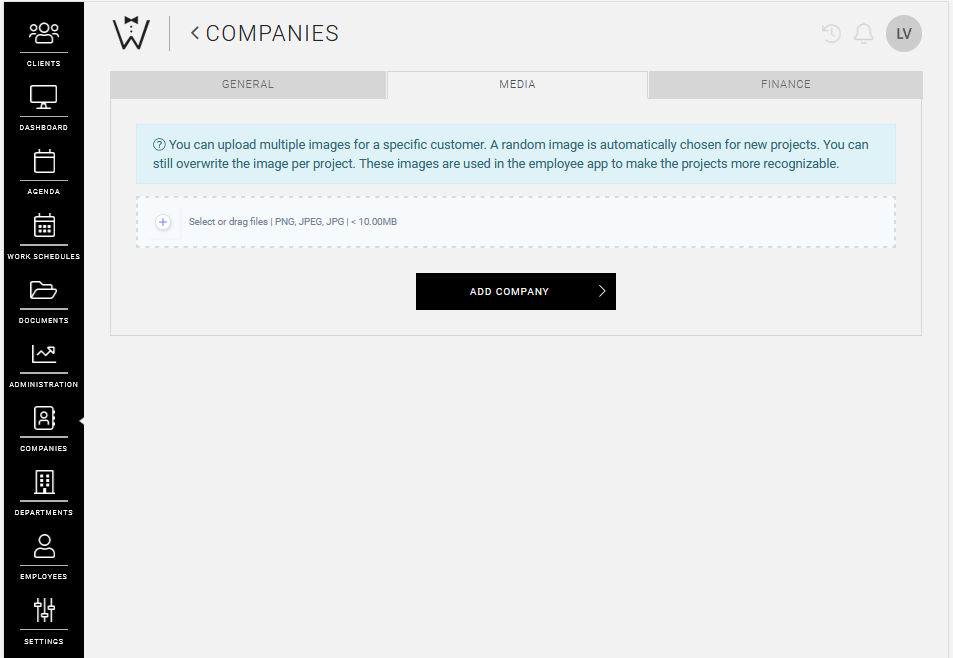
When you create a new project, any of these images will be used as the cover image.
You search and select a file on your computer or simply drag and drop a file below.

CrewTip! The ideal size for a cover image is 1280x960 pixels. If your image is larger, only part of it will be visible to your employees in the app.
As soon as you add images to the company file, only new projects will automatically have a cover image in the app. So this does not apply to already existing client projects, even if they take place in the future. More information on cover images can be found in this article.
Finance
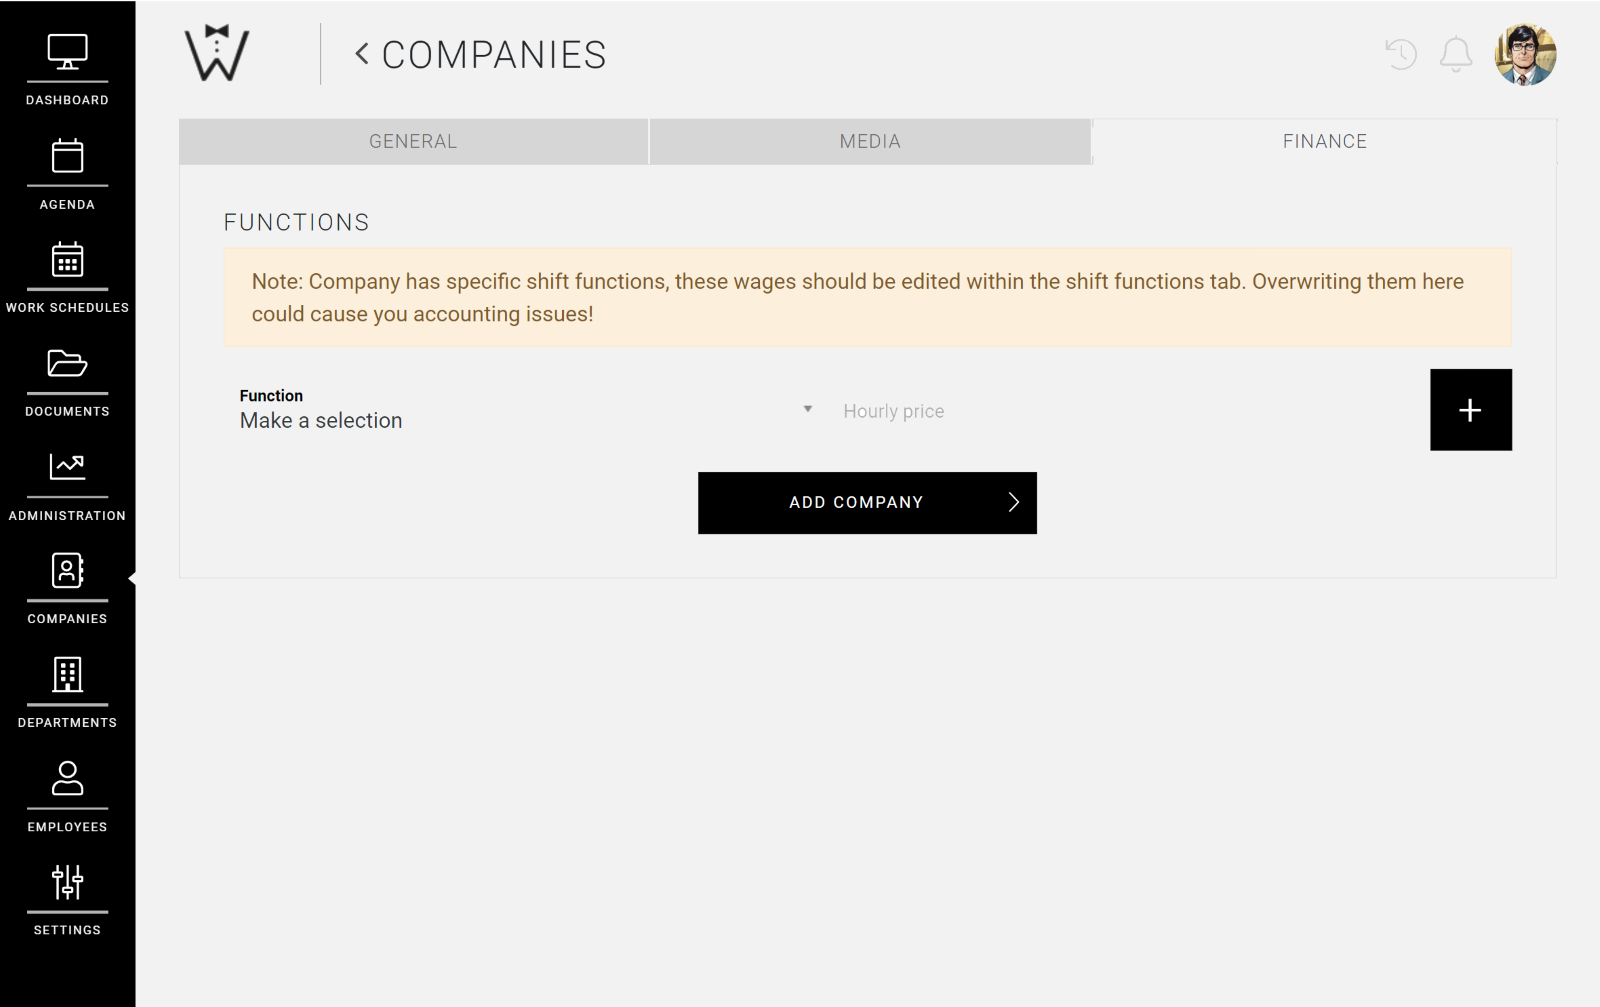
Finally, you will also find a FINANCE tab in a client's company file, where you can add financial data.
Under Functions you can assign different hourly rates to existing general shift functions per company.
An example: an assistant chef costs €14 per hour by default. You decide that for company Omega Company an assistant chef will cost them €20 per hour.
For more information on setting these default prices, click here.
However, how to create company-specific shift functions, we will discuss later in this article.
Optional tabs
If you interface with our service partners Offix and/or Exact Online, you will have two additional tabs called EASYPAY and/or EXACT. You can read more about these tabs in the respective articles.

Via a project/work schedule
When creating a project or work schedule, you have the choice of selecting a company or creating a new company.

For example, if you want to add the company Omega Company as a new company, you type the name in the text field and select ADD NEW COMPANY.

After this, you will be redirected to the general page for adding a new company on the companies page and proceed as already discussed in the previous chapter.
Import companies
If you already have a customer database, you have the option on the companies page to import it in full in one go via an Excel or CSV file.

After selecting IMPORT COMPANIES, you will be taken to this page:
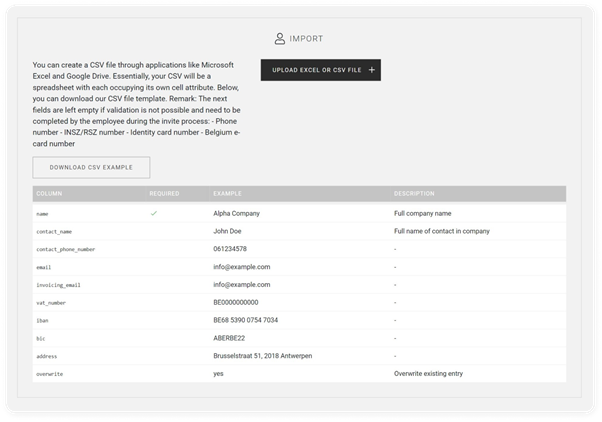
We recommend that you create a document in accordance with the CSV example you can download on this page. You will also find an overview of all the possible data you can capture from your clients and import into CrewPlanner. To help you, you can download the sample file (in CSV format) and add your own data.

Finally, you can upload your Excel or CSV file at the top of the page:

CrewTip! As the second column in the data overview, you will notice required, with a green tick next to name. This means that the company name is mandatory. The rest of the data is optional to fill in, but it is recommended to add as much information as possible. Please note that the file cannot be imported successfully if you change the names of the columns. These must be one-to-one the same as the example CSV document.
Export companies
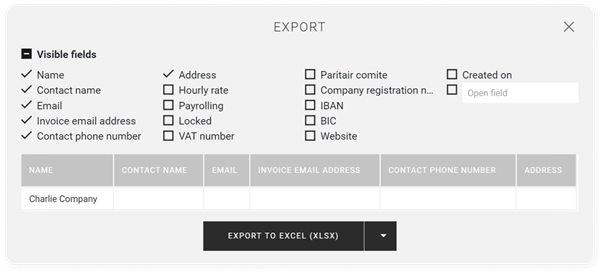
It is also possible to export a list of your companies simply by selecting EXPORT COMPANIES, of course.

This will open the EXPORT DOCUMENT BUILDER and allow you to export your desired data. As described in the article, you can select the desired fields, change their position and add Open fields.
Optional functionalities
Depending on the Paritair Comité of which you are a member and whether you have a link with a service partner, you may also have the following functionalities.
Export Social Balance (BE only)
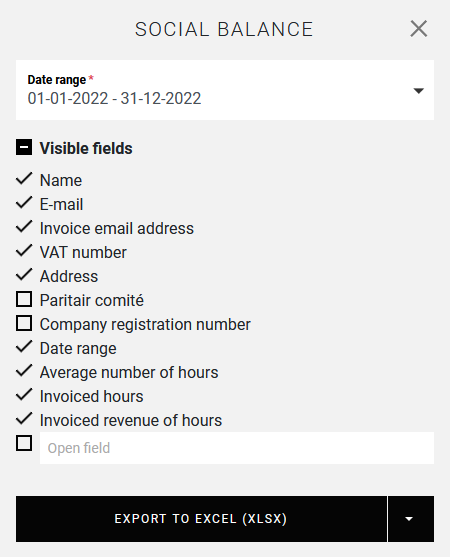
Only if you are a member of the paritair comité 322, you have the option in CrewPlanner to draw up your social balance and export it to an Excel, CSV or Pdf file.

If you select this, the pop-up below opens allowing you to tick your desired data, change its location, add open fields and finally export.
Manual synchronisation
This functionality is only visible and available if you have a link to our service partner Exact Online.

You can find more information here.
The views and actions
On the top right, you also have the option to customise the overview of your companies, which can be displayed in two different ways. Each of these views allows you to perform different actions.
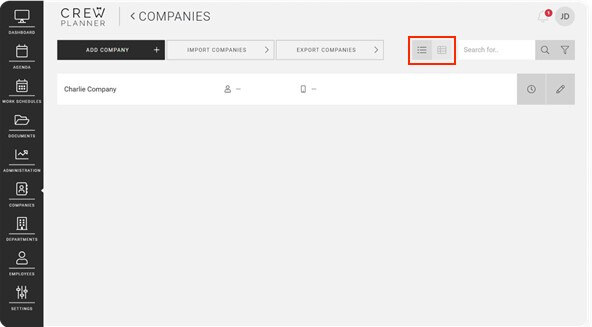
You will find this in both views:
-
Search function
In both views, you can use the search function to quickly find the company you want using certain data.
-
Funnel icon
To the right of the search function you also have the funnel icon that allows you to display or hide a small summary, which shows the total number and number of locked companies from the overview and the total number of company managers. If the companies page is displayed in list mode, you can also display or not display the Visible fields this way. More on this in a moment.
Search function
In both views, you can use the search function to quickly find the company you want using certain data.

Funnel icon
To the right of the search function you also have the funnel icon that allows you to display or hide a small summary, which shows the total number and number of locked companies from the overview and the total number of company managers. If the companies page is displayed in list mode, you can also display or not display the Visible fields this way. More on this in a moment.

The overview mode
This is the default view when you open the company page, represented by the icon below.

In this mode, you have an overview of your companies, with the contact person and phone number next to the name. To the right of the company details, you may see the following icons:

-
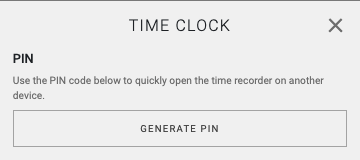
Time clock:
Here you can generate a code for the time clock, which is valid for all events of this company. If your employees always work in one specific place for this company, it is ideal to work there with the time clock as time registration using a tablet in a fixed position. Find out more about the time clock here.
-
Edit company:
Not only do you have the option of editing company data by selecting the pencil icon on the right-hand side, but you can also add a number of interesting things to a company sheet here:
What all you can add, you will discover in the next chapter.
Time clock:
Here you can generate a code for the time clock, which is valid for all events of this company. If your employees always work in one specific place for this company, it is ideal to work there with the time clock as time registration using a tablet in a fixed position. Find out more about the time clock here.
Edit company:
Not only do you have the option of editing company data by selecting the pencil icon on the right-hand side, but you can also add a number of interesting things to a company sheet here:

What all you can add, you will discover in the next chapter.
The list mode
This view not only allows you to display more information about your companies, but you can also choose which information is displayed here.

This is done using the Visible fields, which you can display on the right-hand side using the funnel icon:
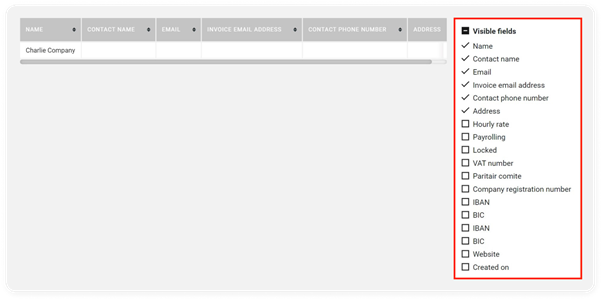
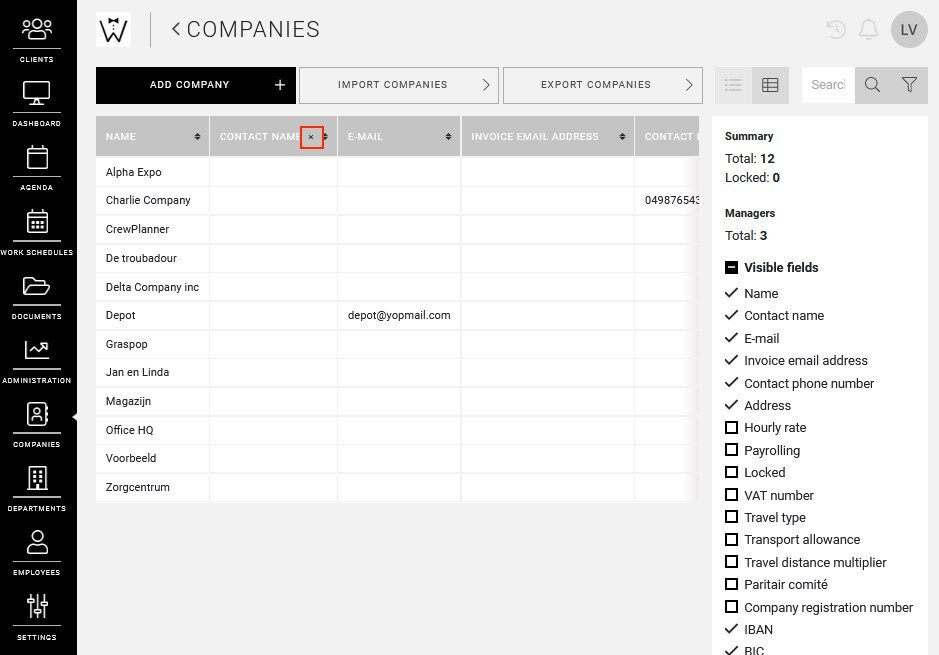
Here, you simply check or uncheck the information you want. In the grey title bar at the top, you have the option of sorting a column alphabetically (up or down). Finally, you can also quickly delete a column by selecting the cross that appears next to its name when you hover your cursor over it.
Edit company
As indicated earlier, edit a company by selecting the pencil icon on the right-hand side in overview mode. Here you will be able to add even more information than already discussed in the add company section.

After selecting the pencil icon, you will enter the company file:
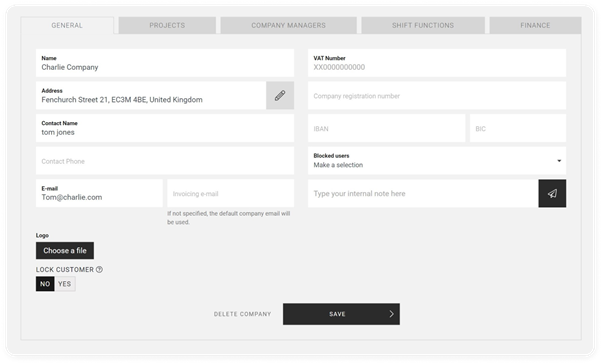
Here you will of course find the information you have already entered when creating or importing a company, but what else can you do? Here we briefly list the additional options.
General:
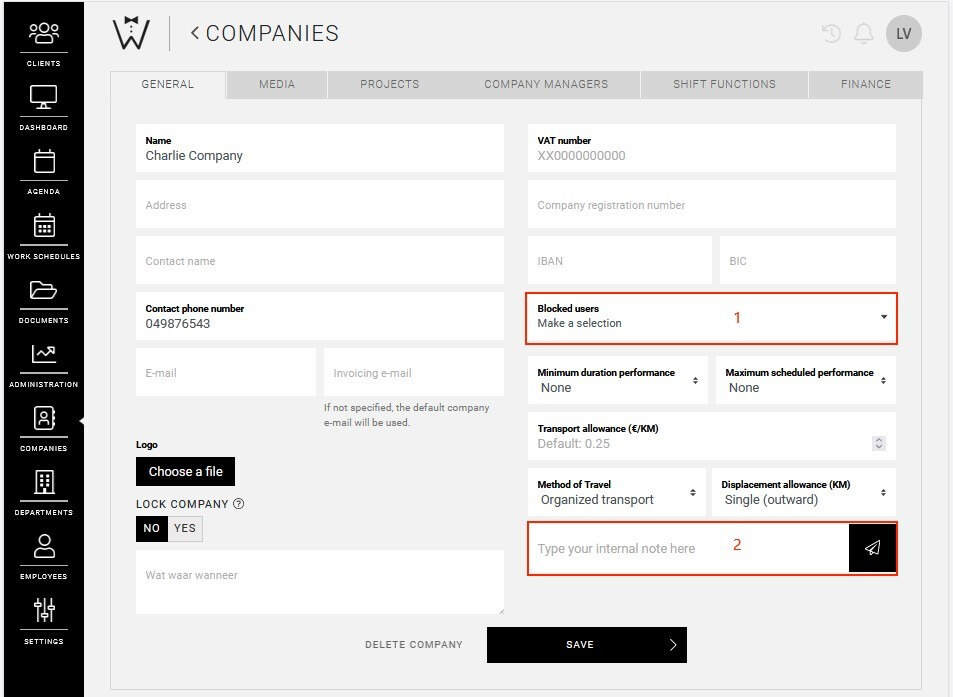
We'll start with the GENERAL tab, where under the company's IBAN and BIC details you will now see the blocked users section, and at the bottom right you have the option to add an internal note.
-
Blocked users: these are your employees who are (temporarily) blocked for projects of this company and are therefore no longer allowed to work for them. You add multiple people by using the plus sign.
-
Internal notes: here you can place notes that are only visible internally, and therefore not to your client and company managers.
Blocked users: these are your employees who are (temporarily) blocked for projects of this company and are therefore no longer allowed to work for them. You add multiple people by using the plus sign.
Internal notes: here you can place notes that are only visible internally, and therefore not to your client and company managers.
Projects:
You now also have a PROJECTS tab, which lists all projects for this company. This list is in chronological order with the project furthest in the future at the top, followed by later and completed projects:
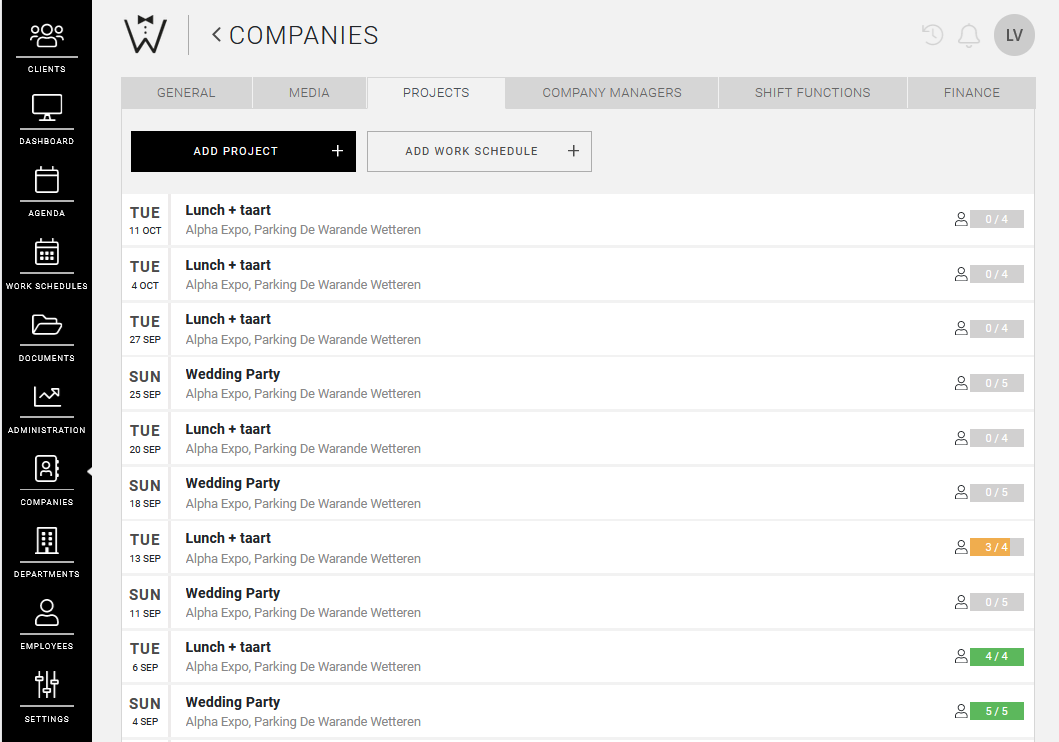
You also have the option to add projects and work schedules here. More on this in the relevant articles.
Company managers:
In the COMPANY MANAGERS tab, you add company managers and manage existing company managers. For more information about the company manager, follow this link.

In the above example, the company, Charlie Company, already has one company manager.
You have the option to invite or add a company manager here.
-
Invite company manager
You enter the company manager's first name, last name and e-mail address, and select the language for the invitation. Then select SEND INVITATION.
-
Add company manager
You are more likely to use this option if you have all the company manager's details or if you fill it in together by mutual agreement. If you select this option, you will be shown this screen:
You fill in the necessary information and add a picture if necessary and press ADD.
When you add a company manager, this person will no longer receive an invitation and the account will be active and ready to use. If you have set your own password for the company manager, they can log in with e-mail address and that password and then the password must be changed.
Invite company manager

You enter the company manager's first name, last name and e-mail address, and select the language for the invitation. Then select SEND INVITATION.
Add company manager
You are more likely to use this option if you have all the company manager's details or if you fill it in together by mutual agreement. If you select this option, you will be shown this screen:
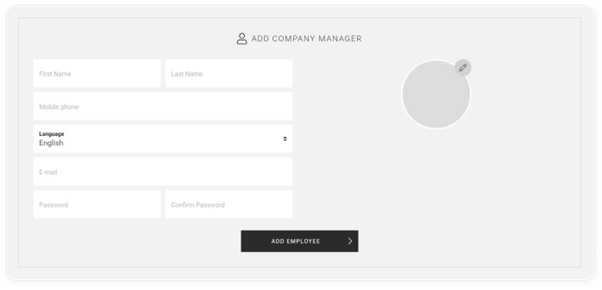
You fill in the necessary information and add a picture if necessary and press ADD.
When you add a company manager, this person will no longer receive an invitation and the account will be active and ready to use. If you have set your own password for the company manager, they can log in with e-mail address and that password and then the password must be changed.
Shift functions:
In the next tab SHIFT FUNCTIONS, you can create company-specific functions which you can then select when creating an event for this company.

If you select CREATE FUNCTION, you will be directed to the SHIFT FUNCTION page in SETTINGS. Read more about shift functions and creating them here.
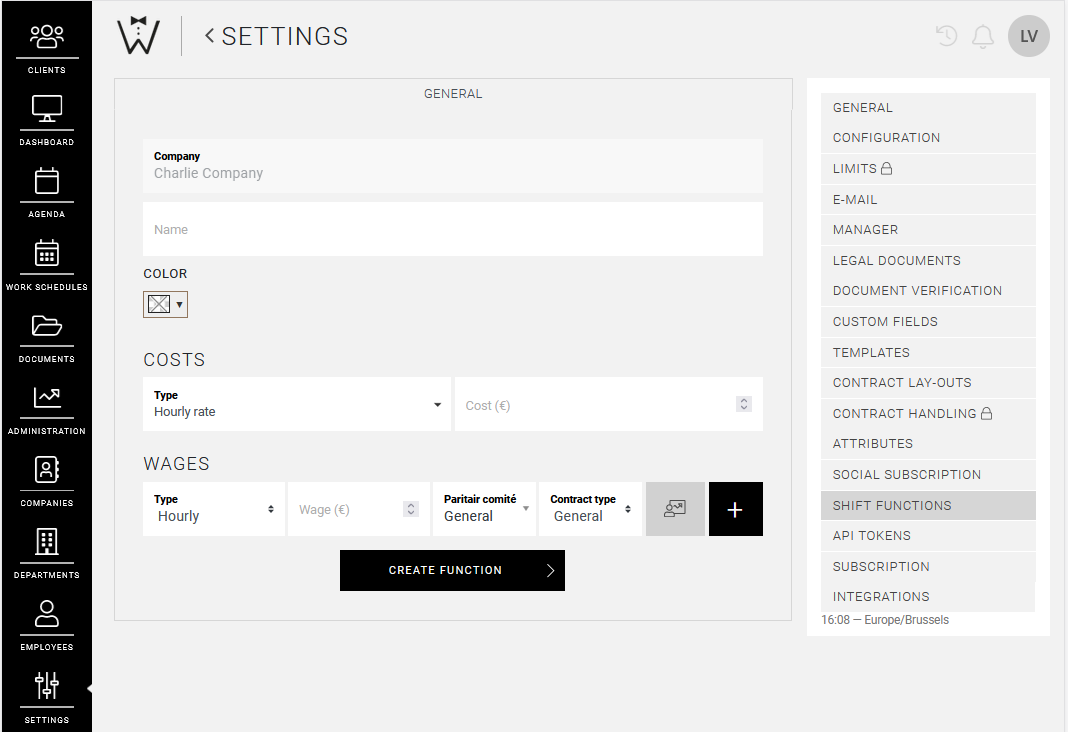
CrewTip! If you create shift functions for a specific company, only these functions will be available for this company. Note: This also means that the company itself, through their customer portal, only has those functions available that were created for them.
Remember to press SAVE to save your changes or additions.
Delete company
You may have already noticed, but to delete a company, again select the pencil icon next to the company in overview mode. Here at the bottom, to the left of save you will see DELETE COMPANY.
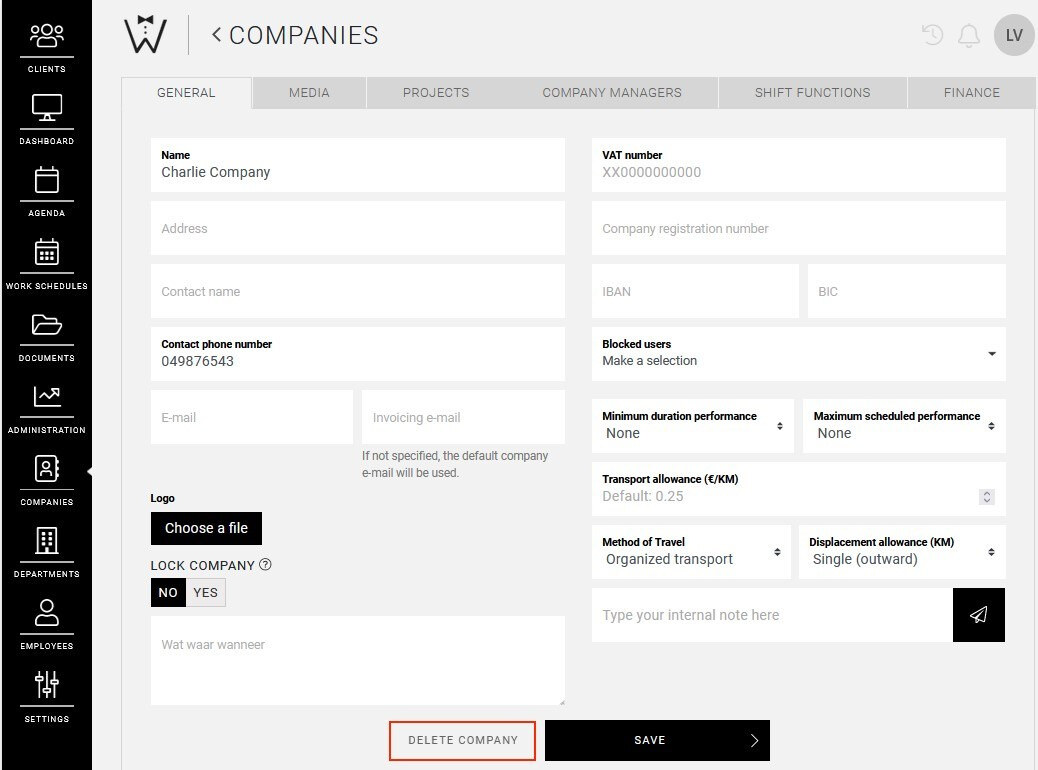
Once you select this, the following pop-up will appear to confirm your choice.
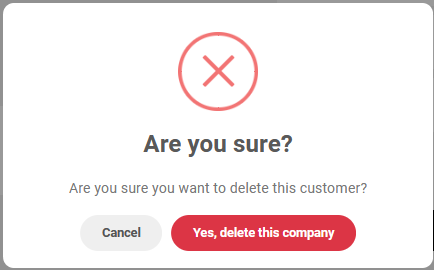
CrewTip! Please note that if you delete a company, you also delete all future projects and work schedules as well as all other data associated with this company. If you use our Dimona and contracts modules, this also means that a cancellation will be sent.
Once you delete a company, this cannot be undone!
Did you find this interesting?
We have more very educational articles for you! Take a look:
Or are you more interested in some practical topics: